2OM-1075-002.pdf - 第139页
AHB01ESPP Starting the Automatic Operation After specifying the start mode and the start step, press the [ST ART] button on the front operation panel. The machine starts the auto- matic operation. *6 "Control Switch…

AHB01ESPP
*2 TEST RUN
Press the [ENABLE] button to perform a test run.
"TEST RUN" appears beside "Run Mode" on the "AUTO OPN." win-
dow (upper right field of the status bar).
When the machine is set in the "TEST RUN" mode, normal
automatic operation cannot be performed because param-
eters for the test run are specified.
*3 STOP
Press either one of the following buttons to specify a stop mode.
[CYCLE] Button : Press this button to stop the machine after 1-
cycle operation.
[STEP] Button : Press this button to stop the machine step by
step.
The selected stop mode is displayed at the upper right field of the
"AUTO OPN." window (status bar).
When the [ON] button (entitled "STOP") is pressed, the se-
lected stop mode becomes valid.
*4 START MODE
Press one of the following buttons to specify a start mode.
[AUTO] Button : Press this button to start the automatic opera-
tion.
[Semi-AUTO (Continue)] Button :
Press this button to start the semi-automatic
operation.
[Semi-AUTO (Step)] Button :
Press this button to start the semi-automatic
operation with the specified step No.
The step No. can be specified in "*5".
[1 Comp Placement] Button :
When this button is pressed, the machine
places one component and stops running.
*5 Start Step
Press one of the following buttons to specify a start step.
[U-No] Button : Specify the unit.
[P-No] Button : Specify the step No. in the placement data (P).
[O-No] Button : Specify the step No. in the placement data (O).
3.1 "Run Mode" Tab
0308-003 5-13
Note
Note
AHB01ESPP
Starting the Automatic Operation
After specifying the start mode and the start step, press the [START]
button on the front operation panel. The machine starts the auto-
matic operation.
*6 "Control Switch" Group Box
The following operation buttons are provided.
"P.C.B. Xfr." Buttons
When the [ENABLE] button on the operation panel is pressed in 2
seconds after the [Locate Posn] button, the P.C.B. is transferred to
the locate position.
When the [ENABLE] button on the operation panel is pressed in 2
seconds after the [P.C.B. Output] button, the P.C.B. is transferred to
the output conveyor buffering position.
When the [ENABLE] button on the operation panel is pressed in 2
seconds after the [P.C.B. Lctn.] button, the backup base moves up
to the point where the P.C.B. is positioned.
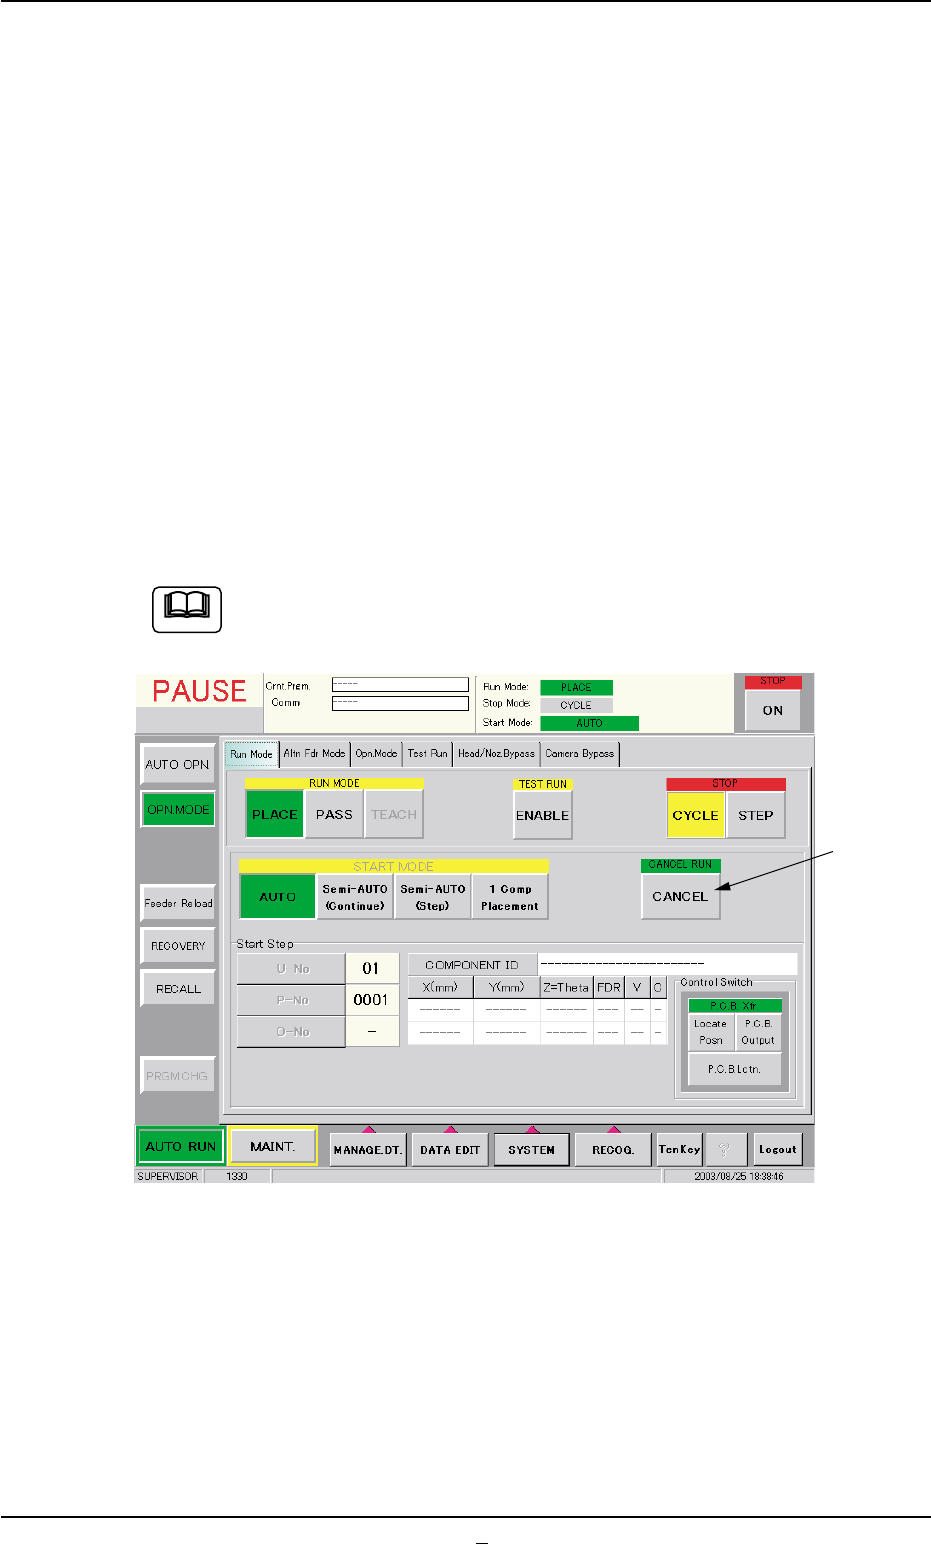
When the machine is in the "PAUSE" mode, a [CANCEL] but-
ton appears in the "Run Mode" tab sheet.
Fig. 2E9 "Run Mode" Tab Sheet ("PAUSE" Mode)
*7 [CANCEL] Button
When this button is pressed, "PAUSE" mode is canceled and the
machine is set in the "STOP" mode.
0308-004 5-14
3.1 "Run Mode" Tab
*7
Note
AHB01ESPP
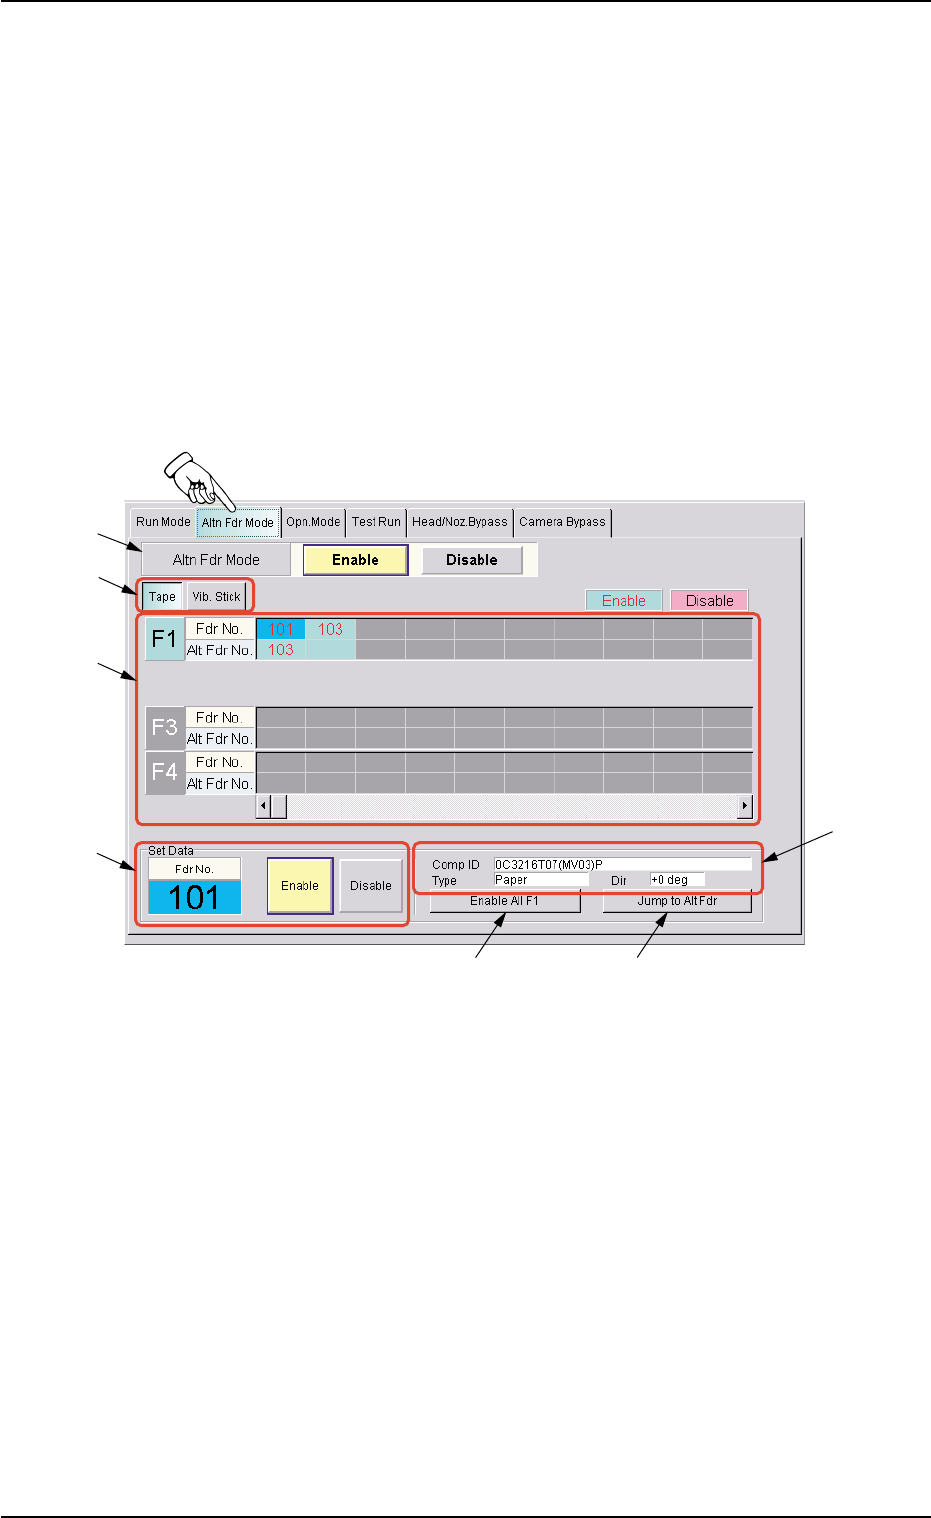
3.2 "Altn Fdr Mode" Tab
The corresponding tab sheet enables the operator to set the feeder al-
ternate mode.
When "Enable" is specified for the alternate feeder mode, it becomes
possible to check how the alternate feeder function is working (feeder
status) and issue a command that indicates the completion of compo-
nent replenishment for the related feeder.
••
••
• Sheet Layout
When the "Altn Fdr Mode" tab is pressed in the "OPN. MODE" win-
dow (submenu), the following tab sheet appears inside the window.
Fig. 2E10 "Altn Fdr Mode" Tab Sheet (Alternate Feeder Mode: Enable)
••
••
• Sheet Composition
*1 Altn Fdr Mode
Enable : The alternate feeder mode is enabled.
Disable : The alternate feeder mode is disabled.
In this case, different contents appear in the tab sheet.
*2 [Tape] and [Vib. Stick] Buttons
Select one of these buttons to specify the feeder for data settings.
3.2 "Altn Fdr Mode" Tab
*2
*3
*4
*1
*6
*7
*5
0308-002 5-14-1