2OM-1075-002.pdf - 第173页
AHB01ESPP • • • • • Sheet Composition *1 "T est Mode" Group Box One of the following options is selected to determine how to teach the offsets for P .E.C. recognition. [P .E.C. Pos] Button When the global P .E.…
AHB01ESPP
5.3.4 Tab Sheets
••
••
• Sheet Layout
When the "PCB Origin Offset Teach" tab is pressed in the "RECOV-
ERY" window, the following tab sheet appears inside the window.
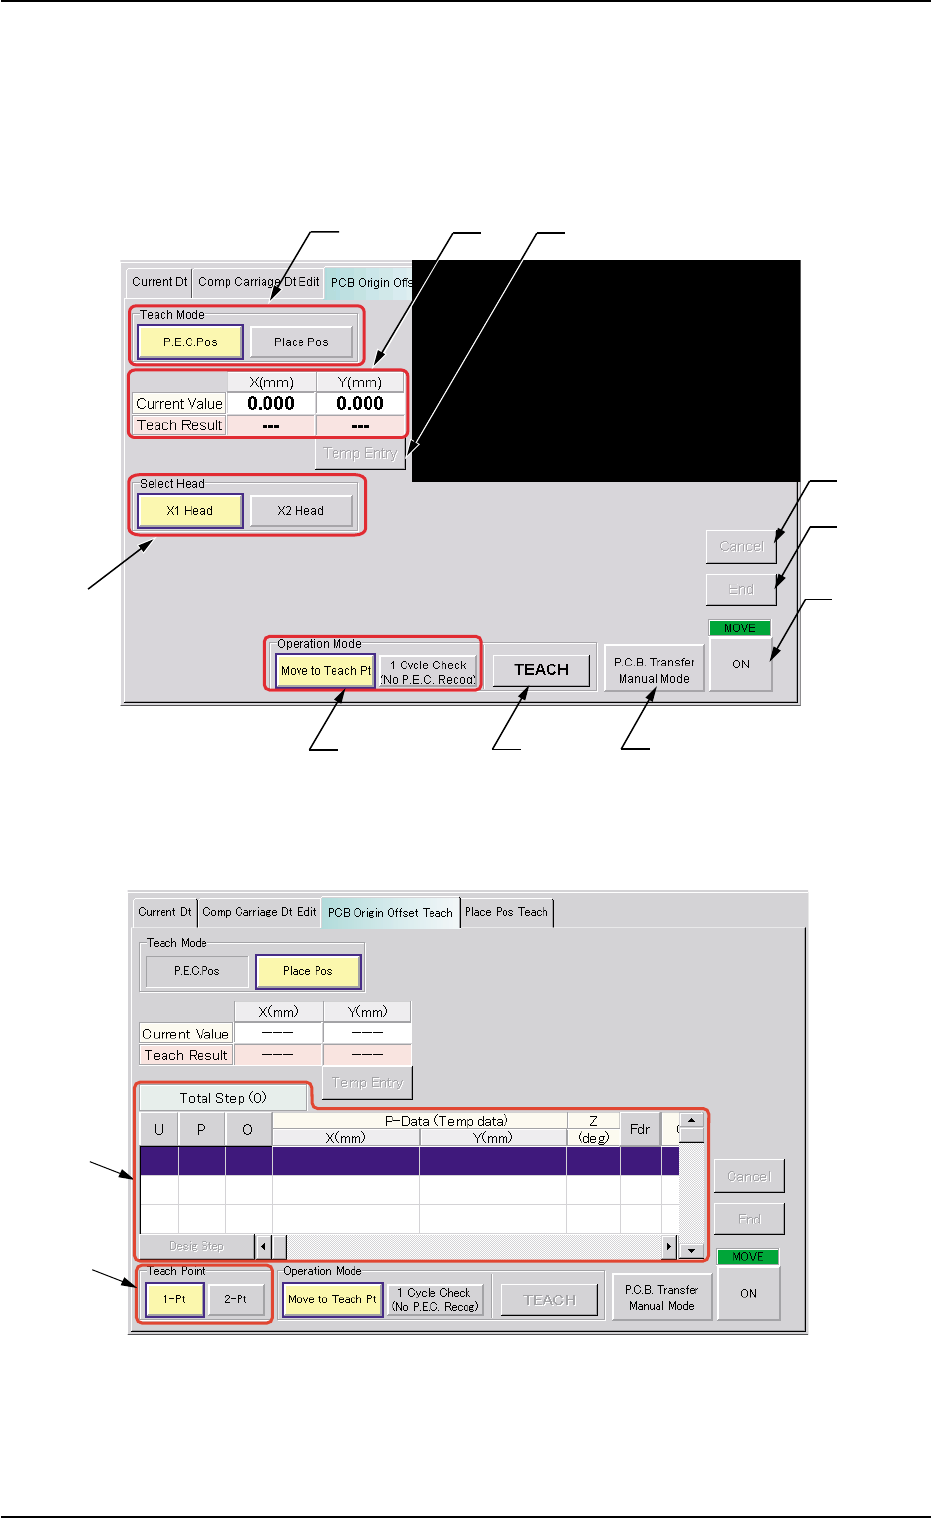
Fig. 2E23-3 "PCB Origin Offset Teach" Tab Sheet
(Example: [P.E.C. Pos] Button Selected)
Fig. 2E23-4 "PCB Origin Offset Teach" Tab Sheet
(Example: [Place Pos] Button Selected)
0308-002 5-25-12
5.3 "PCB Origin Offset Teach" Tab
*2
*1
*3
*6
*8
*9
*4
*7
*5
*10
*11
*12

AHB01ESPP
••
••
• Sheet Composition
*1 "Test Mode" Group Box
One of the following options is selected to determine how to teach
the offsets for P.E.C. recognition.
[P.E.C. Pos] Button
When the global P.E.C. recognition function is used, the P.C.B. ori-
gin offsets are taught, using the first fiducial mark.
[Place Pos] Button
The P.C.B. origin offsets are taught, using the first point (first place-
ment coordinates) or arbitrary placement coordinates.
(a) The option "P.E.C. Pos" or "Place Pos" is automatically
selected according to the contents of the pattern program.
Table 2E6
Contents of Pattern Program Teaching Point
P.E.C. recognition mode Global Enable 1 Point (global P.E.C. recognition) or Specified
Placement Coordinates (Default: Fiducial mark
#1 (Placement Coordinates))
Disable Specified Placement Coordinates (Default: Fi-
ducial mark #1 (Placement Coordinates))
(b) When the global P.E.C. recognition function is used, the
first point (1 Point for "P.E.C. recognition mode Global") is
the teaching point. However, when the teaching is impos-
sible due to deterioration of the fiducial mark on the objec-
tive P.C.B., "Place Pos" must be selected.
(c) When the global P.E.C. recognition function is not used,
the first placement coordinates point is regarded as a
teaching point.
When the teaching operation cannot be performed
smoothly, try to select other placement coordinates.
*2 Indication of Coordinates
Indicated are the coordinates in the currently referred pattern pro-
gram and the teaching results (coordinates).
*3 [Temp Entry] Button
When pressed, this button registers the currently taught coordinates
temporarily.
0308-002 5-25-13
5.3 "PCB Origin Offset Teach" Tab
Note

AHB01ESPP
*4 "Select Head" Group Box
Select one of the following options (heads to be used for the teach-
ing operation).
[X1 Head] and [X2 Head] Buttons
*5 "Operation Mode" Group Box
When an operation mode is selected and the [ON] button (entitled
"MOVE") is pressed, the head moves to the specified position.
[Move to Teach Pt] Button
When selected, this button moves the head to the position specified
by the P.E.C. recognition offsets.
[1 Cycle Check (No P.E.C. Recog)] Button
When this button is selected, the machine performs its continuous
operation.
*6 [TEACH] Button
When this button is selected, a teaching operation is performed at
the current position.
*7 [P.C.B. Transfer Manual Mode] Button
When this button is pressed, the "P.C.B. Transfer Manual Mode"
sheet appears.
Refer to "4.1.1 "P.C.B. Transfer Adj." Tab" in "Section 6" for details.
*8 [Cancel] Button
When pressed, this button cancels the taught data that is saved
temporarily.
*9 [End] Button
When pressed, this button ends the P.C.B. origin offset teaching
session.
Before the session ends, it can be determined whether the teaching
results must be saved or not.
*10 "MOVE" [ON] Button
When the [ENABLE] button on the operation panel is pressed in 2
seconds after the [ON] button (entitled "MOVE"), the machine is
activated.
0308-002 5-25-14
5.3 "PCB Origin Offset Teach" Tab