2OM-1075-002.pdf - 第221页
AHB01ESPP [L-Conveyor (-) Low-Speed] Button When the [ENABLE] button on the operation panel is pressed in 2 seconds after this button is selected and the [ON] button (entitled "MOVE") is pressed, the L conveyor…
AHB01ESPP
*1
*3
*2
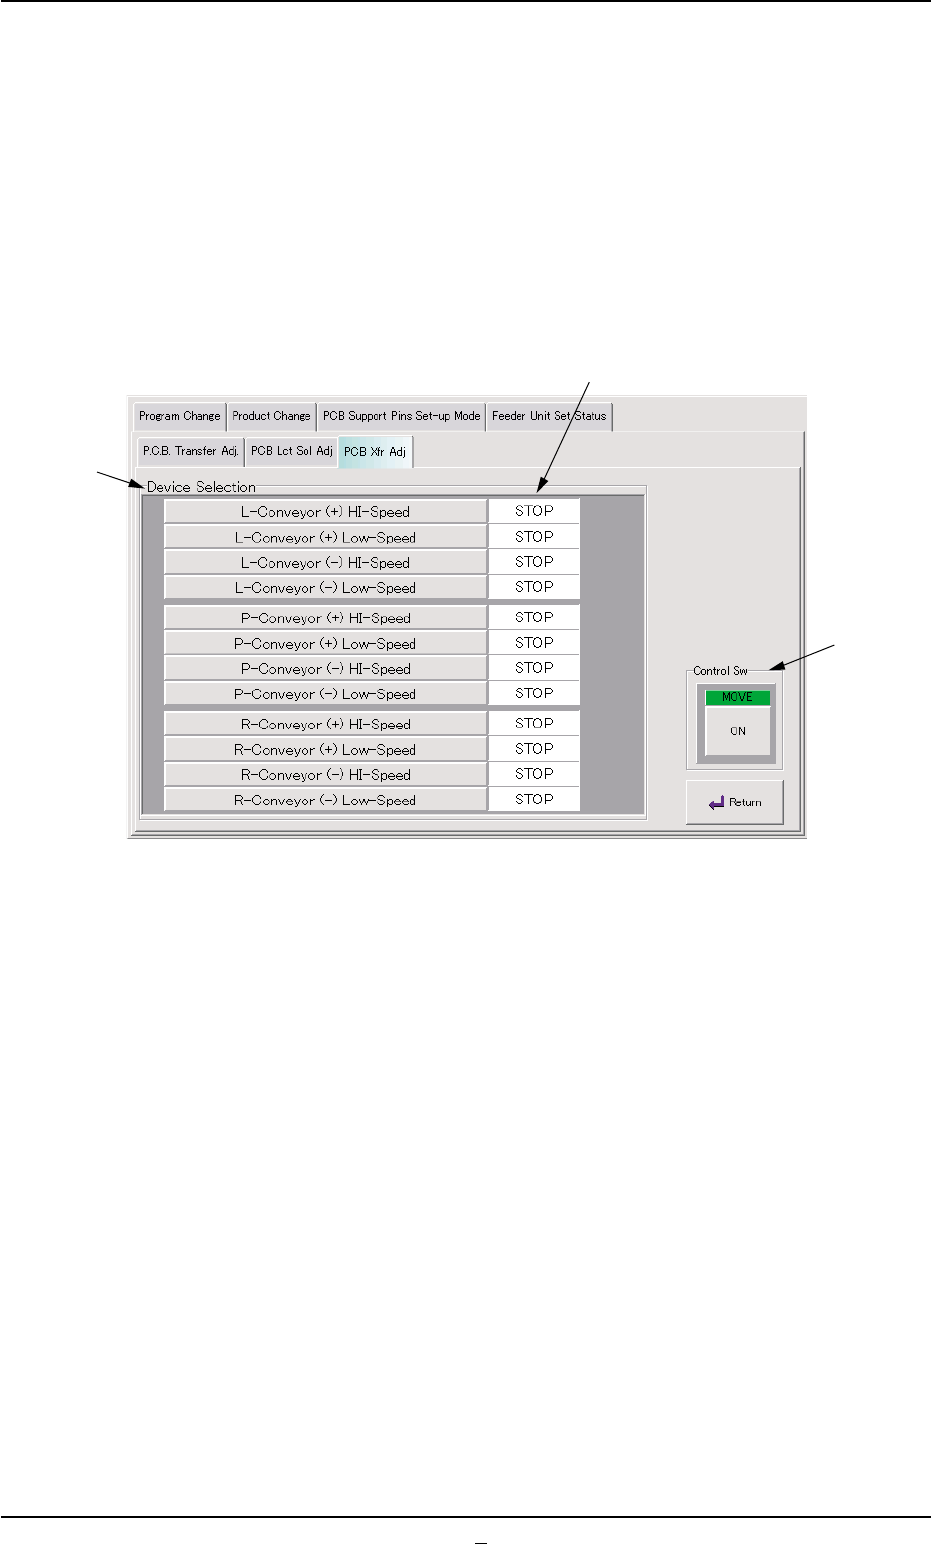
7.3.1.3 "PCB Xfr Adj" Tab Sheet
This tab sheet enables the operator to activate the conveyor motors.
The operator can perform the cycle operations related to the P (P.C.B.
positioning section), L, and R conveyors.
••
••
• Sheet Layout
When the "PCB Xfr Adj" tab is pressed in the "Conveyor Adj" window,
the following tab sheet appears.
Fig. 2E47 "PCB Xfr Adj" Tab Sheet
••
••
• Sheet Composition
*1 Device Selection Buttons
The following buttons are provided for cycle operations in this group
box.
[L-Conveyor (+) HI-Speed] Button
When the [ENABLE] button on the operation panel is pressed in 2
seconds after this button is selected and the [ON] button (entitled
"MOVE") is pressed, the L conveyor moves forward at high speed.
[L-Conveyor (+) Low-Speed] Button
When the [ENABLE] button on the operation panel is pressed in 2
seconds after this button is selected and the [ON] button (entitled
"MOVE") is pressed, the L conveyor moves forward at low speed.
[L-Conveyor (-) HI-Speed] Button
When the [ENABLE] button on the operation panel is pressed in 2
seconds after this button is selected and the [ON] button (entitled
"MOVE") is pressed, the L conveyor moves backward at high
speed.
7.3 "PCB Support Pins Set-up Mode" Tab
0206-002 5-56

AHB01ESPP
[L-Conveyor (-) Low-Speed] Button
When the [ENABLE] button on the operation panel is pressed in 2
seconds after this button is selected and the [ON] button (entitled
"MOVE") is pressed, the L conveyor moves backward at low
speed.
[P-Conveyor (+) HI-Speed] Button
When the [ENABLE] button on the operation panel is pressed in 2
seconds after this button is selected and the [ON] button (entitled
"MOVE") is pressed, the P conveyor moves forward at high speed.
[P-Conveyor (+) Low-Speed] Button
When the [ENABLE] button on the operation panel is pressed in 2
seconds after this button is selected and the [ON] button (entitled
"MOVE") is pressed, the P conveyor moves forward at low speed.
[P-Conveyor (-) HI-Speed] Button
When the [ENABLE] button on the operation panel is pressed in 2
seconds after this button is selected and the [ON] button (entitled
"MOVE") is pressed, the P conveyor moves backward at high
speed.
[P-Conveyor (-) Low-Speed] Button
When the [ENABLE] button on the operation panel is pressed in 2
seconds after this button is selected and the [ON] button (entitled
"MOVE") is pressed, the P conveyor moves backward at low
speed.
[R-Conveyor (+) HI-Speed] Button
When the [ENABLE] button on the operation panel is pressed in 2
seconds after this button is selected and the [ON] button (entitled
"MOVE") is pressed, the R conveyor moves forward at high speed.
[R-Conveyor (+) Low-Speed] Button
When the [ENABLE] button on the operation panel is pressed in 2
seconds after this button is selected and the [ON] button (entitled
"MOVE") is pressed, the R conveyor moves forward at low speed.
[R-Conveyor (-) HI-Speed] Button
When the [ENABLE] button on the operation panel is pressed in 2
seconds after this button is selected and the [ON] button (entitled
"MOVE") is pressed, the R conveyor moves backward at high
speed.
[R-Conveyor (-) Low-Speed] Button
When the [ENABLE] button on the operation panel is pressed in 2
seconds after this button is selected and the [ON] button (entitled
"MOVE") is pressed, the R conveyor moves backward at low
speed.
7.3 "PCB Support Pins Set-up Mode" Tab
0206-001 5-56-1

AHB01ESPP
*2 Mode
Displayed is the operating mode of each device.
*3 "Control Sw" Group Box
When the [ENABLE] button on the operation panel is pressed in 2
seconds after one of the buttons in "*1" is selected and the [ON]
button (entitled "MOVE") is pressed, the action corresponding to the
selected button takes place.
••
••
• Operation Procedure
(1) Select one of the buttons in "*1" as the device to be inspected.
(2) Press the [ON] button (entitled "MOVE"). In 2 seconds, press the
[ENABLE] button on the operation panel. The motor starts rotating.
To stop the rotation, press the [STOP] button on the operation panel.
7.3 "PCB Support Pins Set-up Mode" Tab
0206-001 5-56-2