2OM-1075-002.pdf - 第328页
AHB01ESPP • • • • • T eaching Operation for Eccentric Pick-Up Setting against Hin- drance in Component Picks at Center Perform this teaching operation when a component has a groove, a protrusion, etc., and cannot be pick…

AHB01ESPP
*10 [End] Button
When this button is pressed, the "Confirmation" dialog box opens.
Fig. 2F68
When the [YES] button is pressed, the results of the teaching op-
eration are reflected on the offset data and the dialog box closes.
When the [NO] button is pressed, the dialog box closes without re-
flecting the results of the teaching operation on the offset data.
*11 "Control Switch" Group Box
When the [ENABLE] button on the operation panel is pressed in 2
seconds after one of the buttons in the "Select Mode" group box (*4)
and the [ON] button (entitled "MOVE"), the selected action takes
place.
*12 [Return] Button
When this button is pressed, the "Tape, Vib. Stick Teach Ecc. Pick-
Up Pos. [Pickup Loc. Adj.]" sheet disappears and the "Pick-Up Lo-
cation" tab sheet appears.
5.1 "Pick-Up Location" Tab
0206-003 6-95

AHB01ESPP
••
••
• Teaching Operation for Eccentric Pick-Up Setting against Hin-
drance in Component Picks at Center
Perform this teaching operation when a component has a groove, a
protrusion, etc., and cannot be picked up at the center.
(1) Follow the teaching procedure in Fig. 2F61 and perform a teaching
operation on the component center position.
(2) Follow the teaching procedure in Fig. 2F69 and perform a teaching
operation on the pick-up location corrective position.
Before teaching the data for "Pickup pos correction" in the compo-
nent library data to intentionally shift the pick-up location from the
component center, it is premised that the component center posi-
tion should be grasped first. Therefore, be sure to select the [Teach
Pick-Up Pos. [Comp. Center Pos.]] button and perform the teach-
ing operation on the component center position. After that, select
the [Teach Ecc. Pick-Up Pos. [Pickup Loc. Adj.]] button.
When the center position is not grasped correctly and the
teaching operation is performed on the eccentric pick-up
location, improper values are fed back to the "X [mm]" and
"Y [mm]" text boxes of the label "Pickup pos correction" in
the component library data, causing the component library
data to lose its generality.
5.1 "Pick-Up Location" Tab
Note
0206-003 6-96
AHB01ESPP
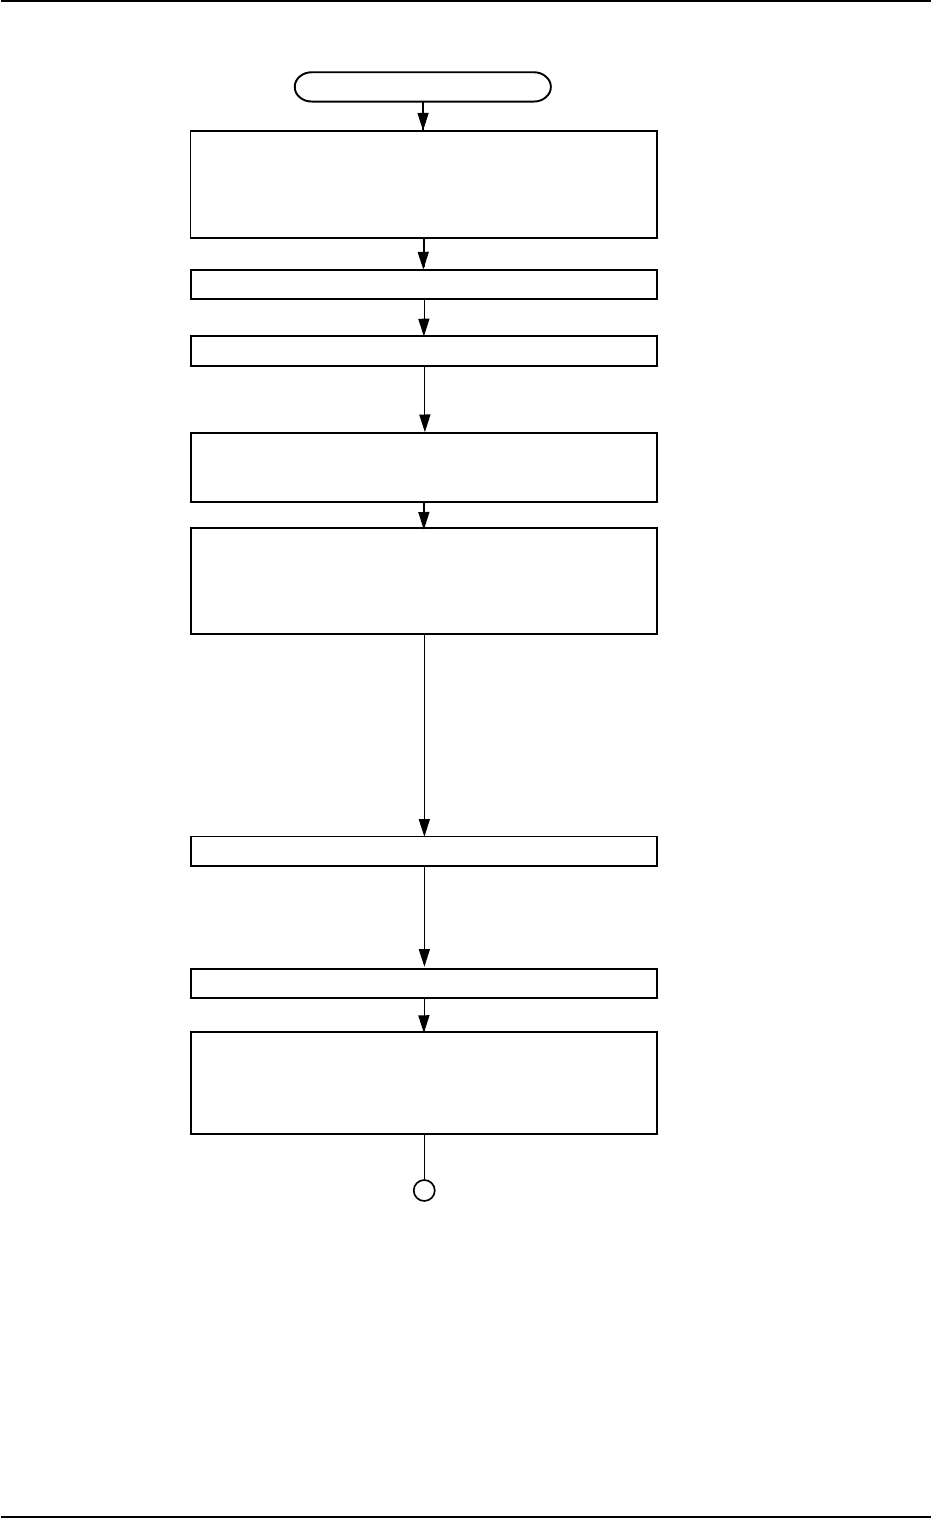
Teaching Procedure
Selection of [Tape, Vib. Stick Teach Ecc.
Pick-Up Pos. [Pickup Loc. Adj.]]
Button in Fig. 2F57
Selection of Head
Setting of Objective Feeder No. for Teaching
Refer to "5.1.4 "Feeder No. Set" Sheet"
for details.
Selection of [Teach Ecc. Pick-Up Pos.
[Pickup Loc. Adj.]] Button
Press the [ENABLE] button on the operation
panel in 2 seconds after the [ON] button
(entitled "MOVE").
An image is taken into the pick-up loca-
tion corrective position of the objective
feeder for teaching by the P.E.C. recog-
nition camera.
The pickup position correction data set
up at teaching execution is reflected.
Positioning Operation with Pointing Device
Refer to "Pointing Device Operation" (de-
scribed later) for details.
Selection of [End] Button
Selection of [YES] Button in "Confirmation"
Dialog Box for Replacement of
Component Library Data
Fig. 2F69
5.1 "Pick-Up Location" Tab
0206-003 6-97