Nordson-EFD-Series-450-Instructions.pdf - 第7页
Series 450 Autovalve / Snuff Back | Instructions / Parts Lists 7 www.nordsonefd.com info@nordsonefd.com +1-401-431-7000 Sales and service of Nordson EFD dispensing systems are available worldwide. P/N Ref. # Qty. Descrip…
Series 450 Autovalve / Snuff Back | Instructions / Parts Lists
6 www.nordsonefd.com info@nordsonefd.com +1-401-431-7000 Sales and service of Nordson EFD dispensing systems are available worldwide.
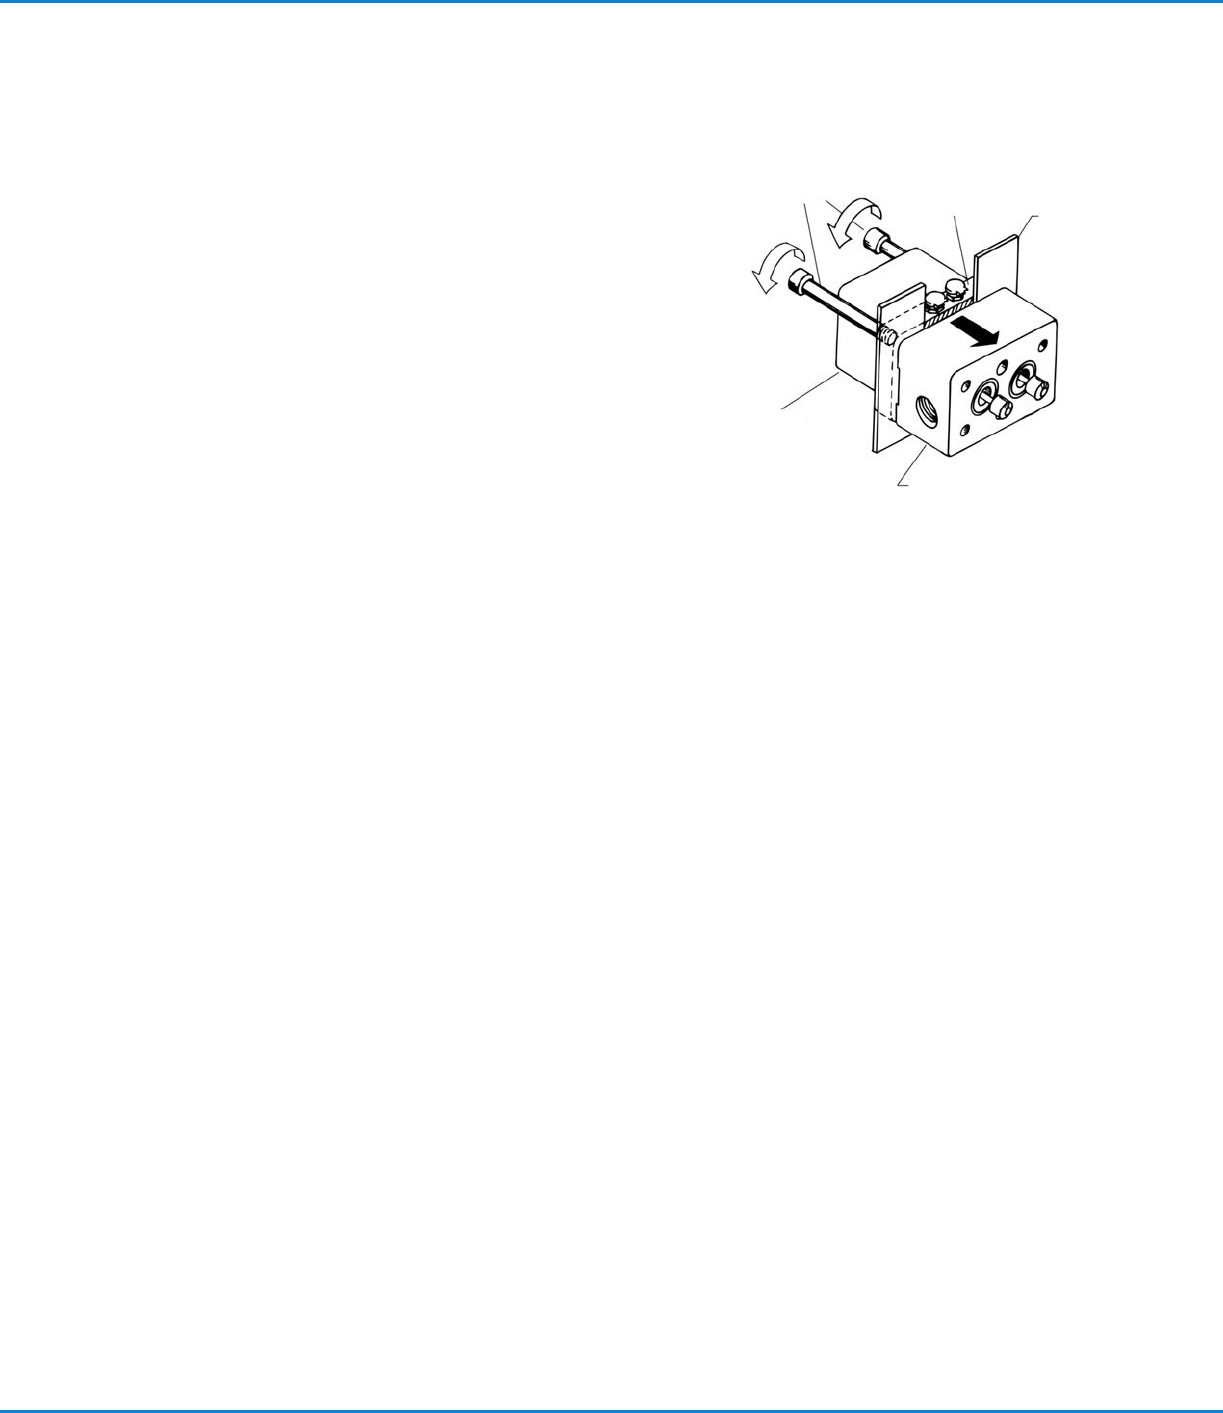
Disassembly And Cleaning
1. Remove the manifold and seat plate (8). Pry bar slots are provided.
2. Remove the air cylinder bolts (2) and wiggle the air cylinder apart. If
the assembly is frozen, use the pry bar slots on the valve body (7) to
separate the valve body (7) from the tie plate (5). Insert flat pieces of
metal between the valve body and the tie plate as per Figure 1. Thread
the manifold screws (36) into the back of the tie plate and push the
valve body apart. Apply uniform pressure to prevent the body from
cocking and bending the spool valves (75).
3. Once apart, the parts should be cleaned. We recommend overnight
soaking in suitable solvent. All parts can be soaked except the handle
and air cylinder.
Rebuilding the Autovalve
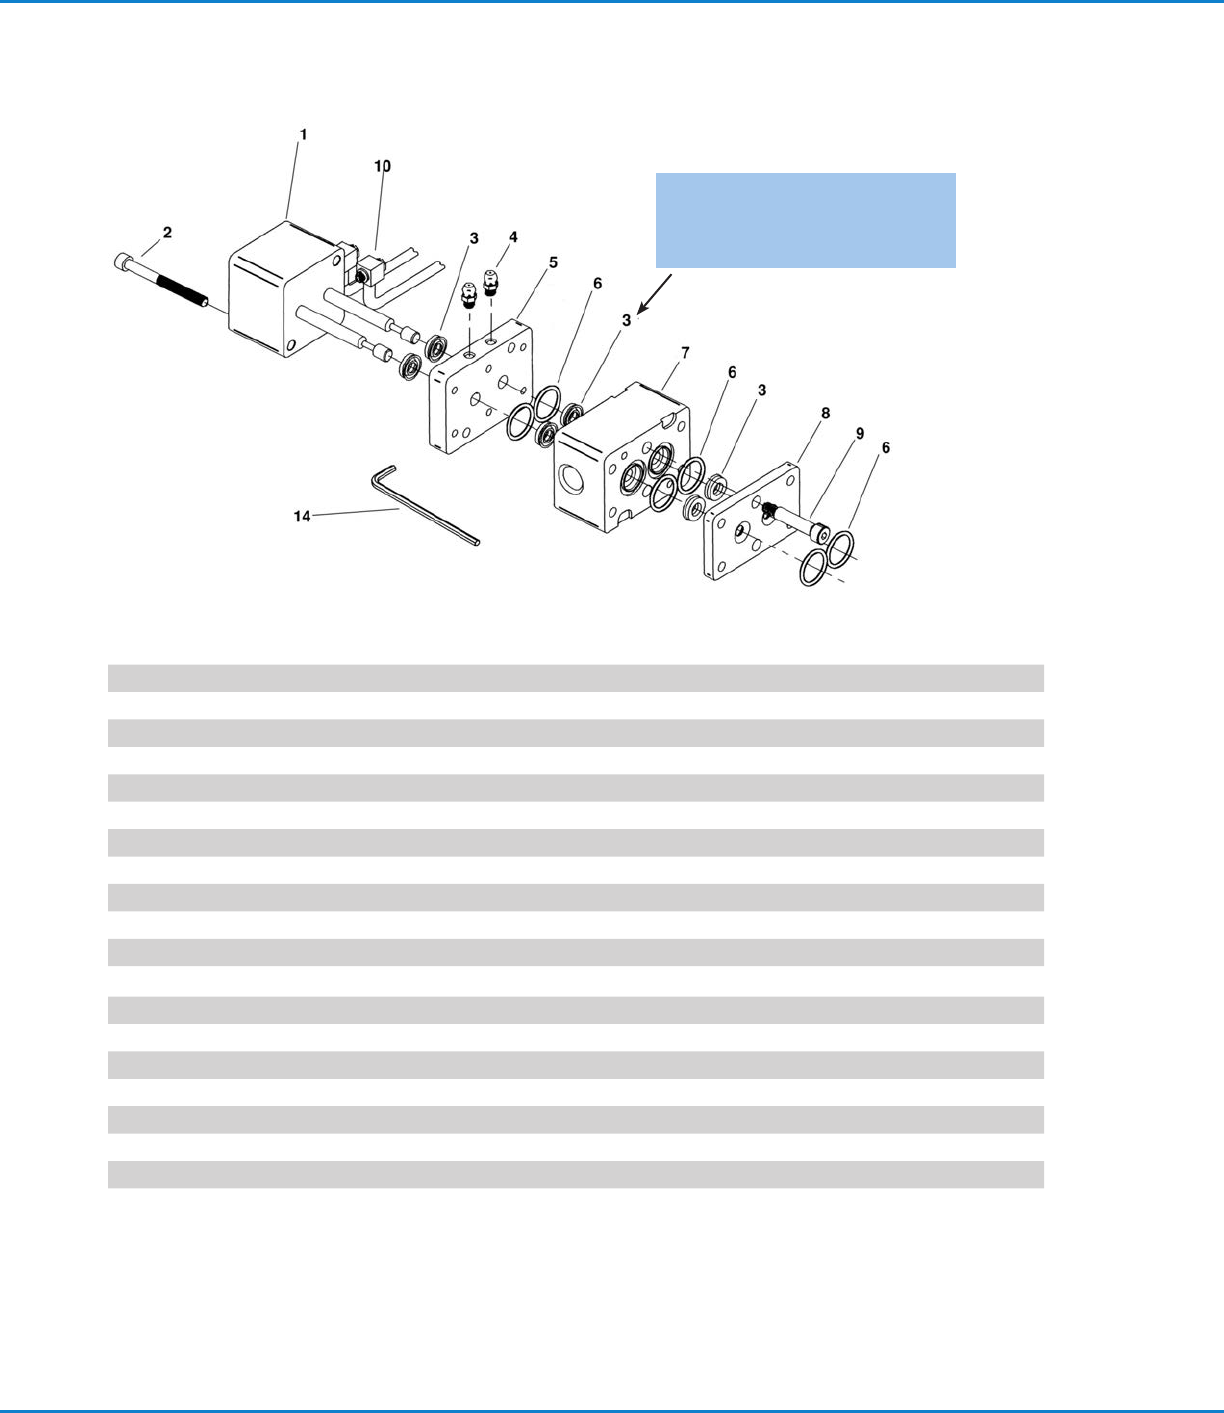
1. After cleaning, inspect the following components:
a. Spool valves (75) for wear
b. Lip seals (3) — both outside and inside lip
c. Manually retract and extend spool valves from air cylinder (1).
d. If the optional handle is used, connect air into the inlet and check 4-way action of cartridge valve (103).
2. Lubricate lip seals (3) and shafts (75) with auto grease.
3. Insert four back lip seals (3): two into tie plate (5) and two into the valve body (7). The lip seals are two piece: an O-Ring
and U-cup. They should always be installed with the O-Ring facing the material inlets (body of the valve).
4. Insert two front lip seals (3) that are located in the seat plate (8). They should be installed with the O-Ring facing the back
of the valve (facing the air cylinder). Optional Installation: With O-Ring facing manifold. Used when minimum snuff-back
is required. However, reduced seal life can be expected.
5. Insert O-Rings (6) and assemble air cylinder (1) and valve body (7). and the valve body (7) and engage the screws (2).
6. Push seat plate (8) through spool valves (75) and tighten bolts (9).
Final QC Check
Before the manifold is assembled, we recommend the following procedure:
1. Check the open and close movement of the spool valves (75).
2. Check gap between seat plate (8) and spool valve (75). Refer to Figure 2 when spool valves are in open position.
3. Check front lip seals by pressurizing the valve body (7) and applying soapy water into the front seals. The valve body can
be pressurized by connecting air into the A and B inlet ports on the valve body.
4. Seat plate (8)
Manifold
screws
Tie plate
Metal
plate
Air cylinder
Valve body
Figure 1
Maintenance (continued)
Series 450 Autovalve / Snuff Back | Instructions / Parts Lists
7www.nordsonefd.com info@nordsonefd.com +1-401-431-7000 Sales and service of Nordson EFD dispensing systems are available worldwide.
P/N Ref. # Qty. Description
7702265 1 1 Single Air Cylinder 5/16" stroke with Hardened SS Shafts
— 2 2 SHCS 10-24 x 2" long for 450 Series
— 3A 6 Lip Seal: Viton U-cup and Viton O-Ring
7702281 3B 6 Lip Seal: PU U-cup and Viton O-Ring
7702280 3C 6 Lip Seal: PTFE U-cup and PTFE O-Ring
7702277 3D 6 Lip Seal: UHMPE U-cup and SS Spring
7702268 4 2 Grease Fitting, 10-32
7702270 5 1 Aluminum Tie Plate
— 6A 6 Viton O-Ring
7702810 6B 6 EP O-Ring
7702275 6C 6 PTFE Encapsulated O-Ring
7702284 7A 1 AlumBody 9/16-18 Inlet Ports for 450 Valve
— 7B 1 SS Body 9/16-18 Inlet Ports for 450 Valve
7702288 8 1 Stainless Steel Seat Plate for 450 Valve
— 9 2 Stainless Steel SHSS 1/4" Dia x 1 1/2" long for 450 Valve
— 10 2 Assembled Air Tube and Fitting 10-32 Thread
7702364 11 1 Auto Grease 3 oz Cartridge (not shown)
7702372 12 1 Grease Gun 3 oz Cartridge Complete (not shown)
— 13 1 Adjustment Screw Driver for 450 Valve
NOTE: The O-rings in the lip seals face
the body (item 7). For proper alignment
see page 6. Consult factory for
additional seal combinations.
Maintenance (continued)
Series 450 Autovalve / Snuff Back | Instructions / Parts Lists
8 www.nordsonefd.com info@nordsonefd.com +1-401-431-7000 Sales and service of Nordson EFD dispensing systems are available worldwide.
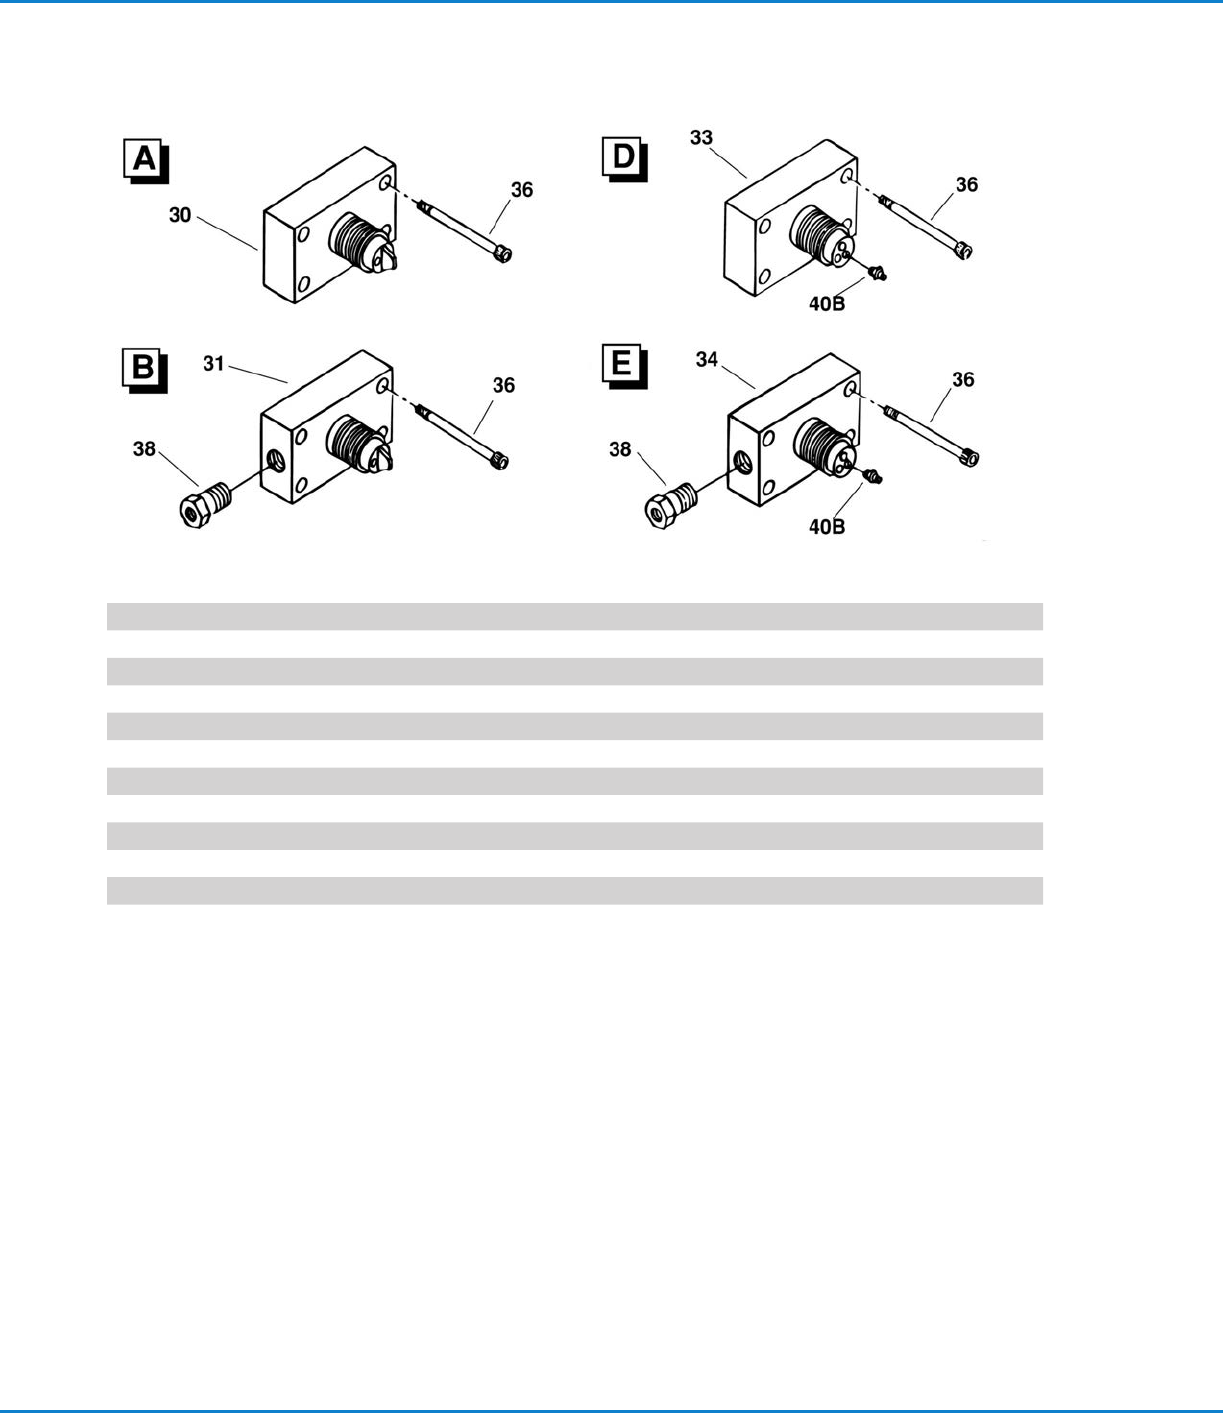
P/N Ref. # Qty. Description
7702292 30A 1 Alum Manifold / 160 Ser. 7/8-14 Thread, 1:1 Ratio
7702293 30B 1 SS Manifold / 160 Ser. 7/8-14 Thread, 1:1 Ratio
— 31A 1 Alum Manifold / 160 Ser. 7/8-14 Thread, 1:1 Ratio with 1/4 NPT Solvent Port
7702349 33A 1 Alum Manifold / 160 Ser. 7/8-14 Thread, Wide Ratio
7702294 36 4 SHCS 10-24 x 2 1/2" long for 450 Manifold
— 38A 1 Check Valve: Brass Solvent Flush
— 38B 1 Check Valve: Stainless Steel Solvent Flush
— 40A 1 Polypropylene fitting, 10-32 with 0.09" orifice
— 40B 1 Polypropylene fitting, 10-32 with 0.06" orifice
7702329 40C 1 Polypropylene fitting, 10-32 with 0.04" orifice
Manifolds for Series 160 Disposable Mixers