00198045-01_OM_BulkFeeder_X_EN.pdf - 第40页
SIPLACE BulkFeede r X / Operating Ma nual 05/2017 Edition 40 5.7 Cleaning the G lass Plate If it was not possible t o clear or clea n the glass plate by performing the act ions in section 5.6 Clearing the Glas s Plate , …
SIPLACE BulkFeeder X / Operating Manual 05/2017 Edition
39
5.6 Clearing the Glass Plate
During the reference run, the components are removed from the glass plate and a contamination
check of the glass plate has to be performed automatically. If contamination is detected on the
SIPLACE Vision image, this can be caused by components still present on the glass plate or by
dirt, dust, scratches etc.. A corresponding warning or error is displayed on the GUI.
If the contamination is caused by components still on the glass plate, these have to be vibrated
back into the component container.
Select Settings… – Feeder settings – Remove components from pickup plate in the table ►
view of the Setup view.
A new reference run starts automatically after this action. If the reference run fails again, the
contamination is probably caused by dirt on the glass plate. An error message is displayed on the
GUI and the machine is stopped. The glass plate has to be cleared manually.
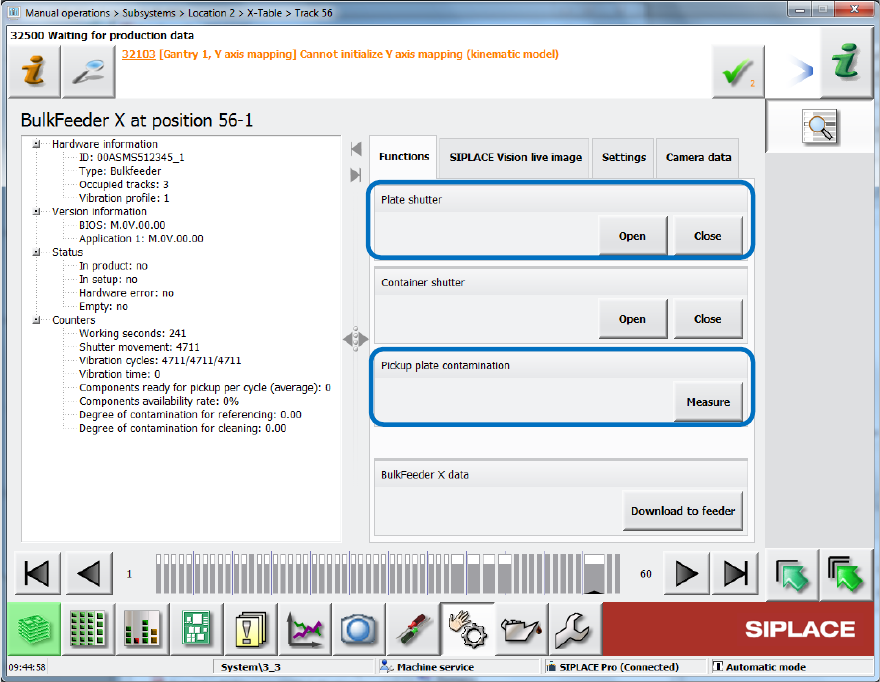
Under Manual operations, select the Open button in the Plate shutter field. ►
Figure 5-6: Opening plate shutter
Clean the glass plate with a cotton bud. ►
Click on Measure in the Pickup plate contamination field to confirm the cleaning and start a ►
new reference run.
If the reference run fails again and the glass plate is still contaminated, the glass plate has to be
cleaned outside the machine.
SIPLACE BulkFeeder X / Operating Manual 05/2017 Edition
40
5.7 Cleaning the Glass Plate
If it was not possible to clear or clean the glass plate by performing the actions in section 5.6
Clearing the Glass Plate, it has to be cleaned outside the machine.
For this, the glass plate has to be removed from the Cartridge and dipped into a cleaning agent.
The following cleaning set is required for the cleaning process:
● Can with distilled water
● Bottle with nozzle for distilled water
● Cleaning agent CB 100 Alu
● Tweezers
● Glass disk for cleaning agent
● Glass disk for distilled water
Remove the Cartridge from the Base Unit as described in section 5.5.1 Unlocking the ►
Cartridge.
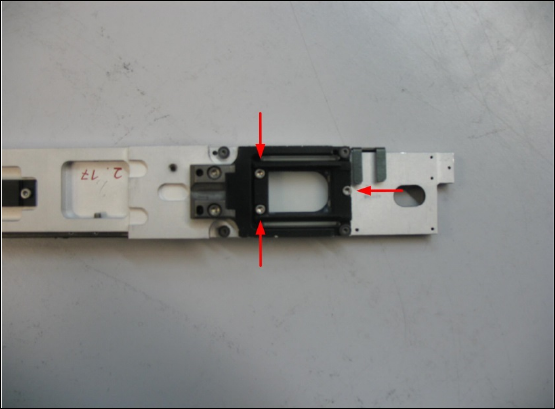
Turn the Cartridge upside-down. ►
Figure 5-7: Removing the glass plate
Pour some cleaning agent into the glass disk. ►
Remove the three screws of the glass plate holder from the underside of the Cartridge. ►
Pull out the glass plate from the holder with the tweezers and put it into the glass disk. ►
Dip the glass plate into the cleaning agent for one hour. ►
Fill the bottle with nozzle with distilled water from the can. ►
Remove the glass plate from the glass disk with the tweezers and put it into the glass disk. ►
Rinse the glass plate thoroughly with distilled water from the bottle. ►
If the cleaning effect does not seem sufficient at a first check you may also use a water jet
and/or rub the glass plate with a lint-free cloth.
Dry the glass plate with a lint-free cloth. ►

SIPLACE BulkFeeder X / Operating Manual 05/2017 Edition
41
NOTICE
Repeating the cleaning procedure
If the glass plate was dirty for a long time and has not been cleaned it may happen that
the result is not satisfactory. In this case the cleaning procedure has to be repeated, i.e.
dipping the glass plate into the cleaning agent for one more hour.
Put back the glass plate into the glass plate holder with the tweezers. ►
NOTICE
Inserting the glass plate
Note the location when inserting the glass plate. The components will be transported on
the less reflective side.
Fasten the three screws of the glass plate holder on the underside of the Cartridge. ►
NOTICE
Fasten the screws
Fasten the three screws with care. Torque 0,05 – 0,1 Nm
Turn the Cartridge back again. ►
Insert the Cartridge on the Base Unit as describe d in section 5.4 Replacing the Cartridge on ►
the Base Unit.