00191684-01.pdf - 第18页
DLM1 Revolver Head for S-23 HM Retrofit Instructions S-23 H M 5 Raising the vacuum generator 10/99 edition 18 5 Raising the vacuum generator 5 Fig. 5 - 1 Raising the vacuum generator 1 D C B 2 5 3 4 6 A

Retrofit Instructions S-23 HM DLM1 Revolver Head for S-23 HM
10/99 edition 4 Extending the vacuum hoses
17
Fig. 4 - 1 Extending the vacuum hoses
ATTENTION
Check again with reference to Fig. 4 - 1 that you have connected the vacuum hoses correctly.
Malfunctions may occur at the revolver head if they are not correctly connected. 4
5
6
9
8
7
3
4
1
2
10
11
4
6
2
DLM1 Revolver Head for S-23 HM Retrofit Instructions S-23 HM
5 Raising the vacuum generator 10/99 edition
18
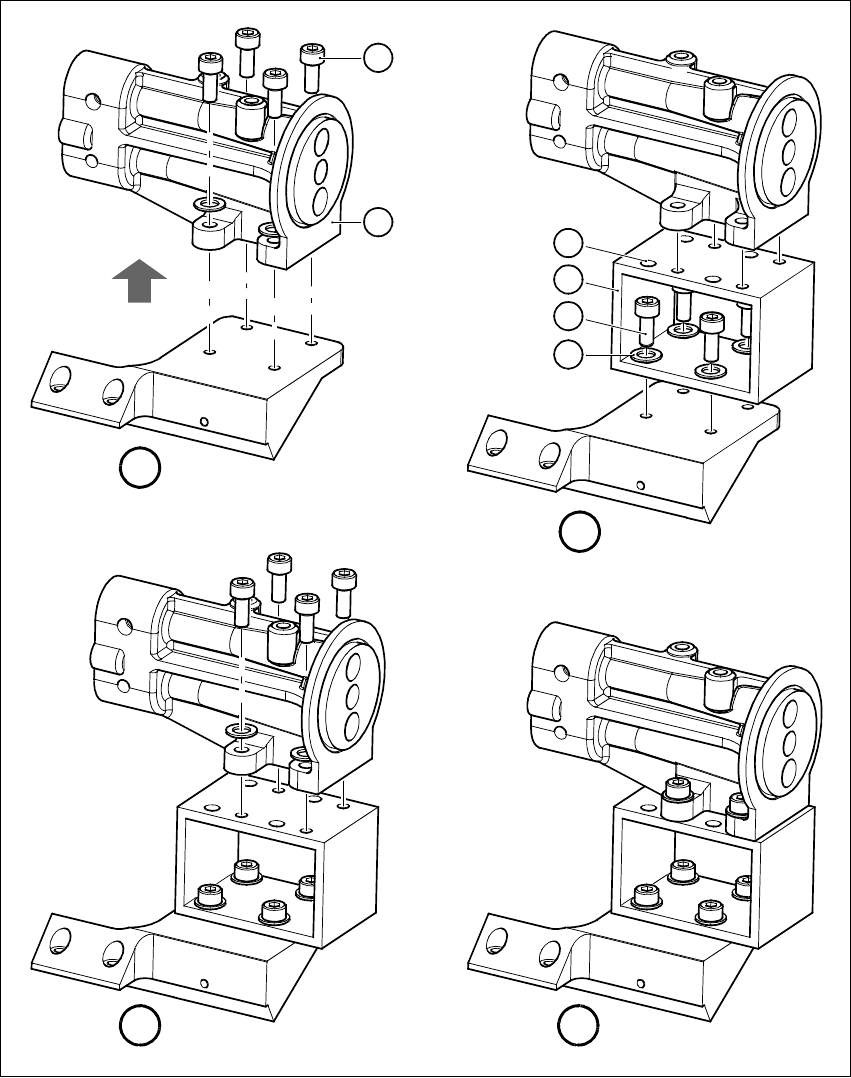
5 Raising the vacuum generator
5
Fig. 5 - 1 Raising the vacuum generator
1
D
C
B
2
5
3
4
6
A

Retrofit Instructions S-23 HM DLM1 Revolver Head for S-23 HM
10/99 edition 6 Attaching the ‘Vacuum generator’ ribbon cable
19
Å Loosen the M2.5 x 5 hexagon socket-head screw (item 6 in Fig. 3 - 1) in the cover (item 5 in
Fig. 3 - 1) and remove the cover.
Å Loosen the four hexagon socket-head screws (item 1 in Fig. 5 - 1) for fixing the vacuum
generator (item 2 in Fig. 5 - 1).
Å Lift the vacuum generator slightly (step A in Fig. 5 - 1).
Å Fix the aluminum square (item 3 in Fig. 5 - 1) contained in the kit to the base using the four
serrated safety washers and four M4 x 10 hexagon socket-head screws provided (items 4 and
5 in Fig. 5 - 1, steps B and C in Fig. 5 - 1).
Å Fix the vacuum generator to the aluminum square (step D in Fig. 5 - 1).
Å Fix the cover to the vacuum generator.
5
5
5
6 Attaching the ‘Vacuum generator’ ribbon cable
Å Remove the protective film from the adhesive surface of the Velcro fastener (item 1 in Fig. 6 -
1).
Å Attach the Velcro fastener to the bottom of the head board (item 3 in Fig. 6 - 1), beneath the
‘Vacuum board connection’ plug (item 4 in Fig. 6 - 1).
Å Make the ‘Vacuum board’ ribbon cable (item 2 in Fig. 6 - 1) into a loop.
Å Remove the film from the adhesive side of the Velcro fastener (item 1 in Fig. 6 - 1) and carefully
press the cable onto the adhesive side.
CAUTION 6
Apply pressure to the board from both above and below when you attach the cable to the
Velcro fastener to avoid bending or breaking the board. 6