00197192-02_VD_EDM_2.1_DE_EN.pdf - 第14页
EDM V2.1 / Versio n Desc ription Ausgabe 11/2012 Edit ion 14 4.3 EDM Data Transfe r Manager ( P ush M ode) The Data T ransf er Manag er allo ws users to send d efin ed data pac kages to Line S ervers. The Data T ransf er…

EDM V2.1 / Version Description Ausgabe 11/2012 Edition
13
All changed sub-objects for which changes are pending in the Clearing Pool are displayed in a
confirmation window. Only the selected, tagged objects will be restored.
Figure 4-7: Confirming objects to be restored
► Confirm your selection by clicking OK.
The selected objects are restored on the Line Server and the changes are removed from the
Clearing Pool.
4.2.2 Transferring the Change Notifications to the EDM Master
All change notifications are transferred to the EDM Master after a configurable timeout has elapsed
(see the EDM Installation Manual, section 5.2.3.5). Notifications can be sent immediately by
clicking Send Pending Notifications in the EDM Client:
Figure 4-8: Sending pending notifications
4.2.3 "Auto Reject" and "Direct Import
Data which matches the rules for Auto Reject and Direct Import is not put into the Clearing Pool.
In the case of Direct Import, the data is transferred directly to the EDM Master database, and in
the case of Auto Reject the data is ignored. Therefore, it is not necessary to enter comments at
the EDM Line in this case.
Further information about this can be found in the EDM Installation Manual, section 5.3.7
Notifications/Rules… .
EDM V2.1 / Version Description Ausgabe 11/2012 Edition
14
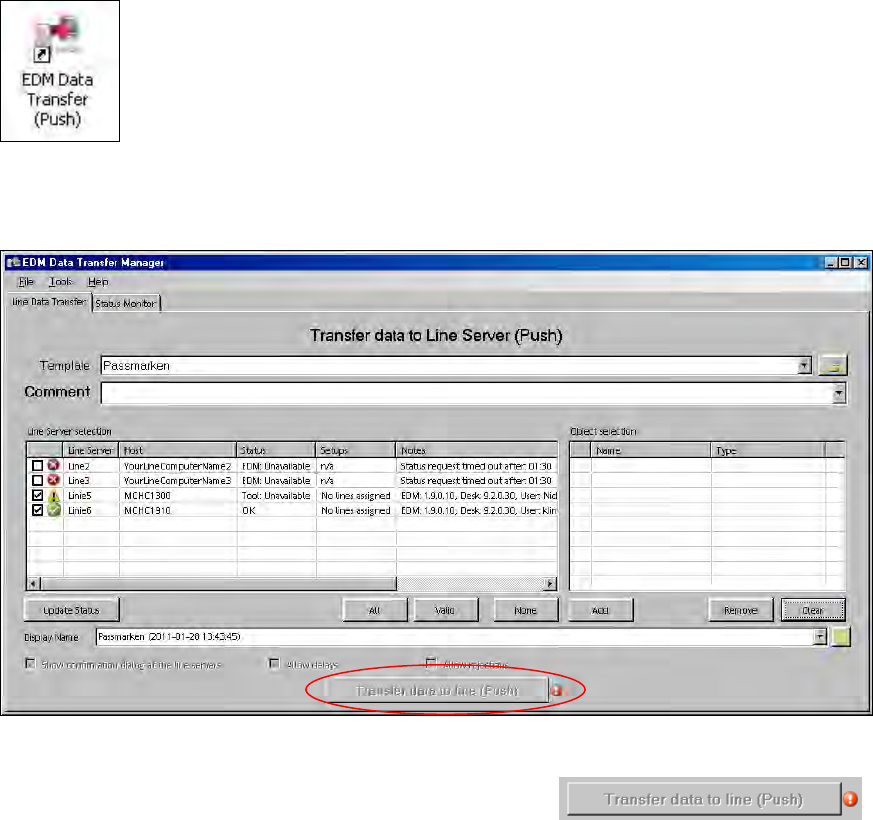
4.3 EDM Data Transfer Manager (Push Mode)
The Data Transfer Manager allows users to send defined data packages to Line Servers.
The Data Transfer Manager opens in selection view when it is started (either from the Windows®
Start menu: Programs - SIPLACE EDM - EDM Data Transfer (Push) or from the shortcut on the
desktop).
4.3.1 Creating a Data Package
Figure 4-9: Creating a data package
The Transfer data to line (Push) button is disabled by default: .
The red error icon to the right shows that the user still has to make entries. Details are displayed as
a tooltip or if the user left-clicks on the error indicator.
The following steps are necessary to successfully transfer objects to a line. It is recommended that
you initially follow the sequence given.
EDM V2.1 / Version Description Ausgabe 11/2012 Edition
15
4.3.1.1 Selecting an Application Template
If a template has previously been selected in an earlier session of the Data Transfer Manager, this
is preselected in the drop-down list. This drop-down list contains all the templates stored in the
selected template folder.
► Select a template from the drop-down list or click the
button to select another template
folder.
4.3.1.2 Selecting the Line(s)
Once a template has been selected, the Line Server drop-down list shows all the known lines
selected by the template. The following icons indicate the status of the line. Further details are
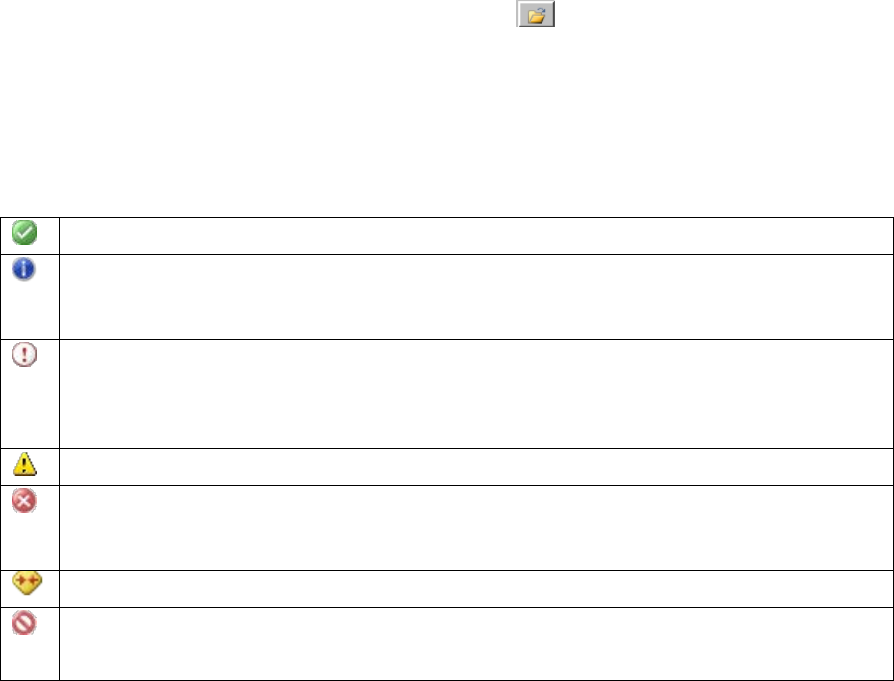
displayed in the tooltip for the icon and in the Status field of the Line Server drop-down list.
The Line Server is available and can receive data packages.
The Clearing Pool contains unprocessed entries for this line. The entries in the Clearing
Pool should be checked and removed before data is sent to this Line Server. Nevertheless,
it is possible to push data.
The Clearing Pool contains unprocessed entries for this line. One of these objects in the
Clearing Pool has been added to the Object selection list. The object must be removed
from the Clearing Pool or the Object selection list or the line must be deactivated in the
Line Server drop-down list before data can be sent to this Line Server.
Something is wrong on the Line Server. The EDM Tool may not be running.
The Line Server is not responding, does not exist (incorrect entry in the EDM configuration
file), the EDM service is not running on the Line Server, or push mode is not enabled
there.
The SIPLACE Pro versions are not compatible with each other.
The activated functions do not match each other.
Example: the conflict detection is active but no SPI line is configured.
Table 4-1: Icons for line status
The associated check box at the beginning of the row must be checked to transfer objects to a Line
Server. The All (all Line Servers shown), Valid and None buttons check or uncheck the check
boxes of the relevant Line Server groups.