00197191-02_IM_SIPLACE_Pro_10.1_EN.pdf - 第33页
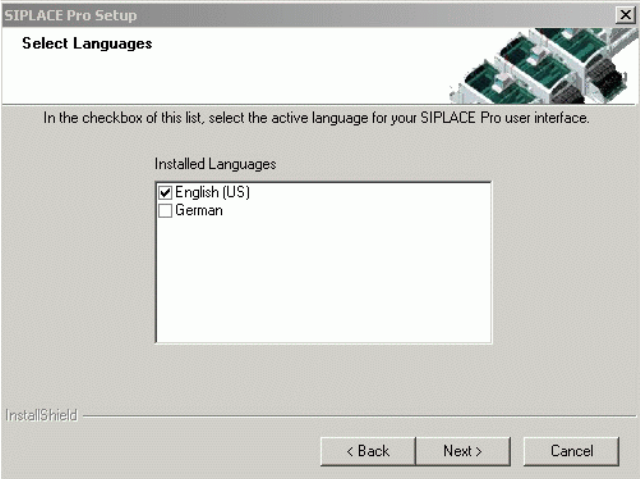
4 Installation of SIPLACE Pro and possible Setup Types Installation Manual Edition 09/2012 SIPLACE Pro 10.1 31 4 Fig. 4.3 - 3 "Select Languages" dialog box Select the check box of the language with which the …
Installation Manual 4 Installation of SIPLACE Pro and possible Setup Types
SIPLACE Pro 10.1 Edition 09/2012
30
4.3.2 Setup Type – SIPLACE Pro Complete System
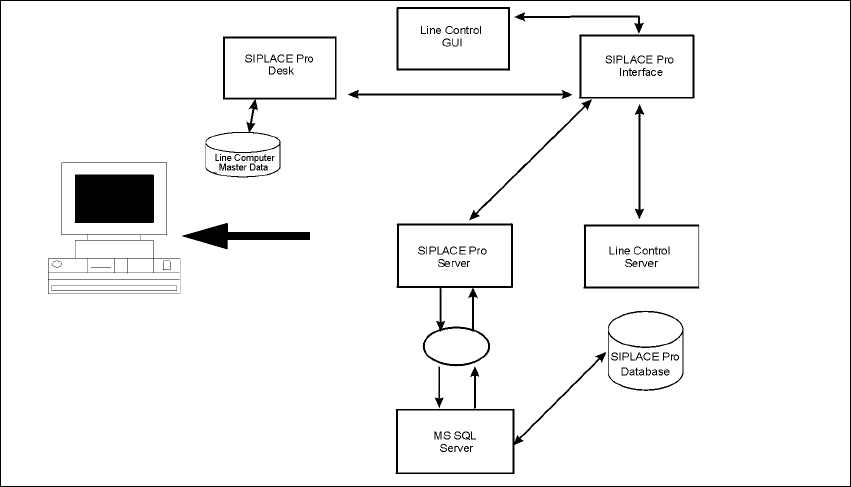
This setup type contains all SIPLACE Pro components for operating the system on a single com-
puter. Setup detects if SQL Server has already been installed.
4
Fig. 4.3 - 2 Components – SIPLACE Pro Complete Installation
Select this type to install all SIPLACE Pro system components (Programming system, LC GUI, LC
Server) on one computer as described here. Even if you choose this Setup type, it is possible to
integrate further clients on other computers.
Step 1
Run through the steps in “Starting installation – first steps” on page 21.
Select the SIPLACE Pro complete system setup type
Click Next.
Step 2
In the "Select languages" dialog box, select the languages you want to install to make them avail-
able for the applications. In addition, select which language should be active first.
You can switch the active language subsequently in SIPLACE Pro Desk and Line Control to any
other language installed.
Setup
4 Installation of SIPLACE Pro and possible Setup Types Installation Manual
Edition 09/2012 SIPLACE Pro 10.1
31
4
Fig. 4.3 - 3 "Select Languages" dialog box
Select the check box of the language with which the installed applications like SIPLACE Pro
Desk should start first.
Click Next.
Installation Manual 4 Installation of SIPLACE Pro and possible Setup Types
SIPLACE Pro 10.1 Edition 09/2012
32
Note
English and German are always installed. You cannot de-select either language. Additional
languages are listed only if the language pack for this version of SIPLACE Pro has been in-
stalled. 4
Step 3
The "Configuration of SIPLACE Pro Server" dialog box specifies under which Windows user
account the server component of SIPLACE Pro should run. The current domain appears as the
default value in the account text box. This means it is usually sufficient just to add the account
name and the password. However, if this account is local, be sure to change the domain specifi-
cation appropriately.
4
Fig. 4.3 - 4 "Configuration of SIPLACE Pro" dialog box
Enter the Account and Password for the Windows user in the dialog box.
For new installations and upgrades, the option Access rights is deactivated by default. This
means there is no restriction of access rights on stored objects. We recommend you leave
this deactivated until you have created Users, Groups and set Privileges & Permissions in
SIPLACE Pro Desk. After having done that you may activate the option "Access Rights" by
modifying the option "Security On/Off" in the dialog "Settings" of SIPLACE Pro Desk.
Click Next.