00195655-04_SM_X-Series_FSE_en.pdf - 第107页
Service Work 3.9.1 Replacing the Cutter Blades [03009259-xx] Cutter Service Manual (internal ver sion) SIPLACE HF and X Series 107 3.9 3 . 9 C u t t e r Cutter 3.9.1 3 . 9 . 1 R e p la c in g t h e C u t t e r B la d e s…
Service Work
White Balance Process 3.7.1 Replacing the TwinHead Hoses
106 Service Manual (internal version) SIPLACE HF and X Series
3.8
3.8 White Balance Process
White Balance Process
For details about the white balance process, read the user guide "Camera Calibration FCCS Digital User
Guide" [00196449
-
xx].
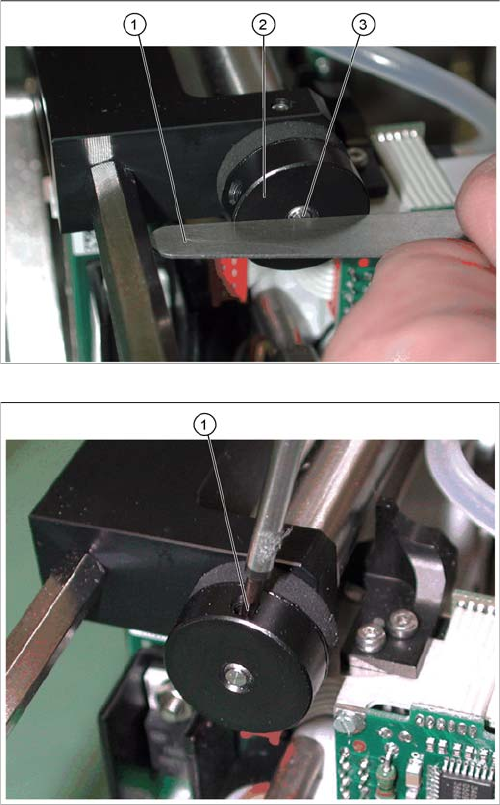
► Screw the bumper (2) in until the underside is level
with the screw (3) (checked with the feeler gauge (1)
on the photo).
► Fix the bumper with the side screw (1).
Service Work
3.9.1 Replacing the Cutter Blades [03009259-xx] Cutter
Service Manual (internal version) SIPLACE HF and X Series 107
3.9
3.9 Cutter
Cutter
3.9.1
3.9.1 Replacing the Cutter Blades [03009259-xx]
Replacing the Cutter Blades [03009259-xx]
Parts
The item number of the cutter blades may vary according to the cutter version and function status.
Tools
▪ Thick protective gloves
▪ Mounting plate [00312731-xx]
Alternatively: 2 large parallel clamps and a sturdy table with even surface to clamp down the disman
-
tled cutter
Removal
Tape cutter, pneumatic Function status Cutter blades, attuned
03000487 -01 to -03 03000501-xx
03000487 -04 to -05 03009259-xx
03019941 -01 03009259-xx
03052900 -01 03009259-xx
WARNING
Risk of injury
There is a high risk of injury from the blades and the tape deflector..
► Wear appropriately thick protective gloves!
► Never reach into the cutter from below or into the empty-tape duct from above.
► Dismantle the COT insert and the cutter.
► Remove the protective plate (2) and the baffle plate
(3).
► Remove the cover plate (1).
► Remove the caps (4) on the fastening screws.
WARNING!
There is a risk of injuring yourself on the cutting edge of
the blades.
For all further work, either fix the cutter to the assembly
plate with 4 hexagon socket-head screws M6 or use
screw clamps to fasten the cutter to a sturdy table.
4
1
4
3
2
Service Work
Cutter 3.9.1 Replacing the Cutter Blades [03009259-xx]
108 Service Manual (internal version) SIPLACE HF and X Series
Installation – requirements
► Loosen and remove the two screws (1) fastening the
stationary blade (2).
► Loosen the screws fastening the left and right tape
deflectors (3) above the moveable blade.
CAUTION!
Do not loosen the two Phillips screws (4).
Remove the tape deflector holder with the tape deflector
(5) and carefully place the whole unit down (with the tape
deflector facing upwards).
► Remove the right-hand holding-down device (1) and
the left holding-down device (2), plus the spacers be
-
low.
► Use an SW 10 open-ended wrench to push against
the joint (3), while loosening the hexagon socket-
head screw of the joint (4) in the moveable blade.
This may require more strength than usual as the
screws have been secured with Loctite no. 243.
► Grasp both ends of the moveable blade (5) with the
protective gloves and pull it upwards and out.
4
3
5
1
4
3
2
3
4
1
5
4
3
2
WARNING
Risk of injury
There is a high risk of injury from the blades and the tape deflector.
► Wear appropriately thick protective gloves!
► Make sure all parts are clean before installing them.