00194591_02.pdf - 第39页
Installation Manual SIPLACE Setup Center RF 2.1 3 Installation Edition 09/2005 EN 3.3 Installation of SIPLACE Setup Center and Possible Setup Types 39 3.3.3.4 Scanner Hardware Inst allation The Dragon scanner's crad…

3 Installation Installation Manual SIPLACE Setup Center RF 2.1
3.3 Installation of SIPLACE Setup Center and Possible Setup Types Edition 09/2005 EN
38
3.3.3 Steps to Perform after Installation
3.3.3.1 SIPLACE Setup Center Database and Windows XP SP2
When installing Windows XP Service Pack 2 (SP2), the Windows Firewall, formerly ICF (Internet
Connection Firewall), is enabled by default. The default configuration in SP2 blocks incoming traf-
fic for the most TCP ports. 3
If you are running the SIPLACE Setup Center GUI on a Windows XP SP2 host and the SIPLACE
Setup Center database on another host, you have to open the port 1433 and 1434 for the data-
base connection. Furthermore, you have to open the port 445, because blocking will cause errors
when using mans MMC snap-ins like Event Viewer, Local Users & Groups, Services, Computer
Management, Disk Management, Device Manager, Group Policy, and others. 3
Please refer to Windows help to get further information how to open TCP ports. 3
3.3.3.2 SIPLACE Setup Center Configuration
Setup Center GUI requires to be configured before it can be used. The configuration can be found
via the main menu Options → Settings. Read "SIPLACE Setup Center - Getting Started" for
more information. 3
3.3.3.3 Dragon Scanner Configuration
New scanners and scanner base stations require the set-up once before the first use. 3
This doesn't necessarily need to happen after the Installation of SIPLACE Setup Center, but it is
recommended. The Scanner configuration is independent from the software installation. 3
Note
The scanner powers off after a period of inactivity. Pulling the trigger will power the scanner on.3
Installation Manual SIPLACE Setup Center RF 2.1 3 Installation
Edition 09/2005 EN 3.3 Installation of SIPLACE Setup Center and Possible Setup Types
39
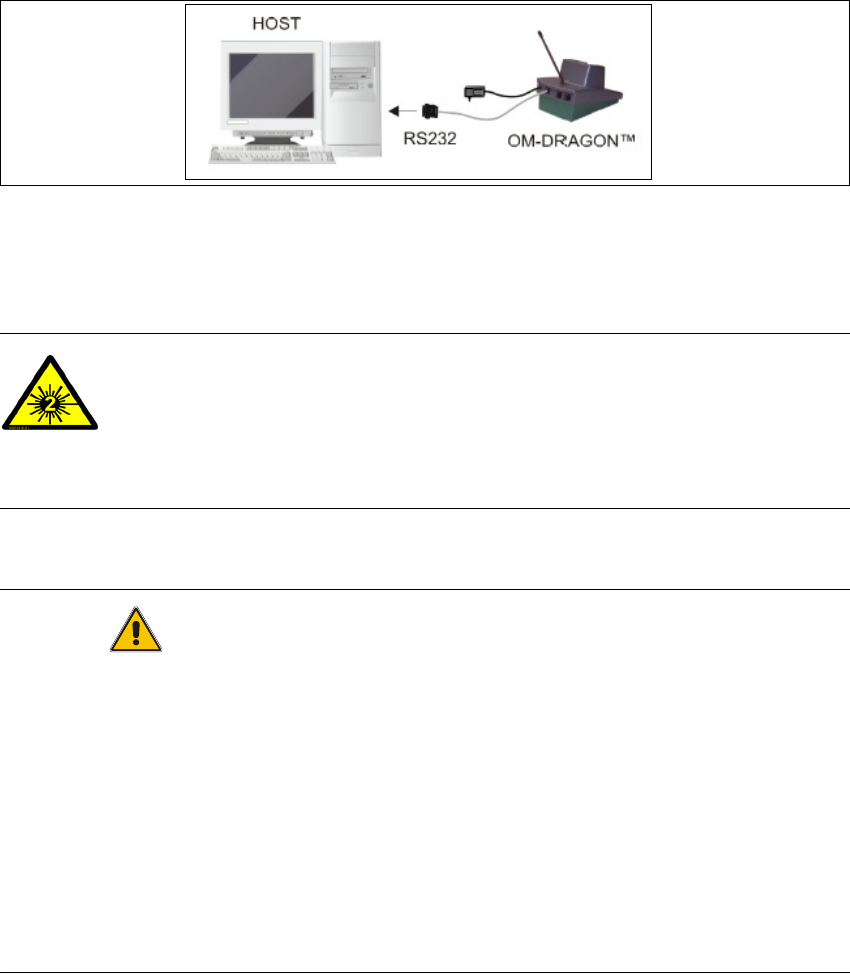
3.3.3.4 Scanner Hardware Installation
The Dragon scanner's cradle needs to be connected to the PC's COM-port. The default port is
COM1. 3
If the COM1 port is already in use another COM port need to be configured (Another port can be
configured in the Setup Center: 3
→ Open Setup Center setting dialog - menu Options/Settings - dialog Scanner/Dragon Scanner/
Serial Port).
→ Connect the cradle to the Setup Center PC according to the following picture:
3
Fig. 3.3 - 27 RS232 Connection
3.3.3.5 Safety Instructions
The Dragon Scanner conforms to laser class 2. 3
LASER RADIATION!
Do not look into beam
Laser class 2 3
Warning label W216 (shown above) is displayed on the Dragon scanner. 3
CAUTION
Before using the Dragon scanner, inform all operating personnel about the laser regulations.
While operating the Dragon scanner, observe the respective regulations in line with VDE 0837
„Protection from radiation emitted by laser devices“ and the „Laser radiation“ accident prevention
regulations (VBG93), applicable in Germany.
Also observe the accident prevention regulations applicable in your country.
Despite the low laser power, avoid looking directly at the laser beam. The natural closure reflex of
your eyelids will protect your eyes from the visible beam. 3
3 Installation Installation Manual SIPLACE Setup Center RF 2.1
3.3 Installation of SIPLACE Setup Center and Possible Setup Types Edition 09/2005 EN
40
3.3.3.6 Setting up the Scanner
Setting up the scanner system requires three steps: 3
(1) Scanner configuration
(2) Binding the scanner to the RF station
(3) RF station configuration
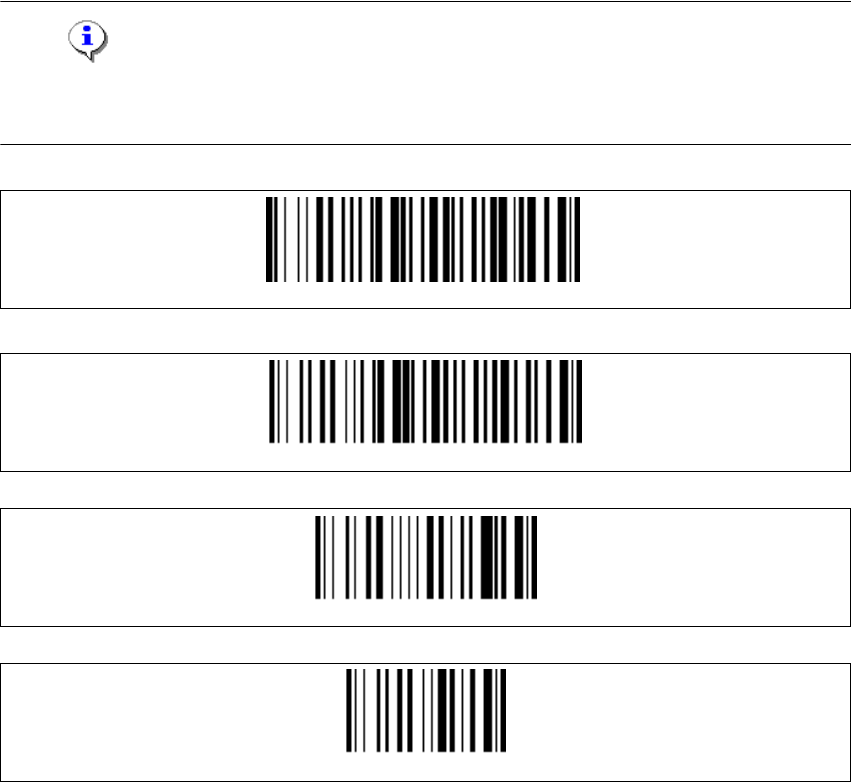
3.3.3.7 Scanner Configuration
The new Scanner is setup up by scanning of a series of barcodes. Pull the trigger to switch the
scanner on and scan the following barcodes in the order they are printed. 3
Note
The configuration must be completed in one run. If it is halted or any problems appear, all config-
uration steps have to be redone from the start. 3
3
3
3
3
3
Set DLL6000-R compatibility
Restore DRAGON ™ M standard configuration
Restore DRAGON ™ M default
Enter Configuration