00195376-05_SM_D1_D1i_D2_D2i_EN.pdf - 第275页
Settings 6.7.12 Jumper Settings for Conveyor Control T SP 201 Modular PCB Conveyor System Service Manual SIPLACE D1/D1i/D2/D2i 275 6.7.12.1 6 . 7 . 1 2 . 1 O v e r v ie w Overview TSP 201 Legend 6.7.12.2 6 . 7 . 1 2 . 2 …
Settings
Modular PCB Conveyor System 6.7.12 Jumper Settings for Conveyor Control TSP 201
274 Service Manual SIPLACE D1/D1i/D2/D2i
6.7.12
6.7.12 Jumper Settings for Conveyor Control TSP 201
Jumper Settings for Conveyor Control TSP 201
See also
6.7.12.2 PCB Handling - Predecessor and Successor Station [ ➙ 275]
6.7.12.3 SIEMENS / SMEMA [ ➙ 276]
6.7.12.4 Single / Dual Conveyor [ ➙ 276]
Values: Move upwards Move down-
wards
Tolerance
Values without lifting table plate as adjustment
aid for single conveyor
~440 ms ~580 ms +/- 20 ms
Values with lifting table plate 500 ms 480 ms +/- 20 ms
Time needed to move lifting table up with lifting table
plate (D4 shown as example)
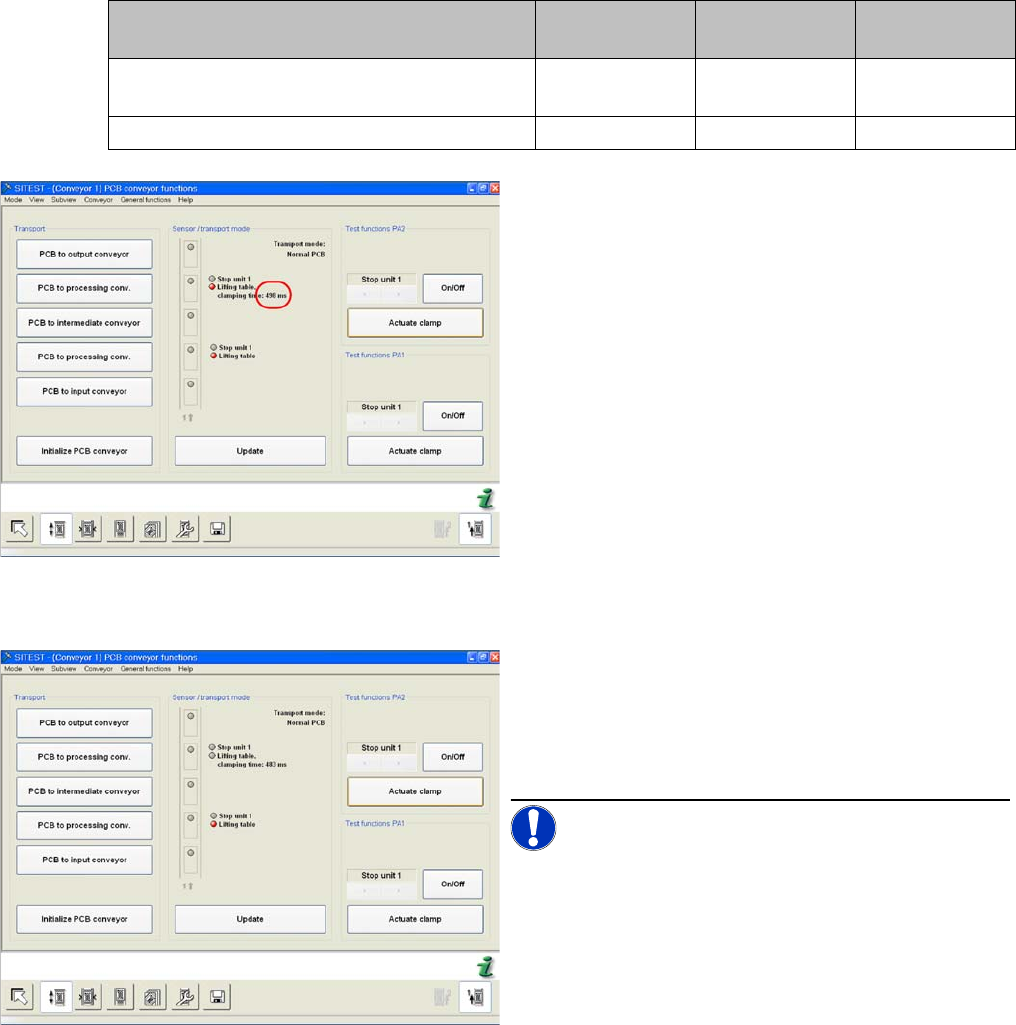
Checking times in SITEST
► Check the times in the SITEST menu Leiterplatten-
transport:
► Switch the machine on and start the SITEST pro-
gram.
► In the PCB conveyor functions menu (see adjacent
diagram) you can see the travel time for the lifting ta-
ble (from SW 602 upwards).
► Click on Actuate Clamp.
Time needed to move lifting table down with lifting table
plate
► The lifting table will be moved up and the travel time
will be displayed (see diagram).
► Press the Actuate Clamp button again to move the
lifting table downwards and to view the travel time for
the downwards movement.
NOTICE! Move the lifting table plate multiple
times, to check the setting times.
► If malfunctions occur during the downwards move-
ment or if the board is shaken, reduce the lowering
speed accordingly.
Settings
6.7.12 Jumper Settings for Conveyor Control TSP 201 Modular PCB Conveyor System
Service Manual SIPLACE D1/D1i/D2/D2i 275
6.7.12.1
6.7.12.1 Overview
Overview
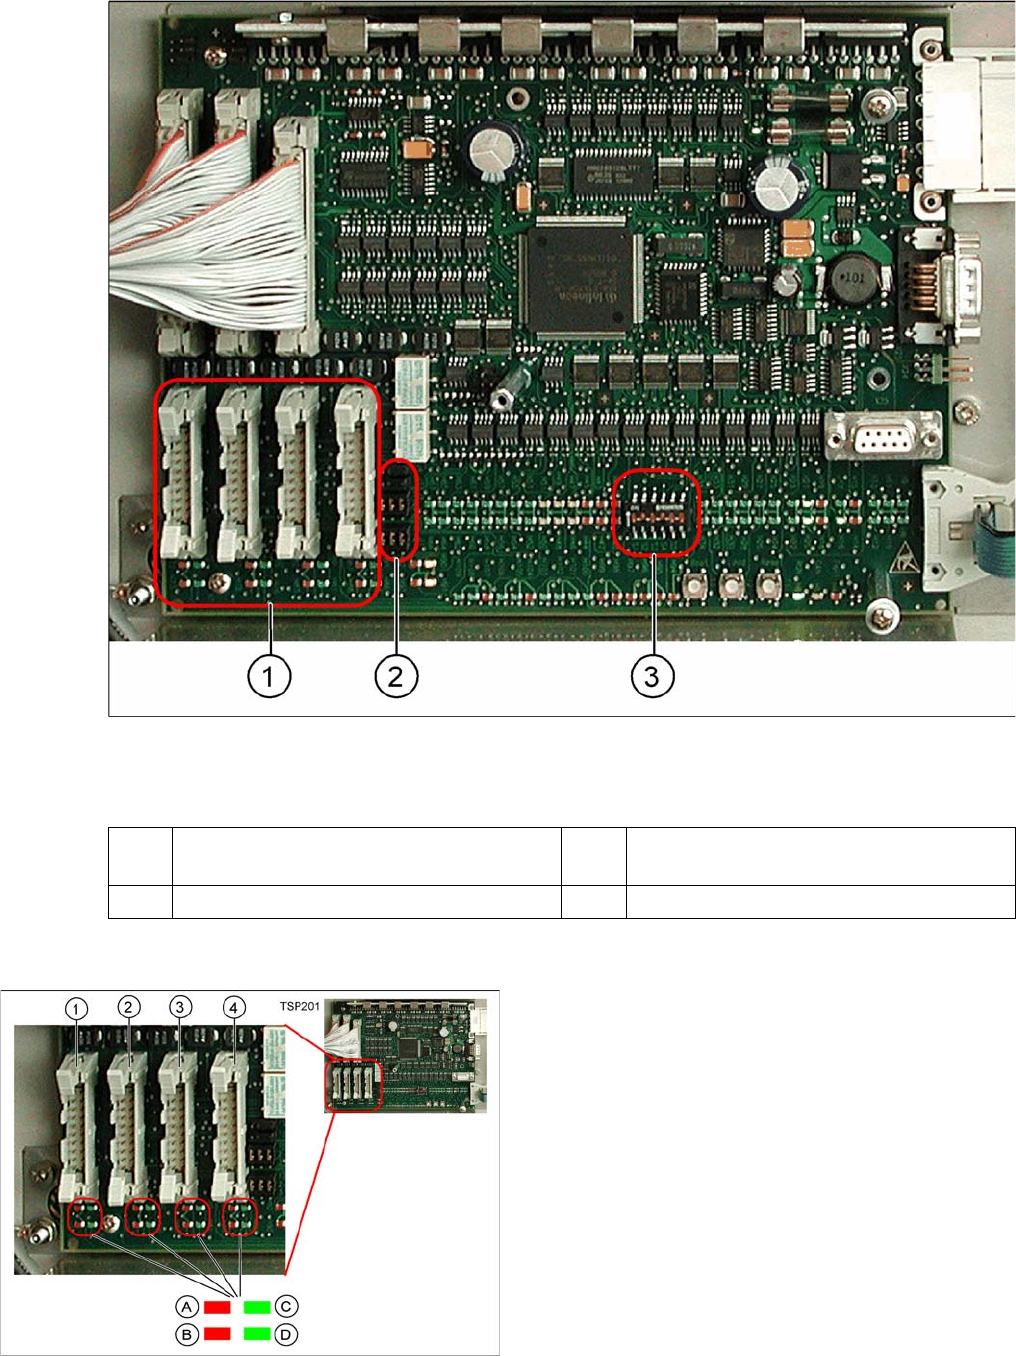
TSP 201
Legend
6.7.12.2
6.7.12.2 PCB Handling - Predecessor and Successor Station
PCB Handling - Predecessor and Successor Station
1 PCB handling (predecessor /successor
stations)
3 DIP switch for single / dual conveyors
2 Jumper for SIEMENS / SMEMA option
Legend
1. X1 – PCB handling – predecessor station lane 1
2. X2 – PCB handling – successor station lane 1
3. X4 – PCB handling – predecessor station lane 2
4. X5 – PCB handling – successor station lane 2
Connector and interface status display
▪ A = Received
▪ B = Permitted
▪ C = Transmitted
▪ D = Requested
Settings
Changeover Table 6.7.13 LEDs on the TSP201
276 Service Manual SIPLACE D1/D1i/D2/D2i
6.7.12.3
6.7.12.3 SIEMENS / SMEMA
SIEMENS / SMEMA
6.7.12.4
6.7.12.4 Single / Dual Conveyor
Single / Dual Conveyor
DIP switch S1 on TSP201
6.7.13
6.7.13 LEDs on the TSP201
LEDs on the TSP201
See also
6.2.3.1.2 Description of LEDs on the Gantry Head Distributor [ ➙ 209]
6.7.14
6.7.14 Siemens/SMEMA TSP 201 Interface Description
Siemens/SMEMA TSP 201 Interface Description
6.8
6.8 Changeover Table
Changeover Table
6.8.1
6.8.1 Setting the COT Basic Height
Setting the COT Basic Height
6.8.1.1
6.8.1.1 Tools and equipment
Tools and equipment
The following tools and equipment are needed to adjust the height of the component trolley:
▪ Set of Allen keys, size 5
▪ Eyebolt with M12 thread to raise the component trolley table,
DIN 580 M12-St [00048350-xx]
▪ Leverage device for raising the component trolley table, must be able to carry at least 80 kg
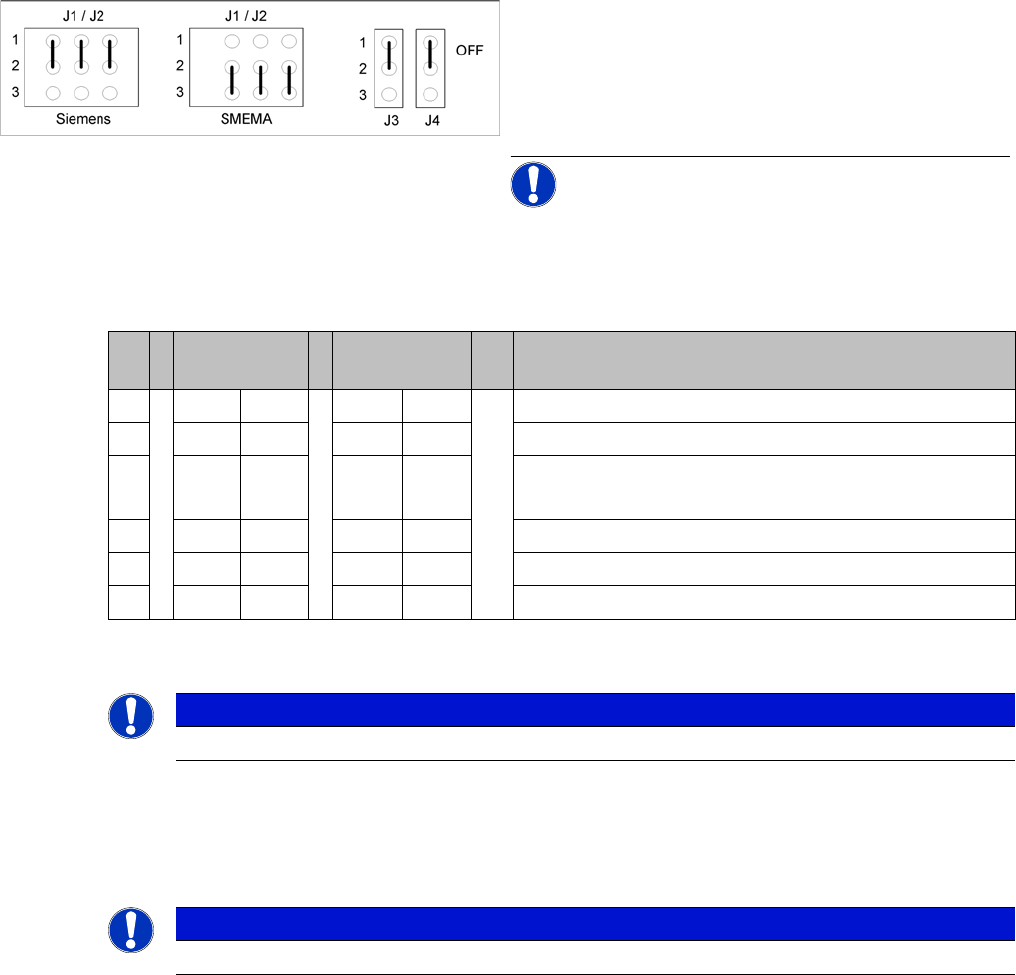
Jumper J1, J2 "successor/predecessor station" at TSP
201
Legend
▪ J1 predecessor station
▪ J2 successor station
▪ J3/J4 interference loop (emergency stop on produc-
tivity lift switches the placement machine off)
NOTICE! Jumpers J1 and J2 can be set inde-
pendently of one another, at SIEMENS or SMEMA.
S Single con-
veyor
Dual conveyor Comments
1OFF ON OFF = single conveyor, ON = dual conveyor
2ON ONStation type (always ON)
3OFF OFF OFF = clamping sensor disabled (with adj unit)
ON = without adj unit
4ON ONOFF = 125 Kbit/s (S27), ON = 1 Mbit/s (D1/D1i/D2)/D2i
5oo oo CAN terminating resistor, OFF for D1/D1i, ON for D2/D2i
6OFF OFF not used
NOTICE
See also the label on the TSP201 cover.
NOTICE
See also the label on the TSP201 cover.