00197447-01_AI_Innenraumbeleuchtung_X-Serie_S_de_en - 第38页
Installation Installing the Inner Illumination 38 Inner Illumination Innenraumbeleuchtu ng ► In the machine interior, fi nd the pr ovided powe r sup - ply cable and run it out of the machine. ► Run the cable of t he ligh…
Installation
Preparatory Steps
Inner Illumination Innenraumbeleuchtung 37
3
3 Installation
Installation
3.1
3.1 Preparatory Steps
Preparatory Steps
► Switch off the machine, disconnect it from the power supply and secure it to prevent unauthorized
reactivation. Observe the instructions in section "1.2 Preparatory Work..." [ ➙ 31].
► Move the component trolley out of the machine.
See also
1.2 Preparatory Work... [ ➙ 31]
3.2
3.2 Installing the Inner Illumination
Installing the Inner Illumination
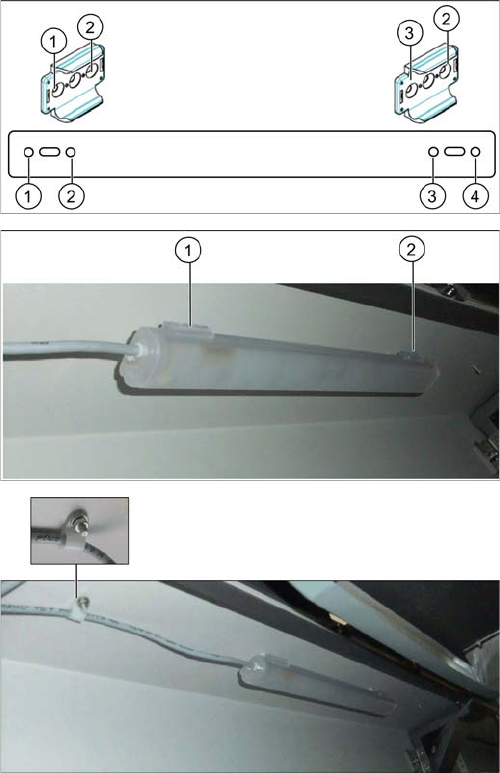
One light bar can be installed per placement area. In the following, the installation in placement area 1
is described as an example. The arrangement in placement area 2 is mirrored.
► Open the cover and fix it in a position which gives you best access for working and which ensures
that it cannot close itself on its own.
► Screw the two brackets onto the mounting plate using
the four M4x6 screws (positions 1 to 4).
► Screw the assembly consisting of brackets and
mounting plate to the provided fixation points at the
top of the machine interior (1 and 2, top left at location
1 for placement area 1, top right at location 3 for
placement area 2). Use the two M4x10 screws.
► Slide the light bar into the brackets. Make sure that
the light bar engages.
► Run the cable through the cable clip and fix the cable
clip to the provided bolt in front of the light bar.
Installation
Installing the Inner Illumination
38 Inner Illumination Innenraumbeleuchtung
► In the machine interior, find the provided power sup-
ply cable and run it out of the machine.
► Run the cable of the light bar out of the machine.
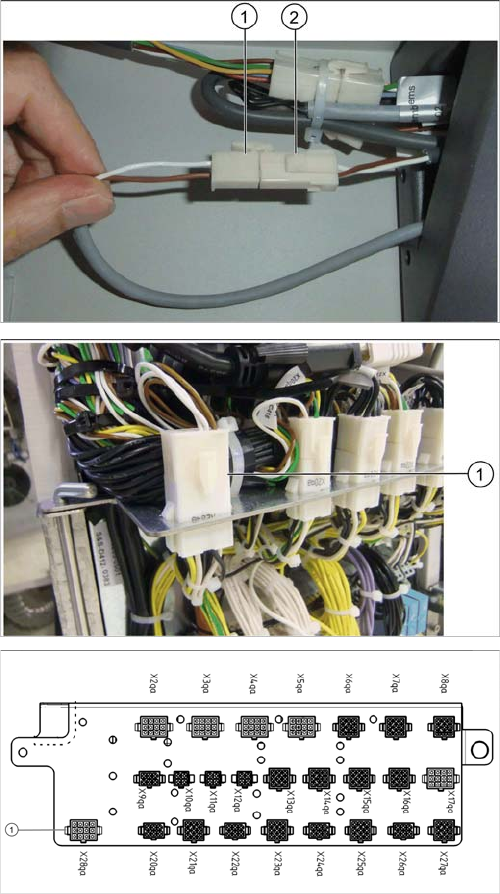
► Connect one Mini-Mate connector [00354616-xx]
each to the cable ends.
► Connect the two cables (1 and 2).
Ensure the correct polarity of the lines.
► Open the distributor door.
► Find the provided power supply cable [03106366-01].
► Connect the Mini-Mate connector [03002124-xx ] to
cable [03106366-01]. Connect the cable to connector
X28qa (1).
► Close the distributor door.
Installation
Final Work
Inner Illumination Innenraumbeleuchtung 39
3.3
3.3 Final Work
Final Work
► Switch on the machine
► Move the component trolley into the machine.
► Close the cover.
Activating/Deactivating the light bar
The light bar is switched on and off via the station software. You can choose between two options: having
the light bar always switched on as long as the machine is not in production mode or switching the light
bar explicitly on when work has to be carried out in the machine.
For both options, proceed as follows:
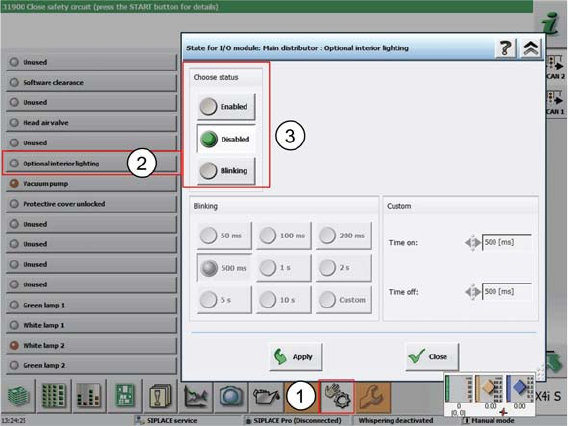
► In the stations software, select Manual operations (1).
► Select the individual function Optional interior lighting (2).
⇨ The dialog box for activating and deactivating the interior lighting (3) opens.
► In the Choose status field, select Enabled to activate the interior lighting.
⇨ The interior lighting will be switched on as long as the machine is not in production mode.
- or -
► Select Disabled.
⇨ The interior lighting will not be switched on at all.
► Confirm with Apply.
► If the light bar does not function as expected, check the cable connections and make sure that the
wiring is correct.