GD450 说明书(中英文版) - 第47页
- 47 - Click “ ” ( start) button in the main interface of the softw are. According to the software instructions , it w ill enter production mode. T he int erface in the pix 3-18 w ill be displayed after the finish of the…
- 46 -
慢,待完全脱离后,基板可以快速下降。慢速分离有利于焊膏形成清晰边缘,对细间距的印
刷尤其重要。一般设定为 3mm/s,太快易破坏锡膏形状。
本机器允许设置范围为 0~20mm/s。
Demoulding speed: It is the speed after the printed base board separates from the
template. Before the solder paste separates from the template completely, the separation
speed need be slow. After completed separation, the base board can decline fast. Slow
separation speed is good for the clear edge formation of solder paste. It is very crucial for
the narrow space printing. Generally, the speed is set at 3mm/s. If the speed is too fast, the
shape of solder paste will be damaged.
The allowed scope of demouding speed is 0~20mm/s.
PCB
与模板的分离时间:即印刷后的基板以脱板速度离开模板所需要的时间。时间过长,
易在模板底面残留焊膏,时间过短,不利于焊膏的站立。一般控制在 1 秒左右。
Separation time for the PCB and template: It is the time for the printed base board
separates from template with stripper plate speed. Too much time, it is easy to remain the
solder paste on the bottom side of template. Too little time, it is not good for the standing of
solder paste. The speed is controlled at about 1 second in general.
本机器用脱模长度来控制此变量,一般设定为 0.5~2mm。本机器允许设置范围为 0~
10mm。
The printer control this variate by the demoulding length which is set at 0.5~2mm. The
allowed scope for this printer is 0~10mm.
3.3 试生产 Trial production
在以上准备工作做完以后,即可进行 PCB 板的试印刷。操作方法是:
Can do the trial printing of the PCB board after above preparations are finished. The
operation methods are as following:
1. 单击主工具栏中的[ ]按钮,出现图 3-18 界面,在该界面上勾选显示调节窗口,
然后点击[确定]按钮回到软件主界面。
Click the “ ”(production setting) button in the mail tool bar. The interface in the
Pix 3-18 will be displayed. Select “显示调节窗口” (display adjustment window) and
click “确定”(ok)button to come back to the main interface of the software.
2. 在软件主界面上点击[ ]按钮,接下来按软件提示操作进入生产模式,机器在完成
PCB 运输,定位,取像,Z 轴上升到印刷位置后,出现图 3-18 画面。
- 47 -
Click “ ” (start) button in the main interface of the software. According to the
software instructions, it will enter production mode. The interface in the pix 3-18 will
be displayed after the finish of the PCB transmission, positioning and image capture
and the Z axis lift up to the printing location.
3. 在 3-18 界面下,检查 PCB 是否和钢网紧贴,要求是 PCB 刚好挨着钢网,否则需调节
Z 轴高度,直到满足要求。检查 PCB 焊盘是否和钢网网孔重合,如不重合,则需要调
整平台 X、Y1、Y2,直到重合为止。
Check whether the PCB is against stencil in the interface of pix 3-18. The PCB need
be against stencil. Otherwise operator need adjust the height of Z axis until the PCB
is against stencil. Check whether PCB bonding pad and stencil hole is overlapped. If
not, please adjust the X,Y1,Y2 of platform until PCB bonding pad and stencil hole is
overlapped.
在图 3-18 界面下安装刮刀,
注意:
刮刀片安装前应检查其刀口是否平直,有无缺损。
Assemble the scraper in the interface of pix 3-13. Please check whether the blade is
even, straight and damaged before assembling the scraper blade.
4. 以上工作完成后点击[确定]按钮,完成第一块 PCB 的印刷。
Click “确定”(ok) button after above preparation are finished. Then the printing of the
first PCB are finished.
5. 如印刷结果不符合质量要求,应重新进行参数设置或在主界面上点击[ ]按钮进入
图 3-19 界面输入平台及印刷误差补偿值,直到印刷结果满足质量要求,方可正式开始
生产。
If the printing performance can not meet the quality requirement, operator need reset
the parameter or click “ ” (production setting) button to enter the interface of pix
3-19. Input the error compensation value of platform and printing in that interface
until printing performance can not meet the quality requirement and then can start
the production officially.
6. 锡膏印刷质量要求:
The quality requirement of solder paste printing.
本机器设定锡膏厚度在 0.1—0.3mm 之间、焊膏覆盖焊盘的面积在 75%以上即满足质
量要求。
The thickness of solder paste for this printer need be 0.1—0.3mm. There are
above 75% solder paste printed on the bonding pad.
- 48 -
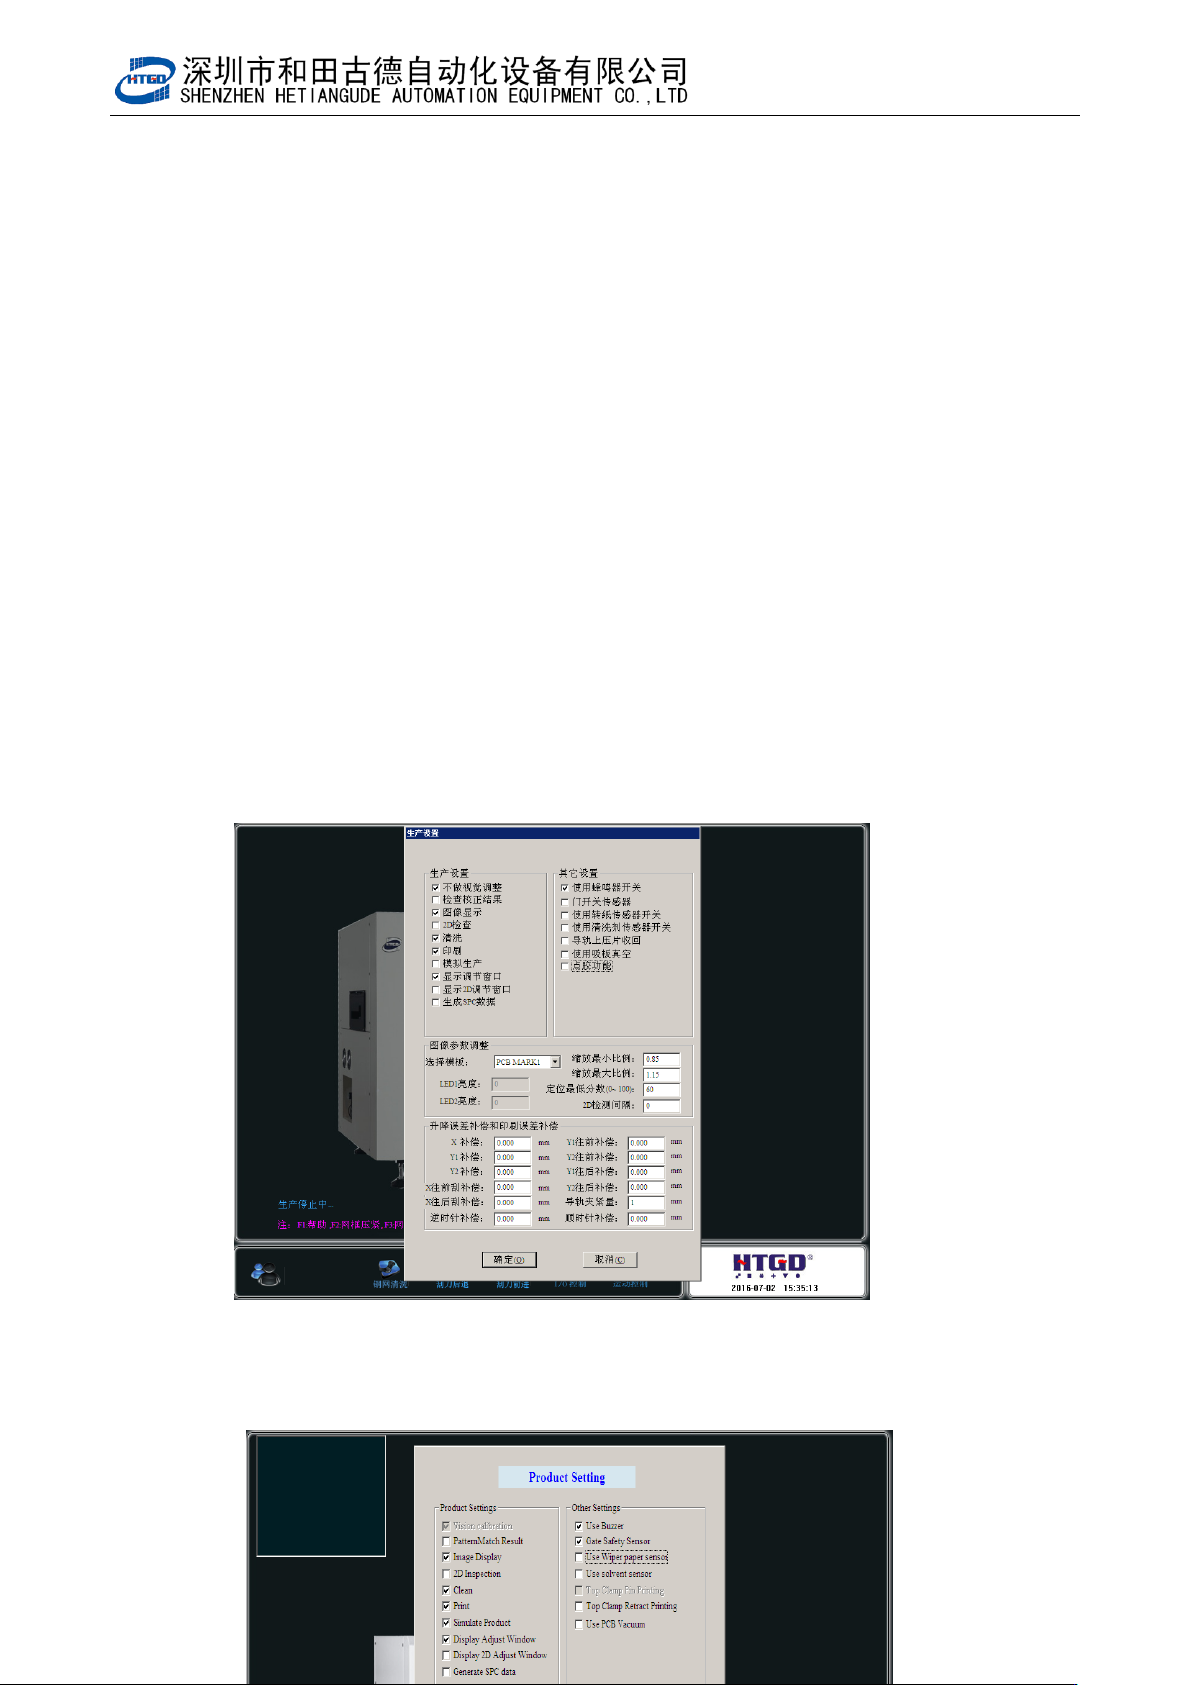
图 3-18(生产设置界面)