QP132三级参考手册.pdf.pdf - 第30页
1.2 Replacing MY -Axis Motor • Resolution : 0.005 mm 0.0025/pulse • Pulse per rotation : 2000 [4000] pulse • MY_reduce (deceleration distance) : 500 [1000] pulse Zero set sensor position: 17.5 mm (3500 [7000] pulse) from…

9. After completion of zero set, press the EMERGENCY STOP button to
turn OFF the 200V.
10. Loosen the coupling and push the MX-robot against the minus side
mechanical stopper.
11. Rotate the motor to the value -2000 [-4000] ± 200 [400] pulse.
12. Tighten the coupling. Coupling Torque: 3.33 Nm (0.34 kgf/m)
13. Push the MX-robot against the minus side mechanical stopper and check
the servo counter value. -2000 [-4000] ± 200 [400] pulse.
14. Move the robot to the value 2400 [4800] ± 200 [400] pulse.
15. Adjust the dog position so the zero set sensor turns ON at this position.
16. Press [SERVO ON] → START to Servo ON and zero set again.
17. After completion of zero set, press the EMERGENCY STOP button to
turn OFF the 200V.
18. Move the MX-robot to the position where zero set sensor turns on and
make sure the servo counter value is 2400 [4800] ± 200 [400] pulse.
Chapter 1 1.1 Replacing MX-Axis Motor
Edition 1.1 1-2 QP-132 Level 3 Tutorial
1.2 Replacing MY-Axis Motor
• Resolution : 0.005 mm 0.0025/pulse
• Pulse per rotation : 2000 [4000] pulse
• MY_reduce (deceleration distance) : 500 [1000] pulse
Zero set sensor position: 17.5 mm (3500 [7000] pulse) from minus
side mechanical stopper.
Zero set complete position: 10 mm (2000 [4000] pulse) from minus side
mechanical stopper.
Note: For machine ROM version 1.52 or above, use figures in brackets [ ].
1. Replace the motor and ensure that the coupling is tightened and
centered.
2. Hold down the axis change key [3] and [Reset] key then press [Power
On] to boot the machine in mechanical check mode.
3. Press the EMERGENCY STOP button to shutdown the 200V.
4. Push the MY-robot against the minus side mechanical stopper and check
the zero set sensor and dog.
5. Move the zero set dog to the front end of oval-shaped hole so the zero set
sensor turns ON away from the mechanical stopper.
6. Move the MY-robot to the center of the stroke.
7. Press [INCH] → [Next data] or [prev data] to select the MY-axis.
8. Press [SERVO ON] → START to Servo ON and zero set.
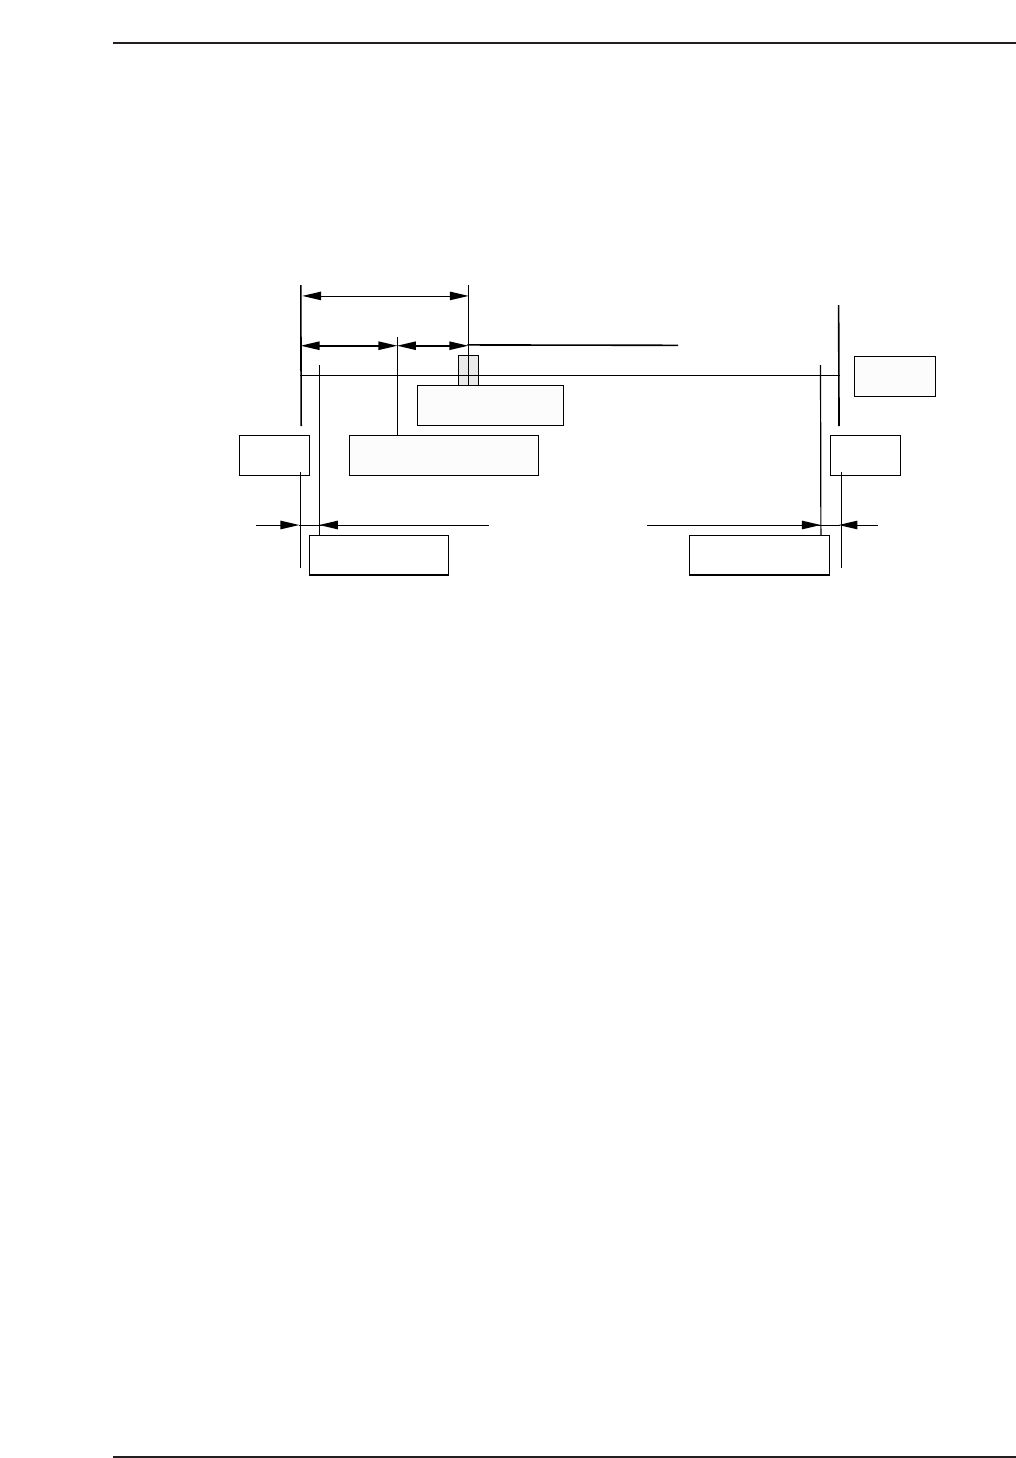
17.5 mm (3500 [7000] pulse)
0.75 mm (1500 [3000] pulse)
3.5 mm (700 [1400] pulse) 3.5 mm (700 [1400] pulse)
+MS
Motor
Zero-set complete pos.
Zero-set sensor
-MS
Soft limit Soft limit
QP13221001
10 mm (2000 [4000] pulse)
Chapter 1 1.2 Replacing MY-Axis Motor
Edition 1.1 1-3 QP-132 Level 3 Tutorial

9. After completion of zero set, press the EMERGENCY STOP button to
turn OFF the 200V.
10. Loosen the coupling and manually push the MY-robot against the minus
side mechanical stopper.
11. Rotate the motor to the value at -2000 [-4000] ± 200 [400] pulse.
12. Tighten the coupling. Coupling Torque: 0.98 Nm (0.1 kgf/m)
13. Push the MY-robot against the minus side mechanical stopper and check
the servo counter value: -2000 [-4000] ± 200 [400] pulse.
14. Move the head to set the servo counter to 1500 [3000] ± 200 [400] pulse.
15. Adjust the dog position so the zero set sensor turns ON at this position.
16. Press [SERVO ON] → START to Servo ON and zero set again.
17. After completion of zero set, press the EMERGENCY STOP button to
turn OFF the 200V.
18. Manually move the MY-robot to the position where the zero set sensor
turns on and make sure the servo counter value is 1500 [3000] ± 200 [400]
pulse.
Chapter 1 1.2 Replacing MY-Axis Motor
Edition 1.1 1-4 QP-132 Level 3 Tutorial