00195094-0202-MM-D3_EN.pdf - 第38页
8 2-monthly maintenance jobs SIPLACE D3 08/2008 US Edition 38 8 2-monthly maintenance jobs 8

SIPLACE D3 7 Monthly maintenance jobs
08/2008 US Edition
37
Clean the IC camera and FC camera 7
There is a risk of cutting the fingers alon
g the edges of the mirror. 7
Wear laboratory gloves to protect your hands and avoid touching the edges. 7
7
The laboratory gloves are also essential for effective cleaning (fingerprints). 7
7
a Carefully lift up the top part of the IC camera.
s Clean the sloping glass disk using a lens cloth.
7
: Insert the top part of the IC camera once more.
When you insert the top part of the IC ca
mera, make sure that it lies flat against the bottom part
and does not move.
7
d Remove the top part of the FC camera in the same way.
f Clean the sloping glass disk using a lens cloth.
7
: Insert the top part again.
7
Clean the coplanarity module (if present) 7
: Clean the lenses of the coplanarity mo
dule with a lens cloth.
7
7
: Switch the placement machine on at the main switch.
: With the nozzle changer:
Pick up
all the nozzles from the nozzle changer.
: Dock the com
ponent trolley into the machine.
8 2-monthly maintenance jobs SIPLACE D3
08/2008 US Edition
38
8 2-monthly maintenance jobs
8

SIPLACE D3 8 2-monthly maintenance jobs
08/2008 US Edition
39
8
You will need for the 2-monthly maintenance jobs: 8
– Vacuum cleaner with appropriate nozzle
– Condensate drip tray
– Short-bristled brush
– Phillips screwdriver
– Whetstone
– Scissors
– Lint-free cloths
– ISOFLEX TOPAS NCA52 grease
– UNISILKON L250L
– Interflon Teflon spray
–WD40
– New compressed air filter 3/4 µm, if required
– New filters, if required
– New silencer for the Collect&Place head, if required.
8
: Switch the placement machine off at the main switch.
8
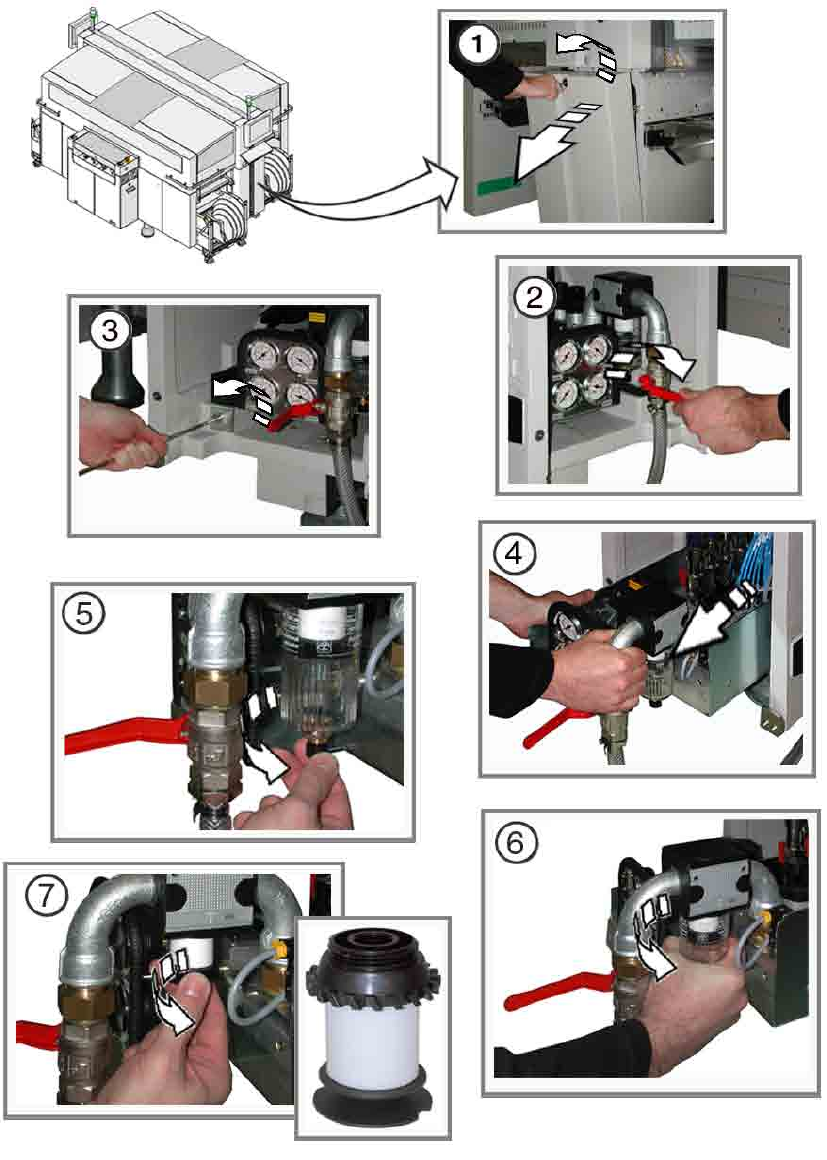
Check or replace the compressed air filter 8
a Use the machine key to open the door to the compressed air supply, detach the cable and re-
mov
e the door.
s Turn the main compressed air valve clockw
ise.
All manometers must be set to zero.
d Loosen the screw to the compressed air supply.
f Remove the compressed air supply.
: Place a drip tra
y
beneath the compressed air maintenance unit.
g Open the screw beneath the cover cap to release the pressure.
h Unscrew the cap from the compressed air maintenance unit.
8
Use an appropriate strap wrench, if you cannot remove the cap by hand. 8
8
j Unscrew the filter from the compressed air maintenance unit and check for dirt.
: Replace the filter if it is dirty.
: Revers
e the sequence described above to refit the filter and filter casing.