00195094-0202-MM-D3_EN.pdf - 第64页
10 Annual maintenance work SIPLACE D3 08/2008 US Edition 64 10 Annual maintenance work 10
SIPLACE D3 9 4-monthly maintenance jobs
08/2008 US Edition
63
a Carefully clean the Venturi nozzles using a lint-free cloth moistened with ethyl alcohol.
a Blow through the Venturi nozzles with compressed air.
a Clean the O-rings with a dry lint-free cloth (replace them, if required).
a Lightly grease the O-rings of the Venturi nozzles with UNISILKON L250L.
a Clean the vacuum generator block with a cottonwool bud moistened with ethyl alcohol and
blo
w through with compressed air.
a Place the cleaned
parts of the vacuum generator on a clean surface.
Silencer 9
: Lo
osen the screw on the silencer and remove the silencer.
s Clean the holes to the Venturi nozzles with a cottonwool bud moistened with ethyl alcohol.
: Check the sile
ncer for dirt.
If there are any signs of discoloration, replace the silencer and reverse the sequence described
above to fit.
Ass
emble the vacuum generator 9
: Asse
mble the block with the Venturi nozzles and carefully screw tight.
d Use the pliers to reattach th
e compressed air hoses.
: Fit the head cover.
: Reattach the nozzles.
9
Test placement 9
The distance between the component camera and the PCB camer
a can be changed by separating
the front and back parts of the head. 9
: Carry out a test placement run to test whether the placement
accuracy is still guaranteed.
: If the placement accuracy is not guaranteed, remeasure the segment offset 2.
9
Conveyor width adjustment 9
: If the PCB wid
th adjustment has not been moved over the last four months, we recommend
that you move the conveyor to the minimum and maximum widths, If you do not do this, you
may experience problems when you move the conveyor rails.
10 Annual maintenance work SIPLACE D3
08/2008 US Edition
64
10 Annual maintenance work
10

SIPLACE D3 10 Annual maintenance work
08/2008 US Edition
65
10
You will need for the annual maintenance jobs: 10
– Phillips screwdriver
– Set of hexagon socket spanners
– Lint-free cloths
– Ethyl alcohol
– SIPLACE cleaning tissue
– ISOFLEX TOPAS NCA52 grease
– Grease gun
– SIPLACE cleaning tissue
– Klüberplex BEM 34-132
– Grease nipple
– Cooling air hoses
– Gas spring(s) in protective cover, if required.
10
There must be no PCBs on the PCB conveyor for the following jobs. 10
: Open both protective covers on one side of the machin
e (locations 1+2 and 3+4).
10
Push the gantry carefully and gently using the handle on the head (not on the end buffers). 10
10
: Move the gantry over the feeder modules. This will stop it outside your working area.
10
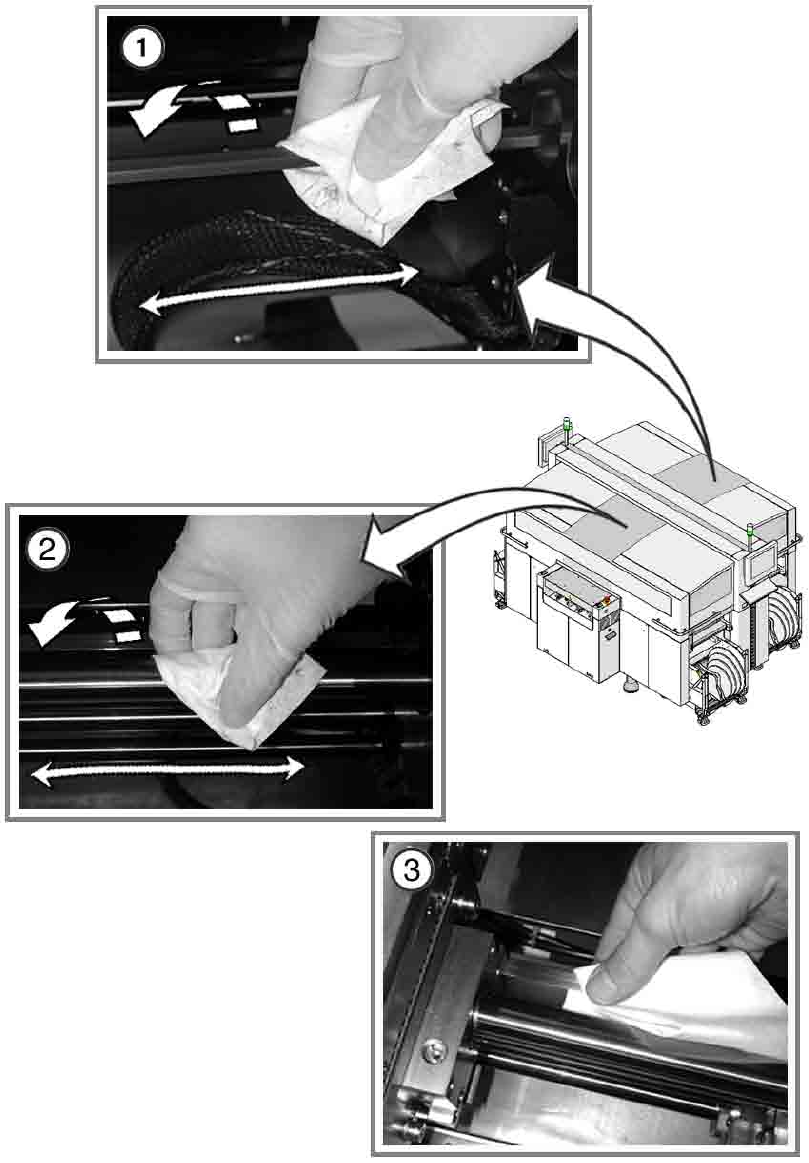
Clean and preserve the PCB conveyor 10
a Clean and preserve the recirculating ball screw by
running a SIPLACE cleaning tissue along
the thread of the screw.
s Clean and grease the sliding surfaces of the guide
rails using a SIPLACE cleaning tissue.
: Clean and preserve the hexagonal shafts using a SIPLACE cleaning tissue.
: Check that
the
entire PCB conveyor mechanism (conveyor, width adjustment, clamping unit)
moves easily.
Carry out the necessary maintenance if it does not move easily.
10
Clean the fixing strip (PCB conveyor) 10
d Clean the fixing strip of the width adjustment clam
ping unit using a lint-free cloth moistened
with ethyl alcohol.