YSM20R_YSM20WR_Mainte_E.pdf - 第180页
6-24 6 How to replace consumable parts n Example: Single-lane type 1 T urn off the air supply and power off the machine. 1. Exit the software and power off the machine. 2. Turn the “Air supply/exhaust” switch (valve) clo…

6-23
6
How to replace consumable parts
Transfer direction from right to left
Mark tube name
CV ST1
CV ST3
CV ST4
CV ST5
CLAMP1
CLAMP3
CV ST6
CV ST8
CV ST9
CV ST10
CLAMP2
CLAMP4
Description
Exit stopper 1
Main stopper 1
Sub stopper 1-2
Sub stopper 1-1
Lane 1 Clamp board (Large)
Lane 1 Clamp board (Small)
Exit stopper 2
Main stopper 2
Sub stopper 2-2
Sub stopper 2-1
Lane 2 Clamp board (Large)
Lane 2 Clamp board (Small)
Remarks
Used for 510 mm length type (option)
Used for 510 mm length type (option)
Used for 510 mm length type (option)
Used for 510 mm length type (option)
Valve position
Right
Right
Right
Right
Right
Right
Left
Left
Left
Left
Left
Left
Sub stopper 1-2
Sub stopper 1-1
Clamp 1Clamp 3
Main stopper 1
Exit stopper 1
Sub stopper 2-2
Sub stopper 2-1
Clamp 2Clamp 4
Main stopper 2
Exit stopper 2
Lane 2
Lane 1
Position of conveyor valve
YSM20WR Dual-lane type 2
53638-KMK-00
6-24
6
How to replace consumable parts
n
Example: Single-lane type
1
Turn off the air supply and power
off the machine.
1. Exit the software and power off the
machine.
2. Turn the “Air supply/exhaust” switch
(valve) clockwise (Exh) to turn off the air
supply.
2
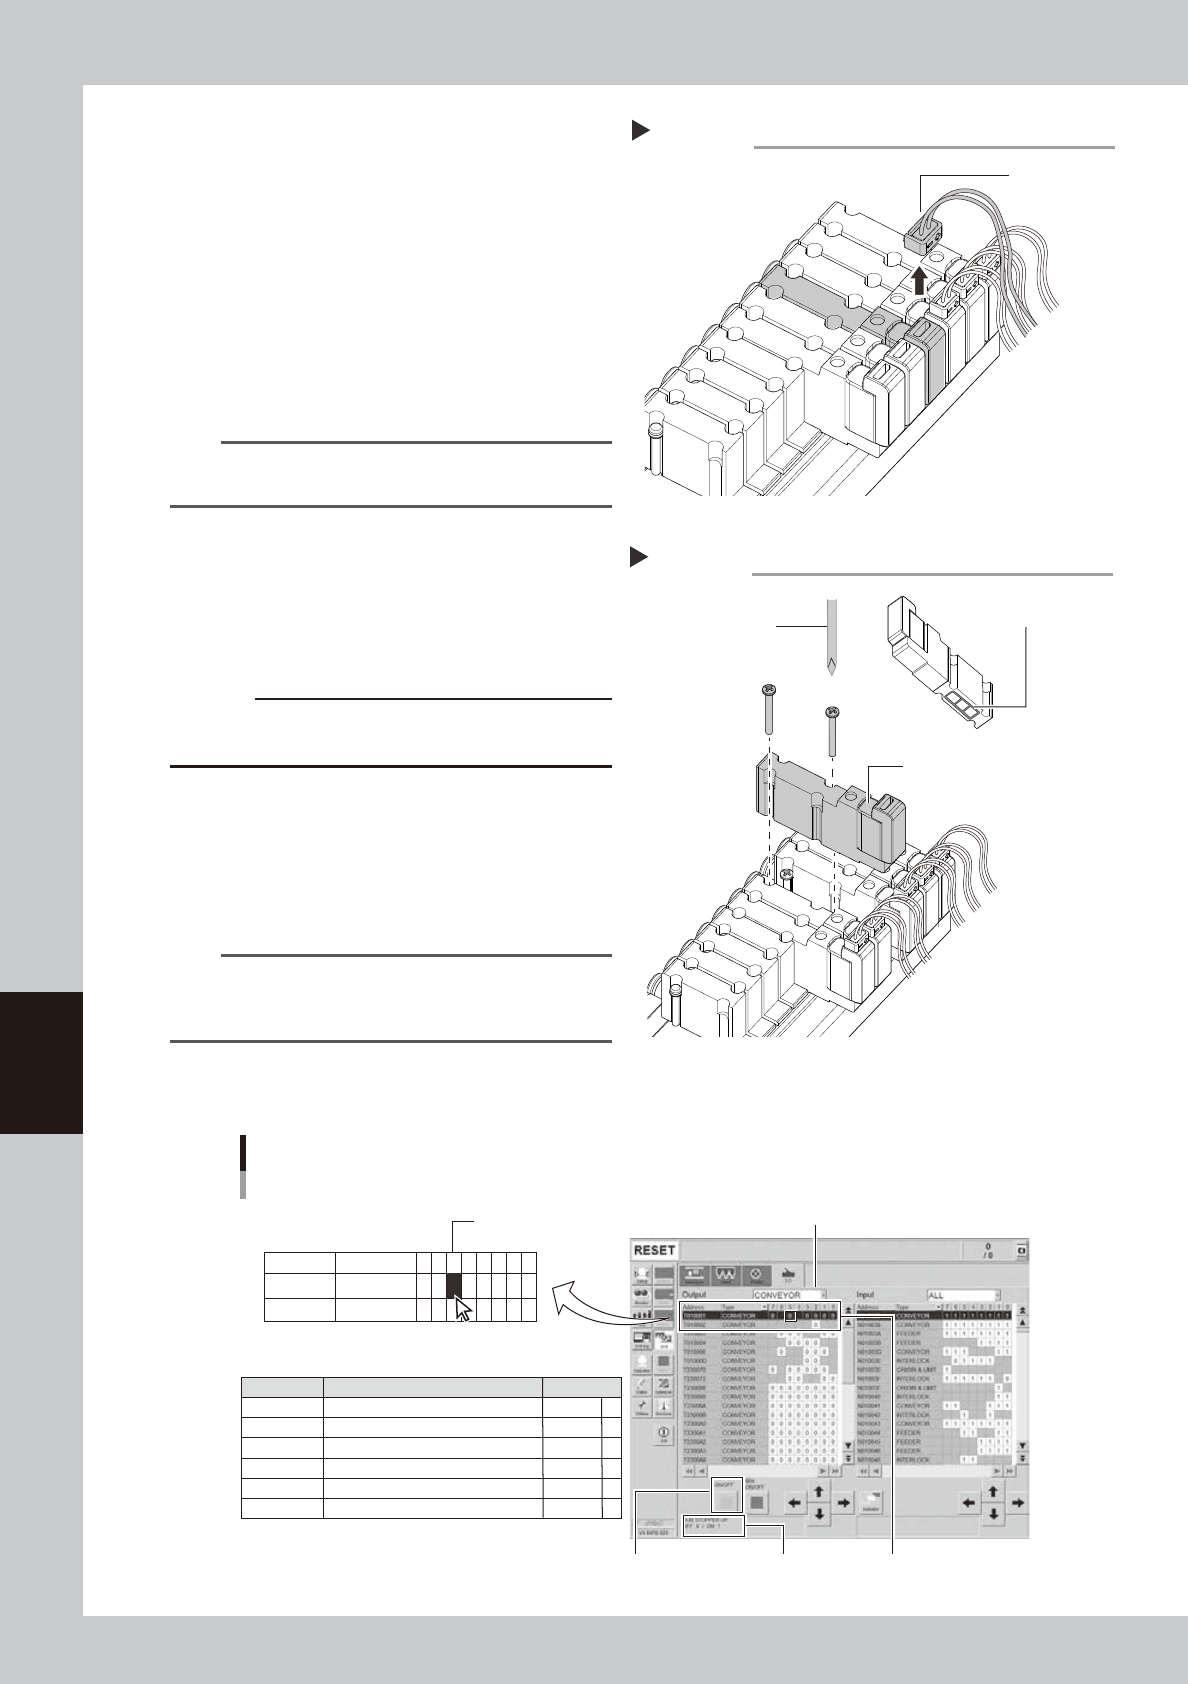
Disconnect the connector.
Disconnect the connector of relevant valve.
n
NOTE
See the mark tube for the connector wiring of relevant
valve.
3
Replace the valve.
1. Remove bolts (2 each) mounting relevant
valve with Phillips precision screwdriver.
2. Attach a new valve.
3. Connect the connector.
c
CAUTION
Packing is on rear of valve. Make sure not to drop or
pinch it when replacing the valve with new one.
4
Check the valve operation.
1. Turn on the supply air and power on the
machine.
2. Check the replaced valve operation on
[Unit] - [I/O] screen.
n
NOTE
The figure below is an example of transfer direction
from right to left. Check the actual address and
operate the valve after replacing it.
Checking conveyor valve operation
Single-lane type (Example: Transfer direction from right to left)
Select “CONVEYOR” from “Output”.
Select address.
7
6
5
3
2
1
Mark tube
Address Description
Sub stopper 1: L 510 mm (OP)
Sub stopper 2
Main stopper
Exit stopper
Clamp board (Small): L 510 mm (OP)
Clamp board (Large)
T010001
T010001
T010001
T010002
T010002
T010002
[ON/OFF] button Address description
Example: T010001-5
Address
T010001
T010002
Type
CONVEYOR
CONVEYOR
7 6 5 4 3 2 1 0
0
0
00
0 00
00 00
CV ST1
CV ST2
CV ST3
CV ST5
CLAMP1
CLAMP3
54604-KMK-00
Disconnecting valve connector
Step 2
Connector
53633-KMK-00
Replacing valve
Step 3
Phillips precision
screwdriver
Valve
Packing is on rear of valve.
Make sure not to drop it.
53634-KMK-00
6-25
6
How to replace consumable parts
5. Base
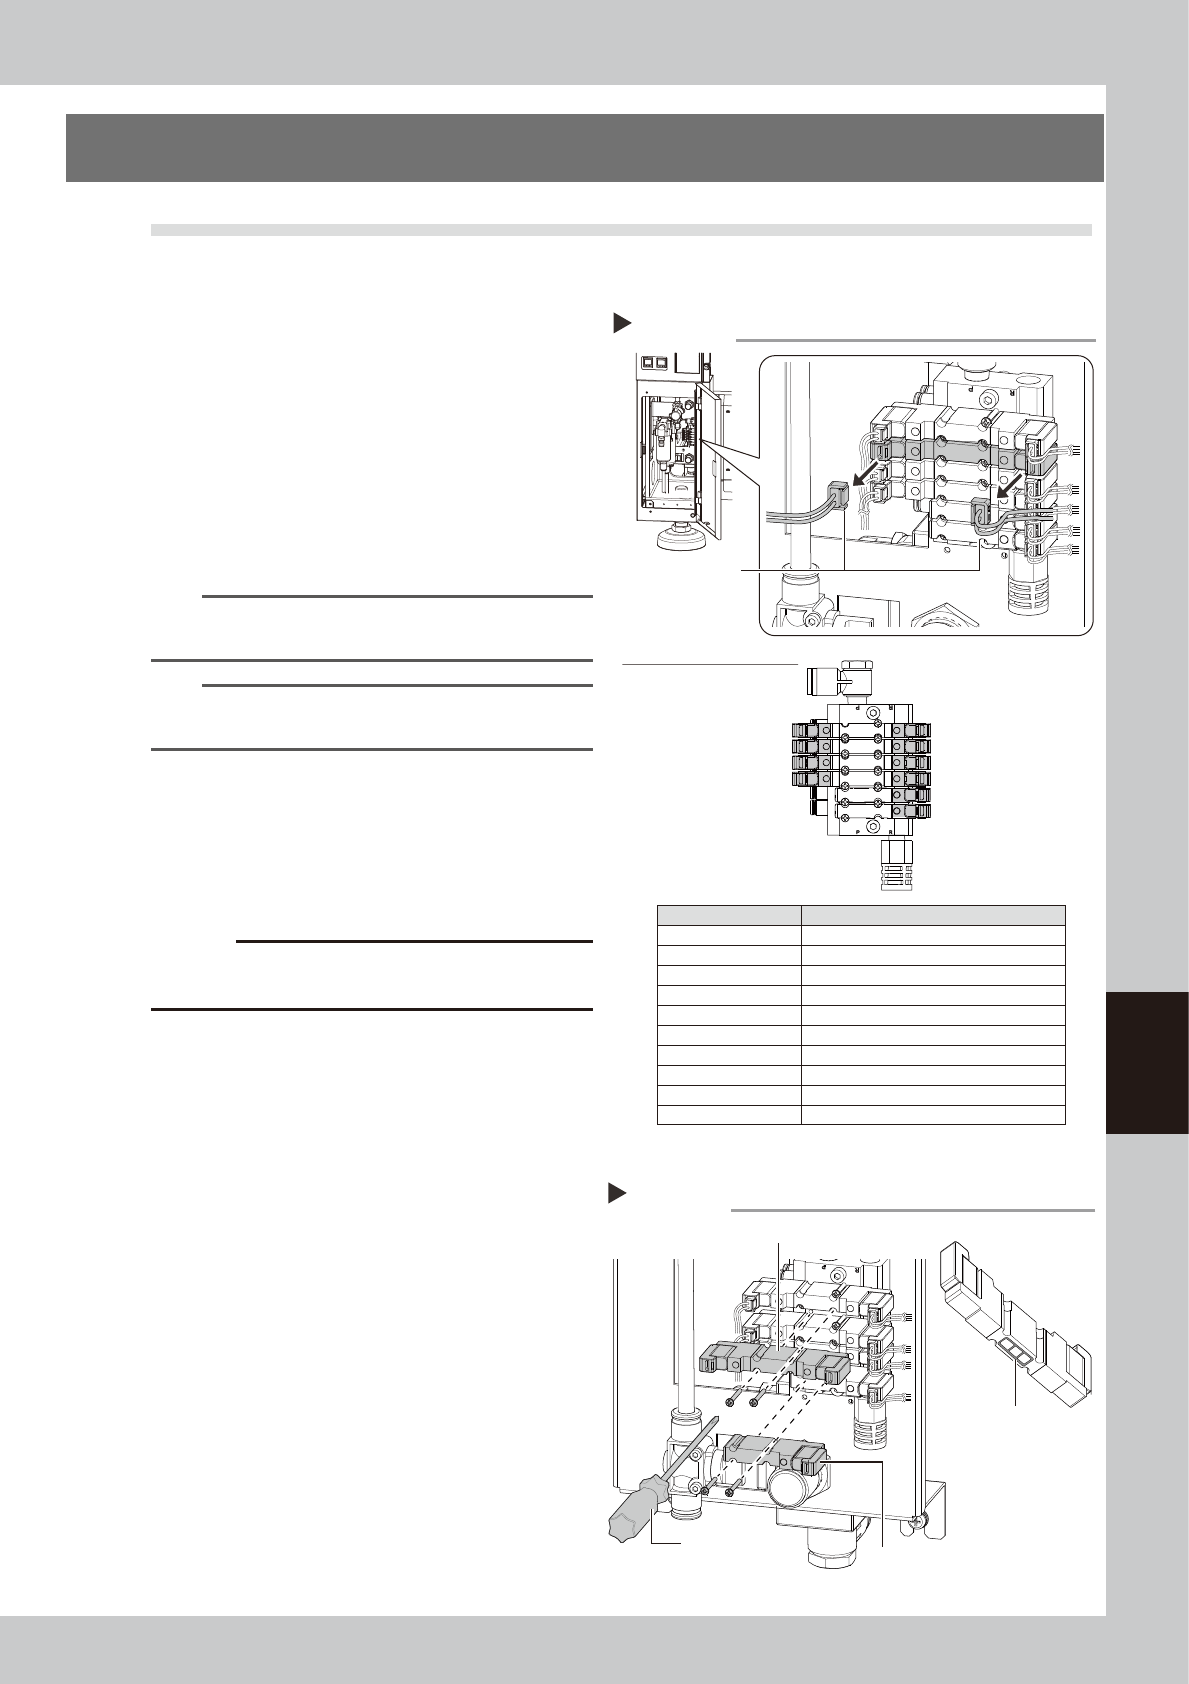
5.1 Replacing carriage clamp valve
The clamp valve for feeder exchange carriage locates on the bottom left of machine front. When the valve has
a problem, replace it with the following procedure.
1
Turn off the air supply and power
off the machine.
1. Exit the software and power off the
machine.
2. Turn the “Air supply/exhaust” switch
(valve) clockwise (EXH) to turn off the air
supply.
2
Disconnect the connector.
Disconnect the connector of relevant valve.
n
NOTE
See the figure on the right and mark tube of valve
connector for the relevant valve and the position.
TIP
The double solenoid valve controls the clamp/unclamp
of carriage.
3
Replace the valve.
1. Remove bolts (2 each) mounting relevant
valve with Phillips precision screwdriver.
2. Attach a new valve.
3. Connect the connector.
c
CAUTION
Packing is on rear of valve. Make sure not to drop or
pinch it when replacing the valve with new one.
Disconnecting valve connector
Step 2
Connector
Valve position and operation
F1 Down
F2 Down
R1 Down
R2 Down
Light UP1
Light UP2
F1 UP
F2 UP
R1 UP
R2 UP
F1 Down
F2 Down
R1 Down
R2 Down
Light UP1
Light UP2
F1 UP
F2 UP
R1 UP
R2 UP
Operation
Clamping carriage on front left
Clamping carriage on front right
Clamping carriage on rear right
Clamping carriage on rear left
Raising multi-camera side light on front
Raising multi-camera side light on rear
Unclamping carriage on front left
Unclamping carriage on front right
Unclamping carriage on rear right
Unclamping carriage on rear left
Mark tube
Replacing valve
Step 3
Phillips precision
screwdriver
Valve (single solenoid)
Valve (double solenoid)
Packing is on rear of valve.
Make sure not to drop it.
53629-KMK-00
53630-KMK-00