00192328-01.pdf - 第79页
SIPLACE S-25 HM 2 Retrofitt. Instruct. RV6-DLM1 Head & Nozzle Chang. RV6 Standa rd (Optionen) 02/01 Issue 2.8 SITEST: Loading Nozzle Changer RV6 Standard with Nozzles and Calibrating 77 Å O n the 6-s egment revolv er…
2 Retrofitt. Instruct. RV6-DLM1 Head & Nozzle Chang. RV6 Standard (Optionen) SIPLACE S-25 HM
2.8 SITEST: Loading Nozzle Changer RV6 Standard with Nozzles and Calibrating 02/01 Issue
76
6,7(67/RDGLQJ1R]]OH&KDQJHU596WDQGDUG
ZLWK1R]]OHVDQG&DOLEUDWLQJ
NOTE:
In SITEST V 502.01 the nozzles on the head and in the nozzle changer are now monitored, as is
the case with the station software.
For the nozzle changer MTC, proceed as described in "Retrofitting Instructions MTC on S-25"
(Item no. -> see Section 2.3.6).
5HTXLUHPHQWV
– The placement heads DLM1 (12-/6-segment) and the nozzle changers RV6 Standard must
be configured (see: Section 2.5).
– All placement heads and cameras must have been calibrated already (see: Section 2.7).
/RDGLQJZLWK1R]]OHV
Å
Starting from the SITEST main view, select
the ICON "Revolver heads" -> and
then "Revolver head 1" or "Revolver head 2" .
Å In the menu "Functions", click on the ICON "Nozzle changer head functions" .
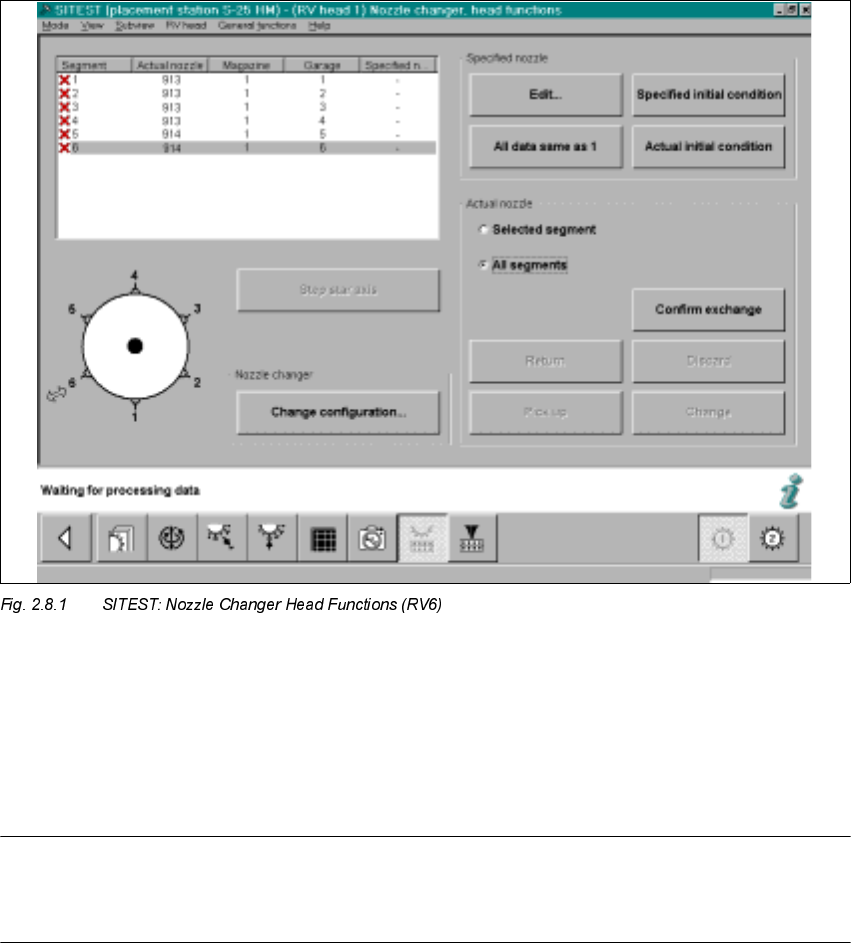
The following will appear on the screen:
SIPLACE S-25 HM 2 Retrofitt. Instruct. RV6-DLM1 Head & Nozzle Chang. RV6 Standard (Optionen)
02/01 Issue 2.8 SITEST: Loading Nozzle Changer RV6 Standard with Nozzles and Calibrating
77
Å On the 6-segment revolver head, insert one 900 series nozzle and one 800 series nozzle.
In the event that you also measure the nozzle changer RV12:
On the 12- segment revolver head it is only necessary to insert a random 900 series nozzle
on the head.
NOTE:
To measure the large nozzles (800 series) for the RV12-nozzle changer, there MUST be ONE
large nozzle on the head or in garage 1 of the magazine in question
2 Retrofitt. Instruct. RV6-DLM1 Head & Nozzle Chang. RV6 Standard (Optionen) SIPLACE S-25 HM
2.8 SITEST: Loading Nozzle Changer RV6 Standard with Nozzles and Calibrating 02/01 Issue
78
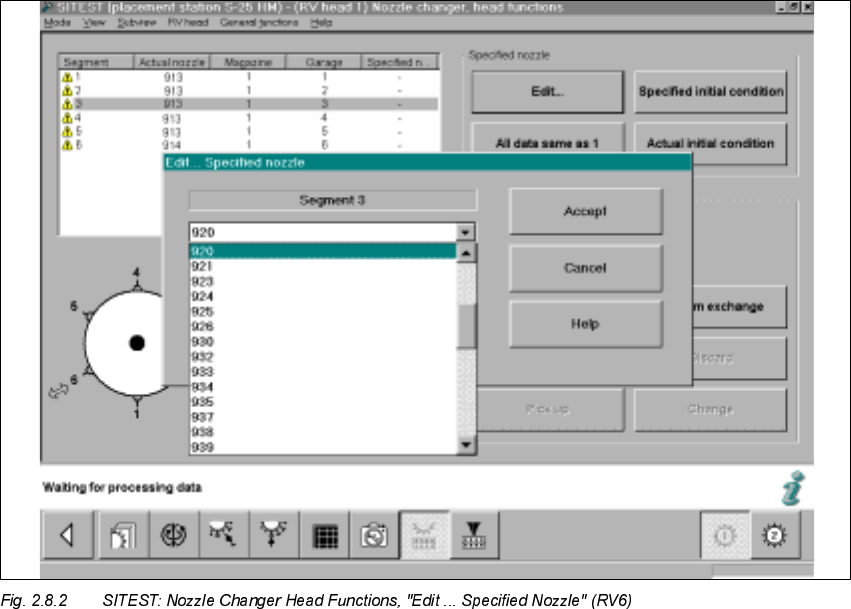
Å Double-click on the line in question as shown on the following screen or select "Edit" (button):
Å In the window that is opening, "Edit...", select the specified nozzle (e.g., type 920) that is con-
figured in the setup -> Select "Accept" (button).
Å Make this selection for each segment in succession.
Å In conclusion, select "Confirm exchange" (button).