00194798-01.pdf - 第17页
Installation Manual, Station Software Version 602.01 Edition 06/2006 4 Inst allation Manual 4.1 Inst allation procedure See sections 4.2.1 and 4.2.2 See sections 4.2.3 , 4.2.4 and 4.2.5 See sections 4.2.1 and 4.2.2 See s…
Installation Manual, Station Software Version 602.01 Edition 06/2006
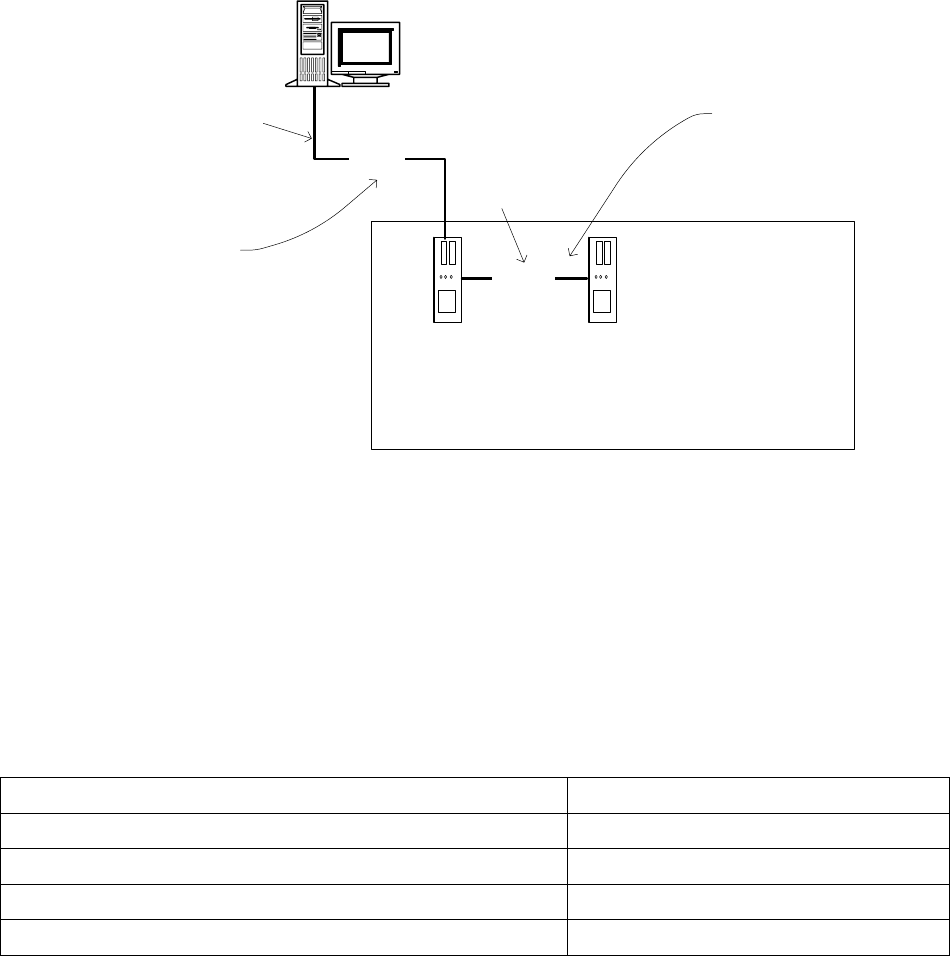
3.4 Network configuration
Station computer
Machine controller
10Base-T
100Base-T
Private network between
station computer and
machine controller
SIPLACE LAN
SIPLACE Pro
Twisted Pair TP
(100 MB)
Twisted Pair TP
(10 MB)
Fig. 3-3: Network connections between the machine and SIPLACE Pro
A separate private network (100 Mbit) is set up between the station computer and the machine controller
via a subnet mask.
Fixed IP addresses for the station computer and the machine controller can thus be assigned for all
SIPLACE machines. These IP addresses are not known outside the private network, for instance in the
SIPLACE LAN.
These IP addresses need not be further configured by the operator while the station software is being
installed.
IP address, station computer 192.168.255.249
IP address, machine controller 192.168.255.250
Subnet mask, station computer/machine controller 255.255.255.248
IP address range, SIPLACE LAN 172.22.xxx.xxx
Subnet mask, SIPLACE LAN 255.255.0.0
Table 3-6: Network configuration
16 of 60
Installation Manual, Station Software Version 602.01 Edition 06/2006
4 Installation Manual
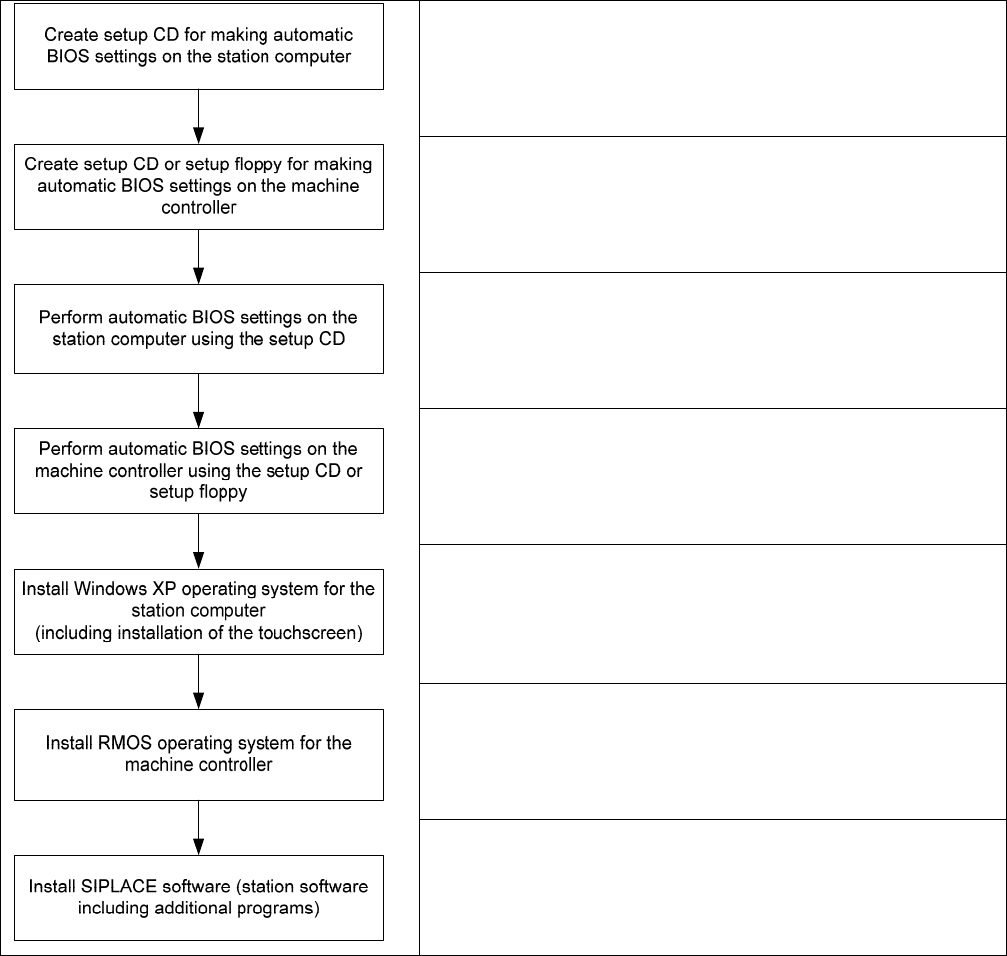
4.1 Installation procedure
See sections
4.2.1 and 4.2.2
See sections 4.2.3, 4.2.4 and 4.2.5
See sections
4.2.1 and 4.2.2
See sections
4.2.3 (for CPU076), 4.2.4 (for CPU086) and 4.2.5
(for CPU420)
See separate "Installation Manual for Windows XP";
For calibration of the touchscreen, see section
4.3.1.2 for the
X-Series and
4.3.1.3 for the D-Series
See sections
4.6.1 (for CPU076), 4.8.1 (for CPU086) and 4.9.1
(for CPU420)
See section
4.3
17 of 60
Installation Manual, Station Software Version 602.01 Edition 06/2006
18 of 60
4.2 Automatic BIOS settings at the station computer and the machine
controller
A setup CD must first be created to automatically make the BIOS settings on the station computer. In order
to make the BIOS settings on the machine controller, a floppy must be created for the machine controller
on the CPU076 and a CD must be created for the machine controller on the CPU086 or a CPU420
(Microbox). To do this, you need a Windows XP computer which has a CD drive, a CD-RW drive and a
floppy drive.
The image files required for creating the setup CD/floppy are in the "BIOS-Images" folder of the CD for
version 602.01 of the software.
4.2.1 Creating a setup CD for the CPU086 and making the BIOS settings on the station
computer
→ Insert an empty writable CD in the CD-RW drive on any computer equipped with a CD RW drive.
→ Insert the CD for version 602.01 of the software in the CD ROM drive.
→ In the Windows Explorer, open the "BIOS-Images" folder on the CD.
→ Open the image file "CPU086_SR_BIOS_Settings.iso" using the installed CD writing program and
follow the instructions on screen.
→ Once the CD has been written, remove the CDs from the drives.
→ Insert the CD you have created in the CD ROM drive of the station computer and boot from the CD by
switching the machine on. The BIOS settings are now performed automatically.
→ After the settings have been made, remove the CD from the drive and switch the machine off again.
4.2.2 Creating a setup CD for the CPU627 (BoxPC) and making the BIOS settings on
the station computer
→ Insert an empty writable CD in the CD-RW drive on any computer equipped with a CD RW drive.
→ Insert the CD for version 602.01 of the software in the CD ROM drive.
→ In the Windows Explorer, open the "BIOS-Images" folder on the CD.
→ Open the image file "CPU627_SR_BIOS_Settings.iso" using the installed CD writing program and
follow the instructions on screen.
→ Once the CD has been written, remove the CDs from the drives.
→ Insert the CD you have created in the CD ROM drive of the station computer and boot from the CD by
switching the machine on. The BIOS settings are now performed automatically.
→ After the settings have been made, remove the CD from the drive and switch the machine off again.