Horizon UserManualV6.pdf - 第139页
Comms Protocol Sets the communications protocol to be used for serial communications to a host computer, options are: GEM; Net_File; No Comms The menu bar changes depending on the option chosen, see the Host Communicatio…

Downline Protocol Sets the protocol for transferring boards to adjacent machines, options are:
No FMI; MIU; Manual
The default is specified by customers requirement.
Transfer Period Sets a programmable time period used by certain transfer protocols, options are:
Min 0 sec
Max99sec
Increments 1 sec
The default is 20 seconds.
Period of Transfer Time - This is the period of time which the machine allows for
a transfer of a board before displaying a ‘Board Transfer Error’ for upline or
downline.
Period of Waiting Time - This is the period of time which the machine allows
when waiting for the upline or downline machine to request a board for transfer
before displaying a message of ‘Waiting for Upline/Downline’.
Selective Print/Pass Sets whether the facility to selective print or pass through a board is to be used,
options are:
Enabled; Disabled
The default is Disabled
This feature is protected by Feature Licence Authenication.
When enabled the identity of the incoming board is checked using a separate
fiducial on the board only, called a Select Mark. If the identity of the board
matches the current product file the board is printed. If the board is different or
cannot be recognized, it is passed through without printing.
Paste Dispense
Position
Sets the position from which paste is dispensed, in relation to the screen image,
options are:
Front; Rear; Auto
The default is Auto.
When exiting set preferences after setting option to either Rear or Auto the
following window is displayed:
2.4 User Manual Software Version 6
SET PREFERENCES
PREFERENCES
Please confirm that there will be no obstruction
when your paste dispenser dispenses paste at the
rear of the image
Paste Dispense Position

Comms Protocol Sets the communications protocol to be used for serial communications to a host
computer, options are:
GEM; Net_File; No Comms
The menu bar changes depending on the option chosen, see the Host
Communications Chapter for further details.
Event Recording Sets which events are recorded in the event log file, options are:
Custom; Group 3; Group 2; Group 1
Over 200 possible events may be recorded.
On selecting Custom the following set up window opens:
The window displays how each event is logged in three possible ways; Disk,
Host and Grp.
Disk This column lists which events are logged to the disk file. The events set to ‘on’
are logged, those set to ‘off’ are not logged.
Software Version 6 User Manual 2.5
SET PREFERENCES
PREFERENCES
Event Report Setting: Disk Host Grp
System Power on
System Power down
Humidity
Temperature
Batch Count
Measured Cycle Time
Throughput Cycle Time
Front Print Pressure
Rear Print Pressure
Print Speed
Table Separation Speed
Stretch Error
X error
Y error
on
on
on
on
on
on
on
on
on
on
on
on
on
on
on
off
off
off
off
off
off
off
off
off
off
off
off
off
off
off
1
1
1
1
1
1
1
1
1
1
1
1
1
1
1
...more
WARNING
HOST COMMUNICATIONS. BE AWARE THAT IF THE MACHINE
SAFETY LOCKS ARE DEFEATED WHILST HOST
COMMUNICATIONS ARE ACTIVE, A DANGER EXISTS WHEREB
Y
MACHINE PARTS MAYMOVE UNEXPECTEDLY.
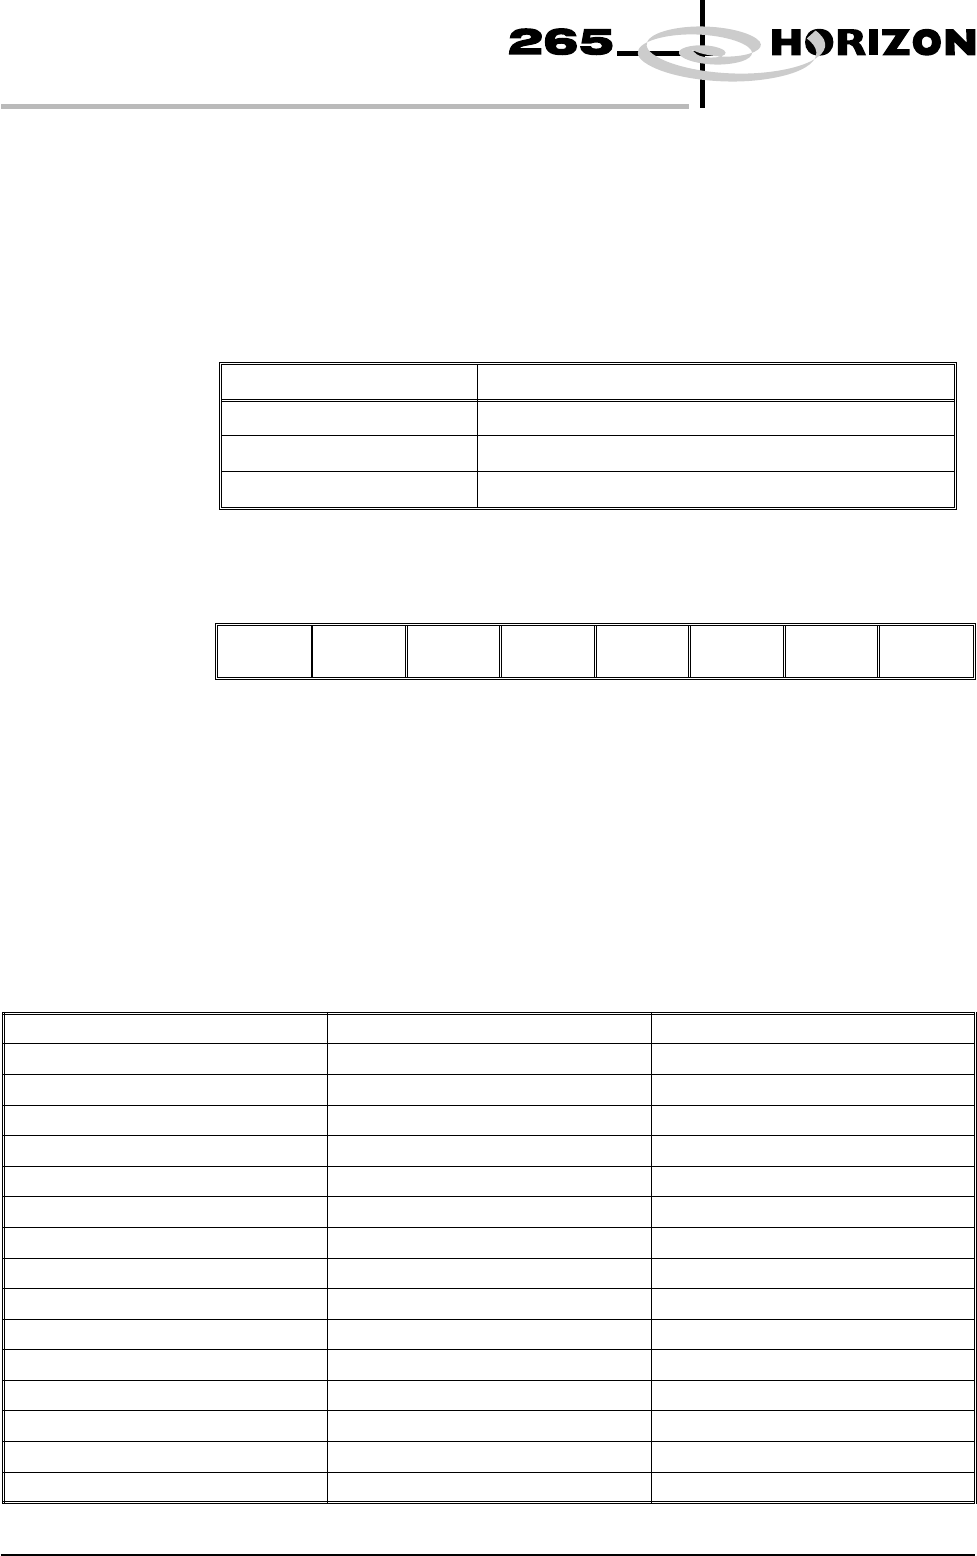
Host This column lists which events are sent to the host computer. The option is only
active if a GEM host comms interface is fitted. The events set to ‘on’ are logged,
those set to ‘off’ are not. How the host computer deals with the event logging,
depends on the host software and is not controlled by the machine.
Grp This column lists the group an event is assigned. The user can select which of the
groups are to be recorded, as follows:
Set Preference Selection Event Groups Recorded
Group 1 Groups 1, 2 and 3 (all events)
Group 2 Groups 2 and 3
Group 3 Group 3
Setting Up Events The Event Recording menu is laid out as follows:
Toggle Left Right Next Previous Incr. Decr. Exit
Use the Next and Previous keys to move to the event to be changed.
Use the Toggle key to toggle the Disk and Host parameters between on and off.
Use the Left and Right keys to move to the Disk, Host or Grp columns.
Use the Incr. and Decr. keys to change the value of the Grp parameter.
Use Exit to leave the Event Recording window.
Recordable Events The following tables show the events that can be selected for recording:
System Power On System Power Down Humidity
Temperature Batch Count Measured Cycle Time
Throughput Cycle Time Front Print Pressure Rear Print Presure
Table Separation Speed Stretch Error X Error
Y Error Theta Error Board Fid 1 Score
Board Fid 2 Score Board Fid 3 Score Screen Fid 1 Score
Screen Fid 2 Score Screen Fid 3 Score ProFlow System Pressure
Pneumatic Power Down Front Squeegee Error Rear Squeegee Error
Rising Table Error Print Carriage Error Paste Carriage Error
Camera X Axis Error Camera Y Axis Error Rail Width Error
Screen XF error Screen XR Error Screen Y Error
Paste Cartridge Tilt Error Screen Changer Drive Error Board Stop Stuck
Board Clamp Stuck Board Stuck In Rails Unable To Find Fiducial
Rail Lifted Error Pressure Error File Error
Unable To Recover Recovery Started Recovered
Upline Transfer Error Downline Transfer Error Dual Shuttle Fault
2.6 User Manual Software Version 6
SET PREFERENCES
PREFERENCES