00196062-03_SM_LDU-X_EN.pdf - 第70页
4 Service Work 4.4 Importing the LDU-X Firmware 70 Service Manual SIPLACE LDU-X Linear Dipping Unit 11/2017 CAUTION Old data will be deleted! When you import the download, the existing program in the LDU-X memory will be…

4 Service Work
4.4 Importing the LDU-X Firmware
Service Manual SIPLACE LDU-X Linear Dipping Unit 11/2017 69
Level sensor option
After fitting the level sensor, you need to determine the control position. This is the position at
which the tapered part of the tub is in the light beam. To do this, open the LEVEL SENSOR AD-
JUSTMENT function. The squeegee will automatically move forwards, until the position is found.
The value will then be saved.
Refill unit option
When the plunger is pushed upwards, the BERO CARTRIDGE sensor should change to "on".
When the belt drive is turned, the BERO DECODER sensor should alternate between "on" and
"off".
4.3.3 Setting the Zero Position of the Z Axis
► Fit the dip plate and the park plate. Make sure that the plates are positioned correctly.
► Set the key switch on the LDU-X to the position SERVICE.
► SYST SETTINGS
► TEACH Z POSITIONS
► Z TEACH ZERO POS
► Use the "+/-" buttons to set the zero position of the Z axis.
NOTICE
The zero position of the Z axis is set correctly when you can no longer feel the interface
between the park and dip plate with your finger.
► Press the ENTER button.
NOTICE
When you open the menu again, the value is reset to 0!
4.4 Importing the LDU-X Firmware
The following section describes how to transfer the LDU-X firmware to an LDU-X device. The firm-
ware is the LDU-X operating system.
NOTICE
This task should only be performed by SIPLACE service technicians.
Introduction
To import a new firmware version into the LDU-X, you need the following:
●
PC with Windows as operating system (2000, XP)
●
Software for the data transfer (download software)
WSD = Windows Serial Downloader
●
The new LDU-X firmware (hex file)
●
Cable for data transfer (service cable)
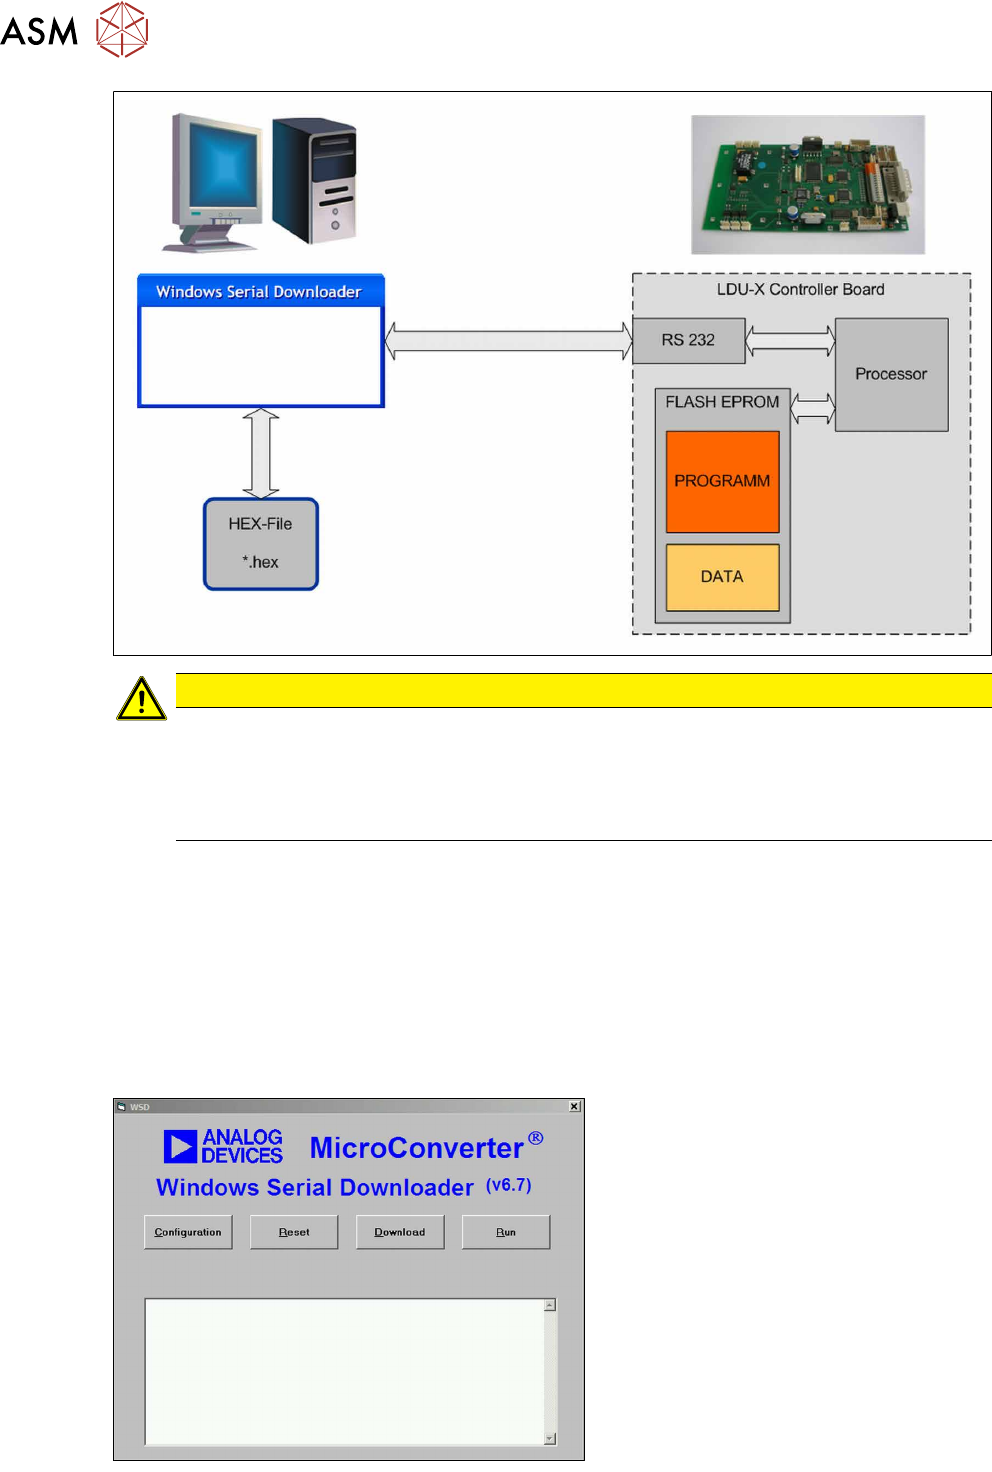
The download software is installed on a suitable PC and started. The LDU-X firmware is also saved
on this PC. The PC is connected to the LDU-X control board via a cable. The download software
sends the new LDU-X firmware via the serial port of the PC to the LDU-X processor, where it is
saved. The LDU-X memory is divided into a part needed for the program (running, displaying, lan-
guages etc.) and a part needed for the application data (speeds, end positions etc.).
4 Service Work
4.4 Importing the LDU-X Firmware
70 Service Manual SIPLACE LDU-X Linear Dipping Unit 11/2017
CAUTION
Old data will be deleted!
When you import the download, the existing program in the LDU-X memory will be overwrit-
ten.
The stored settings (axis positions) will also be overwritten. These values will have to be re-
taught after the download.
Where to get the download software
●
The download software can be found in the SIPLACE service download center.
●
Alternatively, you can find this download software on the internet, at www.analog.com.
ftp://ftp.analog.com/pub/www/technology/dataConverters/microconverter/wsd_v6_7.exe
Where to get the LDU-X firmware
●
The LDU-X firmware can be found in the SIPLACE service download center.
Installation
► Copy the wsd_v6_7.exe file to your
PC.
► Install the program WSD on your PC,
by executing the wsd_v6_7.exe file.
Follow the installation instructions.
► Copy the LDU-X firmware to your PC.
The LDU-X firmware is in a HEX file,
marked with its version date
e.g.: LDU-X_10.12.2007.hex
► Start the download software WSD.
The adjacent menu will be shown.
4 Service Work
4.4 Importing the LDU-X Firmware
Service Manual SIPLACE LDU-X Linear Dipping Unit 11/2017 71
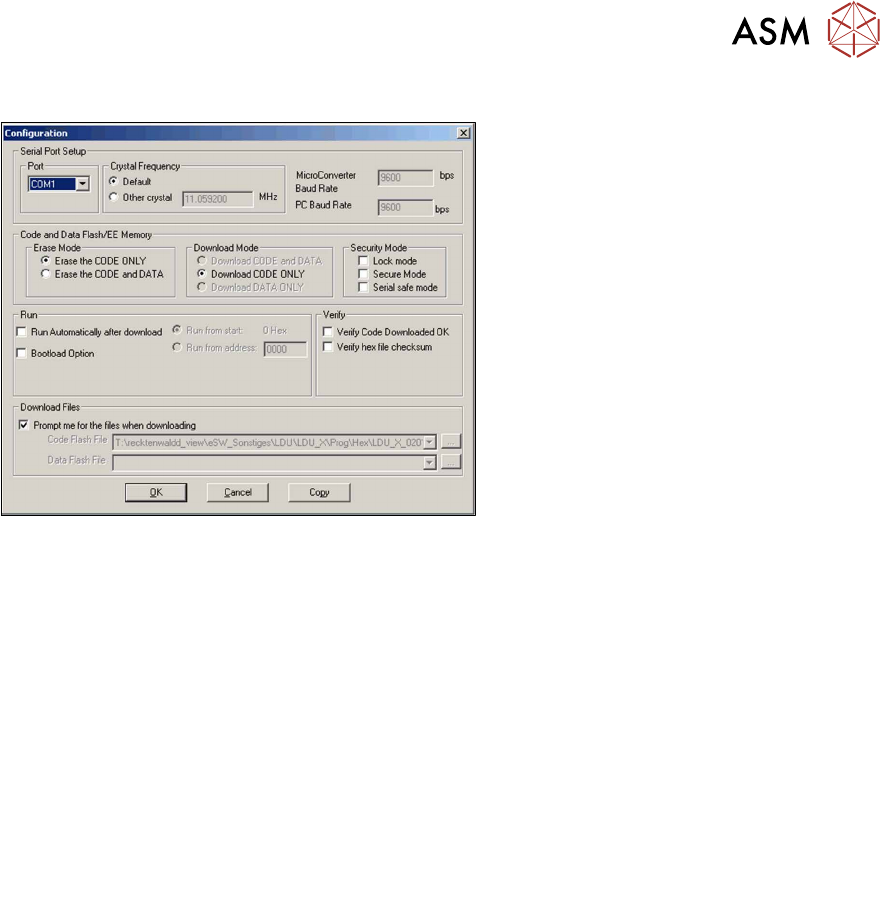
General settings
► In the WSD, click on the Configura-
tionbutton .
► The adjacent menu will be shown.
Set the following values as described below.
Port Com1
Crystal Frequency 11.059200 MHz
Micro Converter Baud
Rate
9600 bps
PC Baud Rate 9600 bps
Erase Mode Erase the CODE ONLY
Attention:
Select this setting, otherwise all user settings will be deleted.
Download Mode Download CODE ONLY
Security Mode none
Run Run from start
COM port setting
The COM port can be set in the configuration menu. This defines the serial connection to your PC,
which you want to use for transferring data to the LDU-X. If you want to use a different COM port,
select it from the list.
If your PC does not have a serial port, you can use a USB serial adapter. The number of the COM
port for the USB port is shown in the Windows devices manager.