M20_Ope_E - 第182页
Chapter 5 Libraries 5-32 5-1-2-7 Image Test Check that whether the created da ta is free from error or not. M6/M6ex/M6ez Action: Attach a component to a nozzle through Prearrange. ① In the Image Library edit window, ma…
Chapter 5 Libraries
5-31
⑨ When the process is successfully completed, [OK] is displayed in the Result box. Then the
message “Are you sure to overwrite?” appears. Press <Yes> button. When the process fails,
[NG] is displayed. In this case, follow the given message. See Chapter 15 MMI Messages.
⑩ Lastly, click <Image Test> button to execute image test. When the process is normally
completed, it proves the data is available for operation.
⑪ Click File>Save to register the data.
Note: On the M6/M6ex/M6ez, multiple-view process cannot be performed via the scan camera.
Note: When ADA is performed in multiple-view process, after the first sub-view is captured, select
[Multi View], “Subview2”, <Next> button to move on to the next sub-view. Repeat it for the
rest of sub-views. In ADA using multiple-view process, after executing ADA, the guide
window won’t be displayed. To display the guide window, click <Guide> button. While the
guide window is displayed, you cannot switch to other sub-view.

Chapter 5 Libraries
5-32
5-1-2-7 Image Test
Check that whether the created data is free from error or not.
M6/M6ex/M6ez
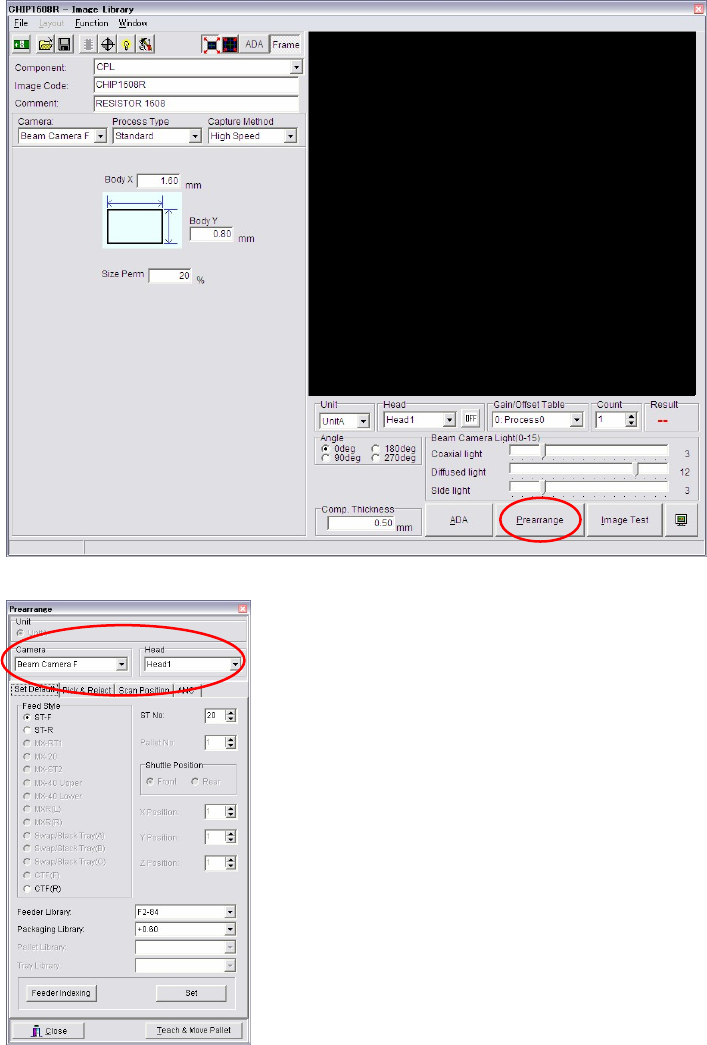
Action: Attach a component to a nozzle through Prearrange.
① In the Image Library edit window, make sure [Comp. Thickness] value is correct. If not,
type the proper value.
② Under [Head], select a head to use. Click <Image Test> to execute the image test.
1
When a
fixed camera is selected, the message “Are you sure to overwrite?” appears. Press <Yes>
button.
③ When the image test ends in success, [OK] is displayed in the Result box. If the image test
fails, [NG] is displayed. In this case, follow the displayed message.
④ Remove the component from the nozzle through Prearrange.
⑤ Click File>Save or button to register the data.
Note: When image test is performed in multiple-view process, after the first sub-view is captured,
select [Multi View], “Subview2”, <Next> button to move on to the next sub-view. Repeat it for
the rest of sub-views. In image test using multiple-view process, after executing ADA, the
guide window won’t be displayed. To display the guide window, click <Guide> button. While
the guide window is displayed, you cannot switch to other sub-view.
1
Image test can be performed twice or more continuously. Select the number of tests to be performed in the
Count box.
Chapter 5 Libraries
5-33
M7
Executing Image Test
Action: To execute Image test, select the Image data edit window.
① In the Image data edit window, type the image code, and comment. Select Camera, Unit
and Head.
② Make sure [Comp. Thickness] value is correct. If not, type the proper value.
③ Attach a component to a nozzle through Prearrange.
Note: Make sure Unit, Camera and Head are selected properly.