M20_Ope_E - 第186页
Chapter 5 Libraries 5-36 5-1-2-8 Zoom In the Image Test Display In the Image Library window, the displayed image can be zoomed in and out. Note: The captured image by Image Test or ADA is displayed enlarged initially as …
Chapter 5 Libraries
5-35
Window: (Display of the screen)
Expect Size: Component size typed in the Image Library edit window.
Actual Size: Actual measured component size
DX (Difference X): X offset from the center of the nozzle
DY (Difference Y): Y offset from the center of the nozzle
DA (Difference A): Component tilt towards the X/Y axis
Permission: Allowable value of the size typed in the Image Library edit
window.
Mark
Action:
① In the Fiducial/BadMark Data edit window, click <Image Test> button.
② When the image test ends in success, [OK] is displayed in the Result box. If the image test
fails, [NG] is displayed. In this case, follow the displayed message.
③ Save the data.
Window: (Display of the screen)
Accept: Match. threshold entered to the Image Library edit window.
Score: Score obtained in the fiducial matching process.
DX (Difference X): X offset from the fiducial coordinates.
DY (Difference Y): Y offset from the fiducial coordinates.
Mode: Bad mark color. 0: White, 1: Black
Bright: White/black threshold of the bad mark.
Measure: Measured brightness of the bad mark.
Chapter 5 Libraries
5-36
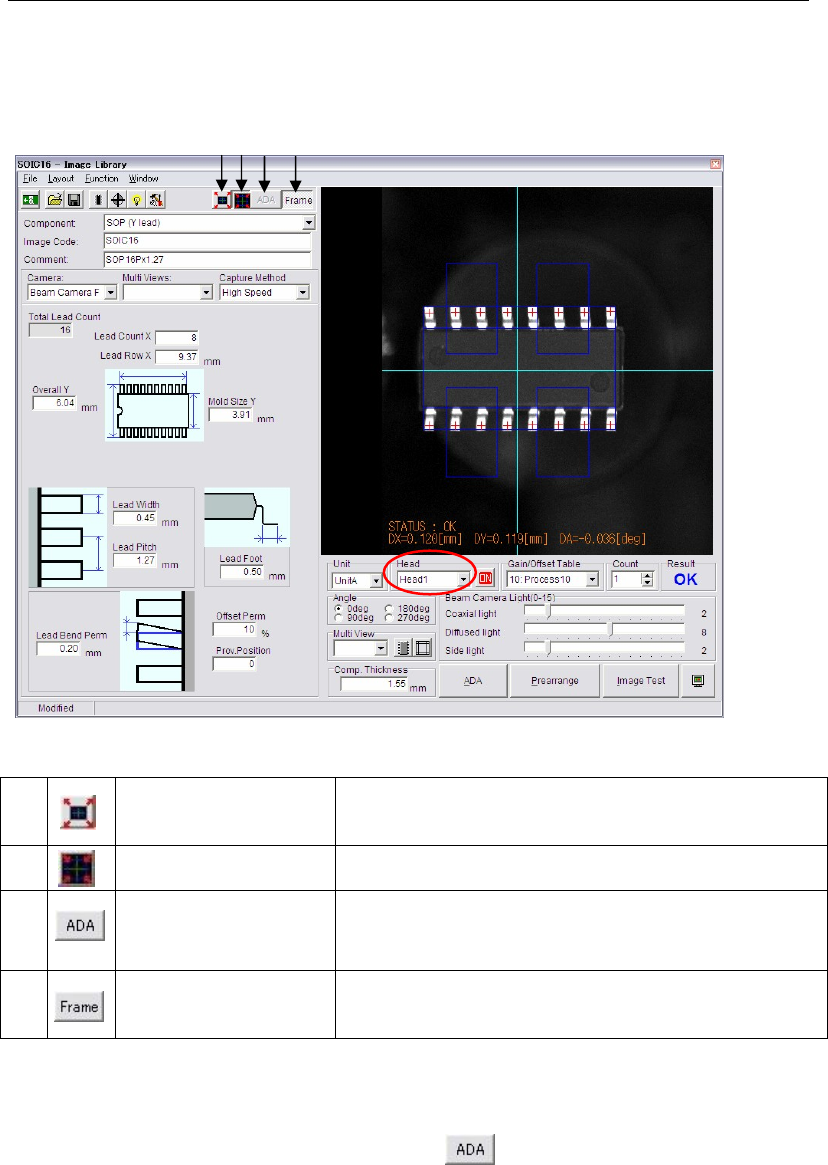
5-1-2-8 Zoom In the Image Test Display
In the Image Library window, the displayed image can be zoomed in and out.
Note: The captured image by Image Test or ADA is displayed enlarged initially as shown in the
figure below.
a)
<Full Screen Mode>
button
Shows all the images of the eight heads within the monitor.
(It can be four heads depends on the mounter
configuration.)
b)
<Head Zoom Mode>
button
Enlarges the image of the selected head.
c)
<Area Select ADA
Mode> button
Enables to specify the ADA range.
(This function is only available when used with the [Full
Screen Mode])
d)
<Frame> button
By selecting the <Frame> button, the component frame will
be able to appear with the image captured by Image Test.
This button is available for ADA too.
Addition to the <Full Screen Mode> and the <Head Zoom Mode> buttons, image size can be
changed by the following mouse operations.
z To enlarge and reduce the image, scroll the mouse wheel.
(When the <Area Select ADA Mode> button is selected, this operation is invalid.)
z To move the image in the monitor, drag the mouse.
Note: The <Full Screen Mode> button and the <Head Zoom Mode> buttons are available for ADA,
too.
a) b)
c) d)
Chapter 5 Libraries
5-37
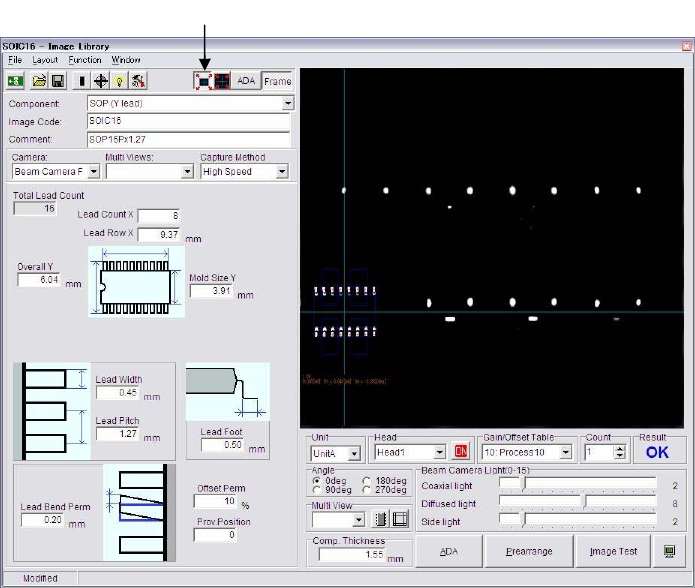
Click the <Full Screen Mode> button.
Note: When the <Full Screen Mode> button is clicked, all the eight heads can be displayed in the
monitor as shown below.
Note: In the mark Image Library window, the image can be zoomed in and out as well as in this
window.