M20_Ope_E - 第231页
Chapter 5 Libraries 5-81 Sometimes the fiducial may not be captured clearly at this location depending on the mark material or ambient lighting even under the best adjusted illumination. In this case, while in teach mode…
Chapter 5 Libraries
5-80
be made between the mark data registered to the image library and
the mark captured by the camera.
If “Center Search” is selected, fiducial marks can be processed by
specifying the model shape, even if the model is not acquired. For
this, the mark center is searched using the mark shape. This
algorithm simplifies operation since no model is registered.
Mark Code: To create new fiducial data, enter a desired code. To edit existing
data, click File>Open to select data. This code serves to link the
fiducial data and the placement & mark data.
* Up to 38 characters can be entered.
Comment: Any appropriate comment.
* Up to 40 characters can be entered.
Model Select “Actual Model” or “Template Model”.
The “Actual model” is registered actually captured by the teach
camera. On the contrary, “Template model” is created from the
selected mark shape and input sizes. “Template model” is
recommended to use for the fiducial pattern matching process
because;
① The “Template model” does not require model centering. An
accurate mark model can be created.
② Besides, illumination setting of ‘Template model” can be
adjusted by Image Test even after model registration to get a better
result of “Actual score”.
③ Only common mark shapes; circle, square, diamond, and triangle,
are available for ‘template model’.
④ Use “Actual model” for the rest of mark shapes.
Fiducial Shape: Used for the model centering function for model registration, or for
the center search process not using the model. Select the number of
the fiducial shape (not an alphabet) referring to the list box below
the image box and enter the number to the setting field.
(Double-click an item in the list box is also available to set the
number.)
Available shapes are as follows:
Circle:
Square: ■
Diamond:
Triangle: S
Cross:
Check:
Corner Square:
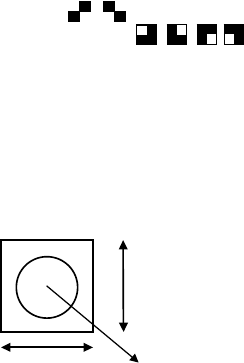
Mark X: Enter the actual length of the mark in horizontal direction.
* Increment : 0.01mm
Mark Y: Enter the actual length of the mark in vertical direction.
* Increment : 0.01mm
Mark X
Mark Y
Fiducial mark
Fiducial Model
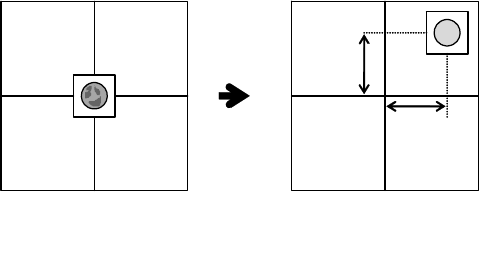
Distance X/Y: Usually fiducial process is performed at the programmed fiducial
coordinates (to which camera center is aligned).
Chapter 5 Libraries
5-81
Sometimes the fiducial may not be captured clearly at this location
depending on the mark material or ambient lighting even under the
best adjusted illumination. In this case, while in teach mode, try to
shift the camera 1mm in X and/or Y direction to where the image is
clearly seen.
* Increment : 0.01mm
Note: The field of view of the teach camera is as small as 5mm. Using the “Distance X/Y” function is
not so effective within such a small field of view. Therefore, do not use this function. Use the
standard center recognition whenever possible.
X offset
Y offset
Viewed at the center of the camera.
(Not clear image)
Viewed at slightly shifted position
(Clear image)
Action:
To avoid problems, follow the procedure below to use [Distance
X/Y].
①Open the Mark Image Editor, and perform “Model centering” to
move the camera center to the Fiducial mark center without
inputting any values for [Distance X/Y].
②Open the Program Edit screen, and acquire the camera position
where is just on the mark center to the Placement&Mark data. (If
you have CAD data of the mark position, input the values
unchanged. If you do not have CAD data, teach and acquire the
mark center with the teach camera.)
③Add [1.00](mm) to each of XY coordinates for mark center, and
modify the coordinates in Placement&Mark data.
④Open a teaching screen on the Placement&Mark data, and move
the camera to the coordinates specified at step③ using “Move”
command.
⑤Go back to the Mark Image Edit screen, and input [-1.00](mm) for
each of Distance X/Y.
⑥Perform “Model centering” command to move the camera center
to the mark center.
⑦Acquire Model when using Pattern Matching.
⑧Perform [Image test] to check, and save the data if OK.
NOTE: Depending on the condition of mark or neighboring pattern, adjust
the offset value accordingly within “+/-1.00”. However, be sure to
follow the same procedure above. If the amount of offset are
different between [Distance X/Y] and the addition of mark
coordinates, that may cause placement shift. (Their absolute values
should be same, but plus/minus orientation should be reversed.)
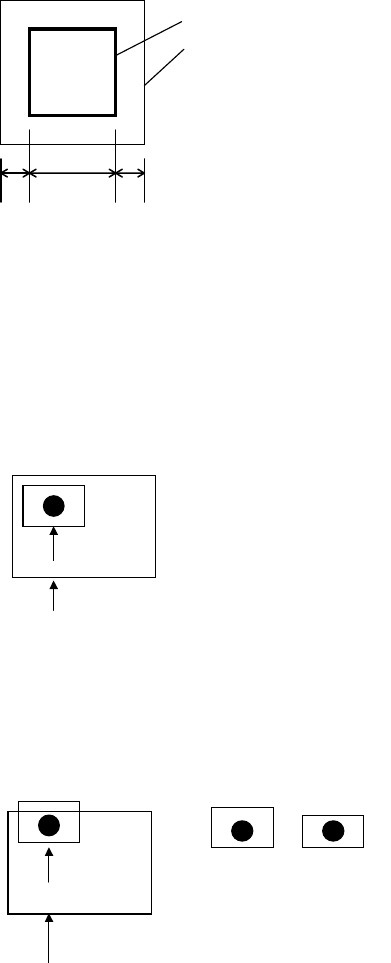
Search Area: Search area means the area within which fiducial search is
performed. The center of the search area corresponds to that of the
fiducial model.
Chapter 5 Libraries
5-82
BBA
A: Model X
B: Search area
Model
Search area
Define the Search Area setting based on the print offset or
expansion/contraction, or board positioning offset in clamping.
Normally about 1mm is adequate.
A fiducial can be in varying location relative to the programmed
coordinates for its purpose. Accordingly, you should suppose the
following case should occur:
Model
Search area
When the model is fitted over the fiducial,
it is contained within the search area.
OK
However, when the model fitted over the fiducial falls out the
search area, the fiducial cannot be detected.
The T
Model
Search area
The model fitted over the fiducial
falls out the search area.
Captured imageModel
In the above case, the model and the captured image do not fit
completely to result in process failure. To prevent this, define the
search area size large enough to cover the variation in fiducial
location.
* Increment : 0.01mm