M20_Ope_E - 第242页
Chapter 5 Libraries 5-92 Speed:: Set the Hook axis speed to pu ll out/return the pallet. The maximu m value is “1000” as 100% speed, and set your desired speed by the unit of 0.1%. If “0” is set, the value in th e Manual…
Chapter 5 Libraries
5-91
5-2-2 Pallet Library (Pallet Data)
Menu: Program>PalletData
Program>PickupData>Feeder/Pallet>PalletData
Maximum 500 records can be registered here.
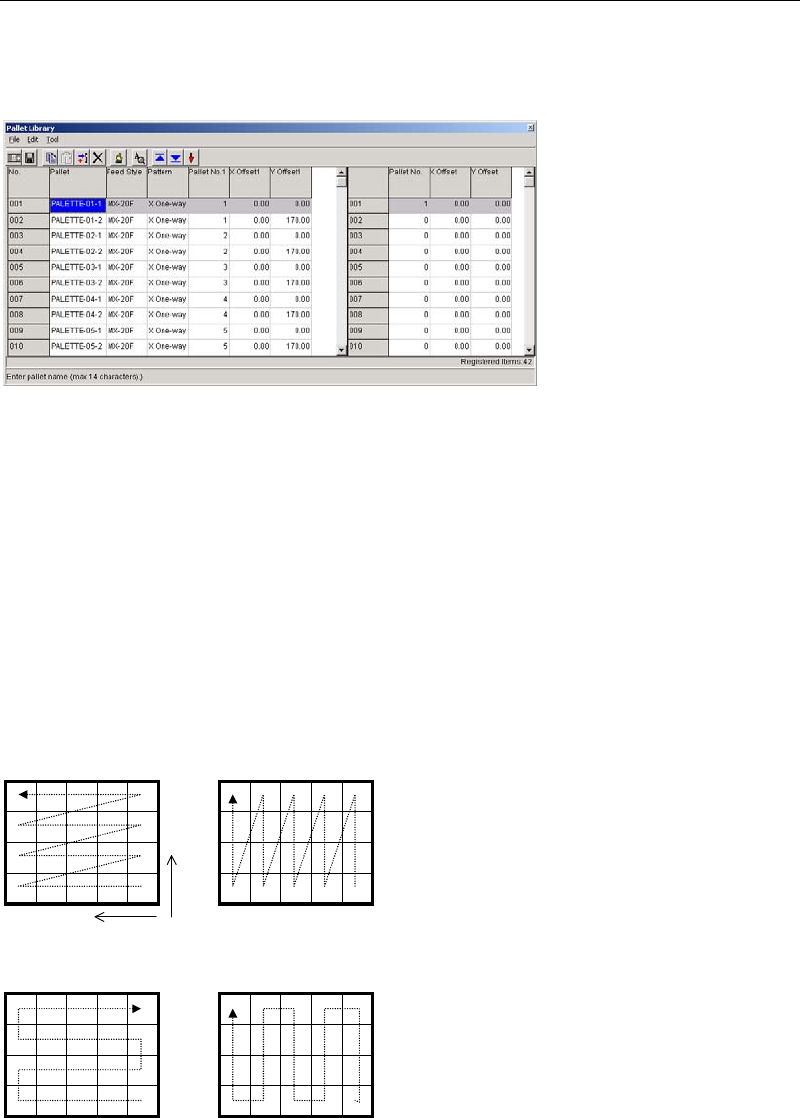
Window:
File>Save: Saves the edited data.
Tool>Teach: Accesses the Teach dialog box.
Pallet: Any pallet name is acceptable. This name represents a group of
linked pallets
1
. It serves to relate the pallet library and the pickup
data editor (program editor).
* Up to 14 characters can be entered.
Feed Style: Select from MX-RT1/MX-ST2/MX-20 / MXR(L)/MXR(R).
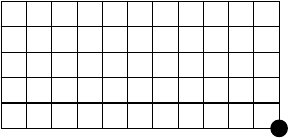
Pattern: Pickup pattern (see below).
Y Two-way X Two-way
Y One-way X One-way
Y
X
1
Pallet library data must be created even for a pallet with no link. In this case, use only the Pallet No.1, X Offset 1,
and Y Offset 1 fields.
A
link assignment for a pallet name is entered from
001 to 100 maximum in the right pane.
When clicking a pallet name in the left pane of
the window, the right pane changes accordingly.
Chapter 5 Libraries
5-92
Speed:: Set the Hook axis speed to pull out/return the pallet. The maximum
value is “1000” as 100% speed, and set your desired speed by the
unit of 0.1%.
If “0” is set, the value in the Manual>MX-20/MXR-20>Transfer
Speed is referred.
Pallet No.: Enter the pallet number in the order of linking.
When there is no link: “0” for the Pallet number2 or later fields
When [Feed Style] = MX-20/MXR(L)/MXR(R): “1-20”
When [Feed Style] = MX-RT1/MX-ST2: “1”
When double-click on the pallet number field in the right-window,
the pallet will be pulled out. When the number is 0, the pallet on the
shuttle will be returned in the stocker.
X/Y Offset: X/Y offsets from the reference coordinates. See the following
description:
Registering Reference Coordinates
z MX-RT1
The reference coordinates on MX-RT1 are pre-registered. Their X,Y correspond to the front
right corner of the tray when the tray is installed to the mounter. Their Z corresponds to the
pallet upper surface.
Reference coordinate (XY)
To re-define the reference coordinates, follow the below steps:
Action:
① Click Tool>Teach to open the Teach dialog box.
② In [Tray Teach] tab, under [Unit], select “MX-RT1”.
③ Teach the reference coordinates (XY).
④ Click <User Origin> button.
⑤ Make sure [X][Y] fields display “0”.
⑥ Attach a nozzle to a head. Under [Axis], select “Z axis”. Teach the upper surface of the
pallet.
⑦ Click <User Origin> button.
⑧ Make sure [Z] field displays “0”.
Chapter 5 Libraries
5-93
z MX-20/MX-ST2/MXR
The reference coordinates on MX-20/MXR/MX-ST2 are pre-registered. Their X,Y coordinates
correspond to the front right corner of the tray when the tray is positioned against the pallet’s
positioning blocks. (in use of a JEDEC tray, the front positioning blocks) Their Z corresponds to
the pallet upper surface. To re-define the reference coordinates, follow the below steps:
Front sto
p
p
oint
Rear sto
p
p
oint
Action:
① Click Tool>Teach to open the Teach dialog box.
② In [Tray Teach] tab, set [Unit], [Shuttle Position], [Pallet No.] appropriately. Set [Mode] to
<Out>. Click <Move Pallet> button so the specified pallet moves out.
③ Teach the reference coordinates (XY) .
④ Click <User Origin> button.
⑤ Make sure [X][Y] fields display “0”.
⑥ Attach a nozzle to a head. Under [Axis], select “Z axis”. Teach the upper surface of the
pallet.
⑦ Click <User Origin> button.
⑧ Make sure [Z] field displays “0”.
Note: To define reference coordinates one by one for each pallet, access Manual>MX-20/MXR for
entering offset values to each reference point.
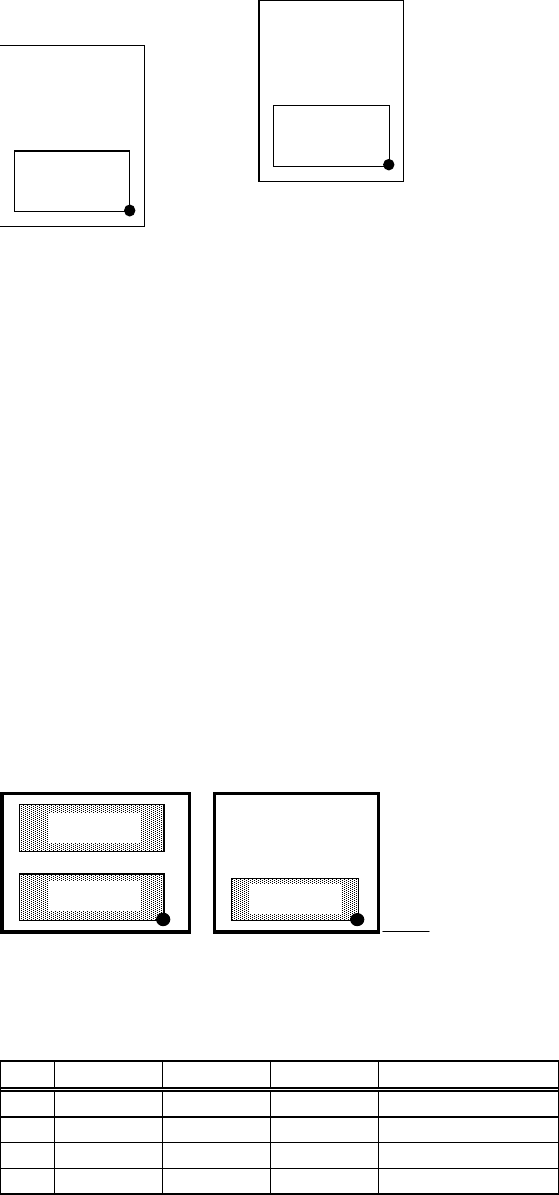
For any tray feeder, to use more than one tray on the same pallet, enter coordinate offsets of
each tray from the reference coordinates to [X Offset] and [Y Offset] fields of the pallet library.
Example: Create pallet library data for MX20 with which to link the pallet number 1, 4, and 5.
Pallet No. 4Pallet No. 1
Front stop point
Tray A
Tray B
Tray C
The setting for the pallet library (right half part) is shown below. Due to space limitation, each
setting field that is actually located side by side is vertically arranged.
Pallet No. X Offset
Y Offset
(Description)
#1 1 0 0 Tray A
#2 1 0 170 Tray B
#3 4 0 0 Tray C
#4 0 0 0 None