M20_Ope_E - 第314页
Chapter 10 Replenishing Com ponents and Using Maintenance Menus 10-10 10-3-2 Origin Performs zeroing of the axes position. This task is used when starting the system, when the emergency stop is executed, or when the serv…
Chapter 10 Replenishing Components and Using Maintenance Menus
10-9
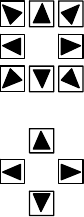
XY axes: The head moves horizontally in eight directions.
Z axis: The up and down arrow buttons are used. The head moves
up or down.
T axis: The right and left arrow buttons are used. With the right
arrow button, the head rotates counter-clockwise in the
downward looking perspective. With the left arrow button,
the head rotates clockwise.
Conveyor
Runs the specified conveyor. Under [Conveyor], select a conveyor and click <Move> button.
Then click <Run> button to run the conveyor.
Head Rotation
Rotates the T axis of the specified head. Select a head and enter rotation angle. Then click
<Rotate> button to rotate the head.

Chapter 10 Replenishing Components and Using Maintenance Menus
10-10
10-3-2 Origin
Performs zeroing of the axes position. This task is used when starting the system, when the
emergency stop is executed, or when the servo motors are turned off due to an error.
The Origin menu allows the specified axes to move. When executing this task, do not
stick head, hands, or other parts of the body inside the mounter. Serious injury can
result. Also make sure non-operators are at a safe distance from the machine.
Before zeroing the axes position, make sure no foreign obstacles are left in the mounter or tray
feeder. Otherwise, costly machine damage can occur.
Menu: Manual>Origin
Action:
For zeroing all axes
① Click <All Axes> button.
② “Execute zeroing axes position?” message appears. Click <OK> button to execute or <No>
button to cancel.
For zeroing an axis individually
① Select the axis that needs to be returned to its origin.
② Click <Execute> button.
③ “Execute zeroing axes position?” message appears. Click <OK> button to execute or <No>
button to cancel.
Note: The machine origin of the X,Y direction is located at the front right area of the mounter (the
rightmost area of the front feeder bank). The center of Head1 moves to this point in zeroing axes
position.
Note: The yellow indicator “- -“ next to each origin indicates that the axis has not returned to its origin.
The blue indicator “○“ indicates that the zeroing has been done.
Caution
Warning
* The number of heads, number of Z axes, and
number of θ axes differ depending on the mounter
model.
Chapter 10 Replenishing Components and Using Maintenance Menus
10-11
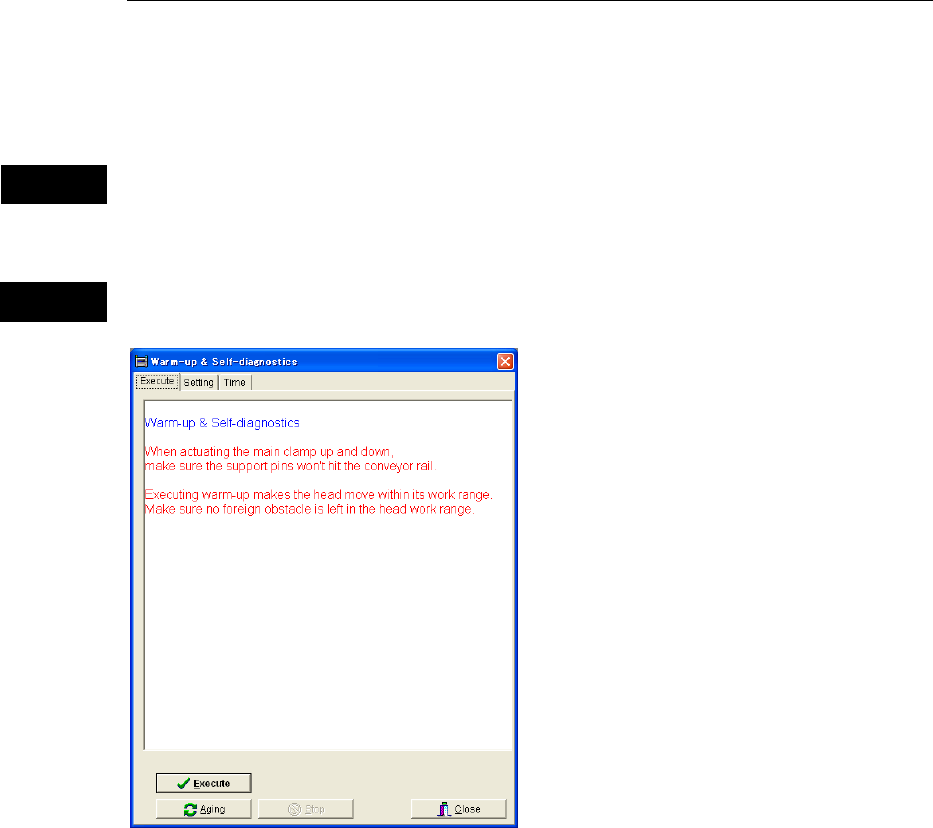
10-3-3 Warm Up
With this menu, the machine performs warm-up operation, while simultaneously self-checking
its performance. If an error is found in this process, an error message will be displayed. At a
system startup at which a specified interval has passed since the last warm-up, the system asks
you whether to execute warm-up. Irrespective of this interval, you can execute warm-up any
time you want by selecting this menu.
Warm-up operation allows the specified machine parts to move. When executing
warm-up operation, do not stick head, hands, or other parts of the body inside the
mounter. Serious injury can result. Also make sure non-operators are at a safe distance
from the machine.
Before starting warm-up, make sure no foreign obstacles are left in the mounter or tray feeder.
Otherwise, costly machine damage can occur.
Menu: Manual>Warm Up
Execute tab
Clicking <Execute> button executes warm-up operation for all the items specified in [Setting]
tab.
Clicking <Ageing> button executes warm-up operation repeatedly until <Stop> button is
clicked.
Note: Only items in the tabs (XY-axes, Conveyor, Head, and more) whose top check box is checked
will be warmed up.
Caution
Warning