M20_Ope_E - 第386页
Chapter 12 Management Data 12-10 ■ Whole (Total) Run Time: Job Eng Time - Job Start Time ( Total time in run mode) Actual Run Time: Run Time – Total Stop Time Total Stop Time: Error Stop Time + Pause in Component Lack Ti…
Chapter 12 Management Data
12-9
■Total
Used to display the total of accumulated performance records. The following two kinds of total
performance records are available: Total and User.
“Total Record” displays the total records accumulated from mounter shipment up to now.
(Cannot be reset)
“User Record” displays the total records accumulated from a reset made by the user up to now.
(Can be reset any time)
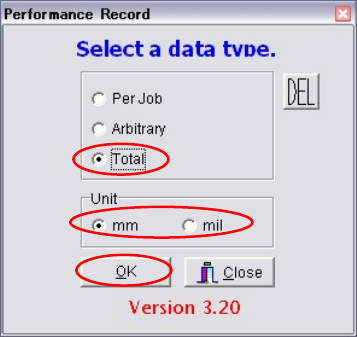
Action:
① Select Management > Performance Record.
② Select “Total”.
③ Select “mm” or “mil” for the unit.
④ Click <OK> button to display performance records.
⑤ Select Edit > Load, then select from “Total Record” or “User Record”.
⑥ If you want to output the records in text format, connect an USB memory to the USB port
of the machine and select File > Text Convert.
⑦ Select Removable Disk (G:) and click <OK> button.
⑧ A message “Convert to text data?” appears, so click <Yes>. The records will be output in
text format to the USB memory.
Chapter 12 Management Data
12-10
■Whole (Total)
Run Time: Job Eng Time - Job Start Time (Total time in run mode)
Actual Run Time: Run Time – Total Stop Time
Total Stop Time: Error Stop Time + Pause in Component Lack Time + Pause
Time + PCB Transfer Wait (for PCB arrival)
Error Stop Time
Pause in Component Lack Time
Pause Time
PCB Transfer, Wait (for PCB arrival)
PCB Time+Run Time
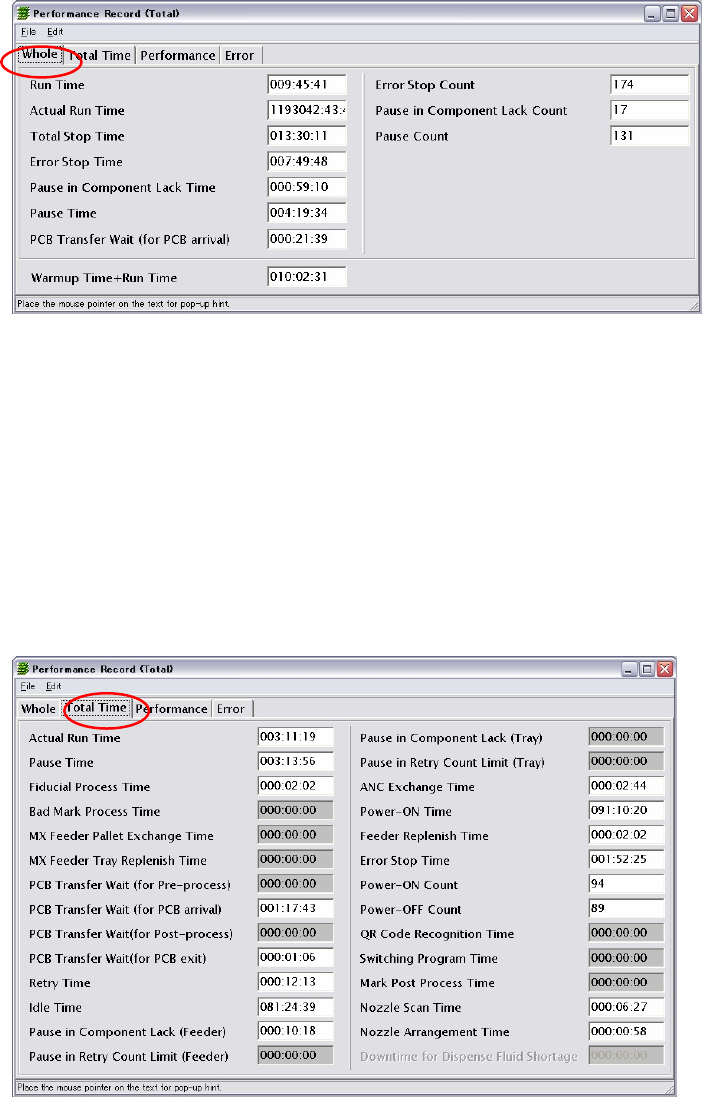
■Total Time (Total)
Refer ‘Total Time (Per Job)’ for more information of the items in this window. The followings
are the additional items in [Total Time (Total)].
Idle Time: Power-ON Time – Run Time
Power-ON Time: MMI operation time = MMI start to MMI end
Power-ON Count: Number of times MMI is started.
Power-OFF Count: Number of times MMI is exited.
■Performance (Total)
Same as “Per Job” and “Arbitrary”.
■Error (Total)
Same as “Per Job” and “Arbitrary”.

Chapter 12 Management Data
12-11
12-2 Log
Menu: Management>Log
The system records the events that occurred during the machine operation. Such a record is
called log and can be used for keeping track of when and what event occurred during the
machine operation.
To View the Log Data
Action:
① Click Management>Log. The Log dialog box appears.
② Click File>Open. The Open File dialog box appears. Select a file.
③ Click <OK> button. In a while, the file opens to display log data.
④ To output the log data as text data, connect an USB memory to the USB port of the
machine and click File>TextConvert.
⑤ The Browse for Folder dialog box appears. Select Removable Disk (G:) and click <OK>
button.
⑥ The confirmation message “Convert to text data?” appears. Click <Yes> button to save the
output text data to the USB memory.
Window: The following lists the items of the log data.
[Message Log] tab
Error No., Date, Contents, Task No., Library Error No., Unit, Issue of Control Message, Serial
No.
[Machine Log] tab
[Mounter] tab Date, Program Step, Offset, Component Code, Head, Nozzle No., Feed
Style, Unit #, Fiducial #, Vis-error Code, Vacuum Threshold, Status,
Place(prgm) (X,Y,Z,T), VISION Offset (after Camera tilt) (X,Y,Z,T), Actual
Place(finally determined)(X,Y,Z,T), Place Feedback (X,Y,Z,T), Pickup
(prgm) (X,Y,Z,T), Pickup Offset (X,Y,T), Pickup (X,Y,Z,T), Pickup
Feedback (X,Y,Z,T),Feeder ID, Feeder kind, Vision Offset (before Camera
tilt correction)(X,Y,Z,T), Corrected Place (with Fiducial correction)
(X,Y,Z,T), AMF Correction(X,Y,T), MAP Correction(X,Y,T), Control Mode
[Fiducial] tab Date, Program Step, Offset, Mark Code, Point Count, Fiducial #, Status
(1,2), Mark (X1,Y1,X2,Y2), Feedback (X1,Y1,X2,Y2), Mark Offset (after
Camera tilt correction)(X,Y,PCB Offset (T), Vis-error Code (1,2), PCB
Stretch, Mark Offset (before Camera tilt correction)(X,Y), MAP
Correction(X,Y),
[Message Count (Non-resettable)] tab
Shows how often each message has been issued. This data cannot be reset.
[Message Count (Resettable)] tab
Shows how often each message has been issued. This data can be reset by clicking
Edit>Initialize.