M20_Ope_E - 第47页
Chapter 2 Creating and Editing a Program 2-3 Defining a Custom Color: ① Click a color from the basic colors that is the closest to the desir ed color. ② Click <Define Custom Colors> button. ③ The window 2 appears. …
Chapter 2 Creating and Editing a Program
2-2
2-1 Customizing MMI Windows
2-1-1 Customizing the Font
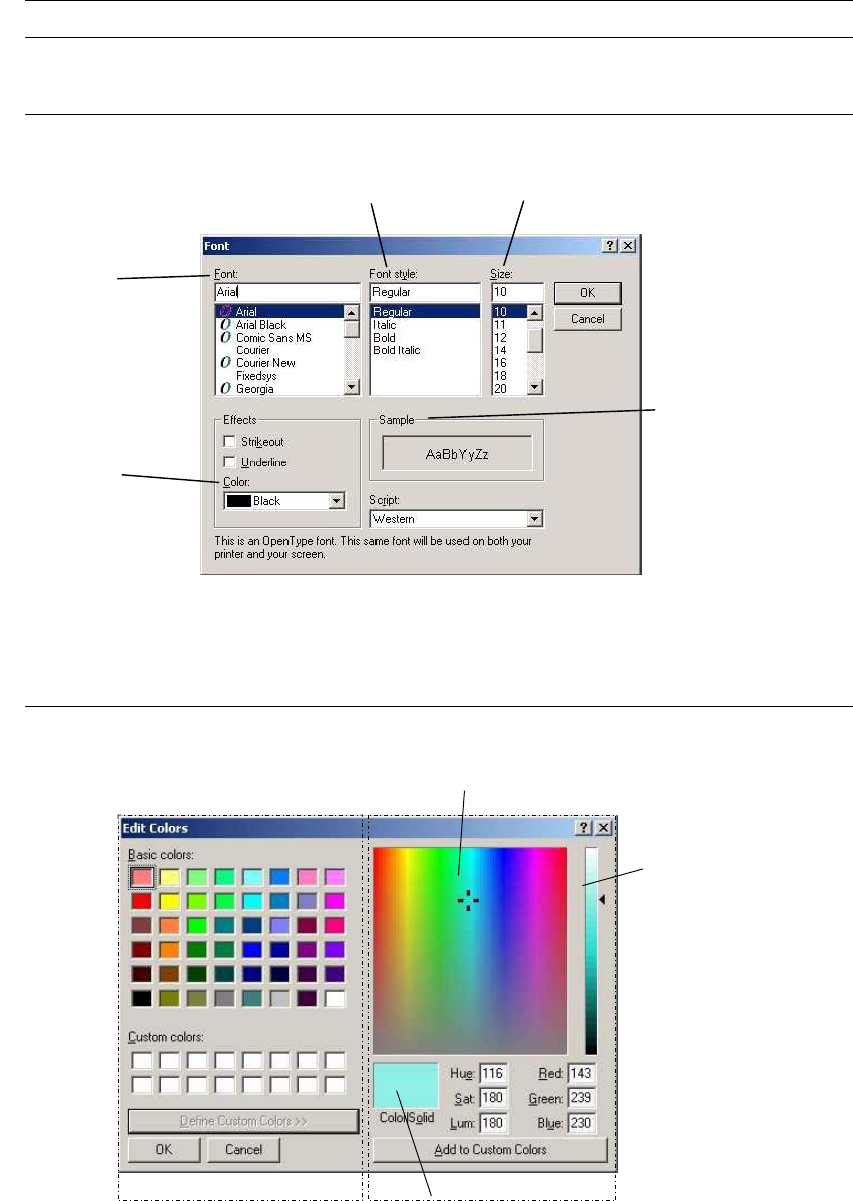
Menu: Tool>Font
Regular, Italic, Bold, Bold Italic
Select a font.
Select a font color.
Select a font size (points).
Display sample characters
with specified value
Note: If you enlarge the font size too far, the displayed text might be too large to fit into place.
2-1-2 Customizing the Background Color
Applied only to the Placement & Mark Data editor.
Menu: Program>Tool>Color
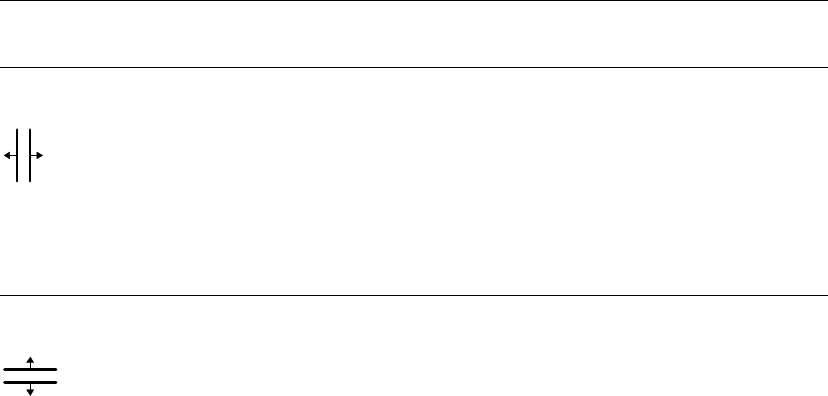
A
B
C
Window 1 Window 2
Action: Window 1: Click a desired color from [Basic colors] and choose <OK> button.
Window 2: This window appears when <Define Custom Colors> button is clicked. How to use this
window is shown below:
Chapter 2 Creating and Editing a Program
2-3
Defining a Custom Color:
① Click a color from the basic colors that is the closest to the desired color.
② Click <Define Custom Colors> button.
③ The window 2 appears. Move the cross cursor by dragging the mouse within the A area to
specify the hue and saturation. Then move the triangular cursor at the B area up or down to
specify the luminosity. While you perform adjustment, the C area constantly changes to show
the result.
④ Determine the adjusted color by clicking <Add to Custom Colors> button.
⑤ You will see the color is added to [Custom colors] of the window 1. Click the color.
⑥ Click <OK> button. You will see the specified color is applied to the windows background.
Note: The specified color applies only to the program editor.
Note: Avoid specifying the same or darker color relative to the text color; the text becomes hard to see.
2-1-3 Resizing Column Width and Row Height
2-1-3-1 Changing Column Width
The mouse pointer changes when positioned over a column boundary of the title row.
Drag the boundary right or left to resize.
2-1-3-2 Changing Row Height
The mouse pointer changes when positioned over a row boundary of the No. column.
Drag the boundary up or down to resize.
Note: Some columns and rows are unresizable.
Chapter 2 Creating and Editing a Program
2-4
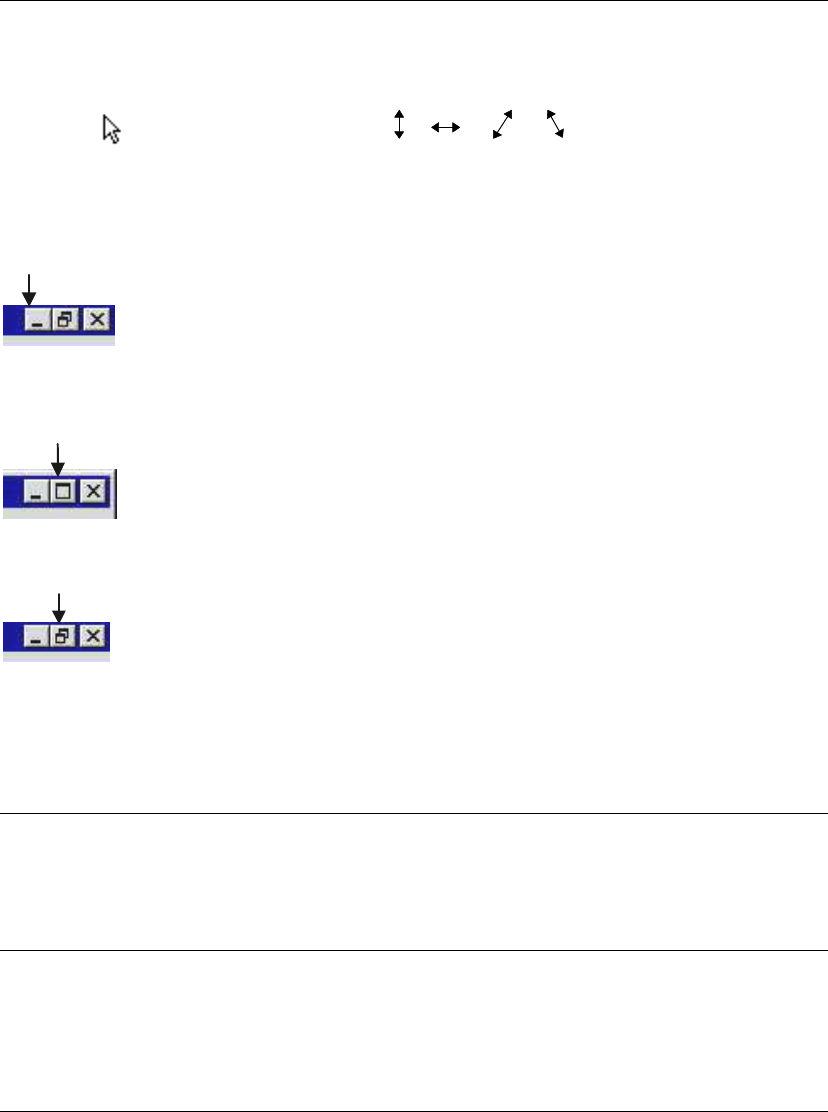
2-1-4 Resizing a Window
To resize an editor window, position the mouse pointer over the boundary or corner of the
window. The pointer changes to a double-headed arrow (Resize arrow). Drag the boundary or
corner to a new window size.
Pointer
Resize arrow
The below three buttons are displayed at the upper right corner of the program editor window.
You can minimize the window to an icon by clicking the button at the left (Minimize button). This
icon is displayed at the lower left part of the screen.
To maximize the window, click the button at the middle (Maximize button).
To reduce the window to its original size, click the button at the middle (Restore button).
Note: Only the program editor window has the three resizing buttons. For other windows, resize them
by dragging their boundary. Note that some windows are unresizable.
2-1-5 Moving a Window
Place the pointer on the title bar and drag it to a new location.
Note: The maximized program editor window cannot be dragged.
2-1-6 Switching Between Windows
The program/library editor windows can be opened at a time.
Note: When a window is visible beneath other overlapping windows, you can bring it to the top by
clicking anywhere on the window.
2-1-7 Closing a Window
To close a window, choose <Close> button. If <Close> button is not shown in the window, choose
the close button “X” at the upper right corner of the window, or choose File>Exit in the window.