M20_Ope_E - 第482页
Chapter 16 Dispenser 16-12 16-1-3-4 Dispense nozzle data This dispense nozzle data contai ns data related to the nozzle. Menu: Dispense Nozzle Data Window : Nozzle Code Enter a nozzle code. Right-click this cell to selec…
Chapter 16 Dispenser
16-11
Eject dot count after a pause
Set the eject dot count for the dot station as described above.
It is recommended to perform 3 to 5 eject dots.
Note: When ejecting to cup after a pause, the dispense material may stick to the
nozzle tip.
To remove this sticking dispense material, perform the eject dots to the dot
station continuously.
Dispense diameter coefficient N
See [Dispense Amount (Hemisphere ratio)] of the dispense data described
previously.
This coefficient is determined by the dispense material.
Fluid shortage detection magnet ASSY.
The dispense head uses a magnet to detect the dispense material fluid shortage in the syringe.
Attach the magnet ASSY to the plunger inside the syringe and set it on the head.
Note: When the syringe is replaced after the fluid shortage has been detected, be careful not to dispose of the
magnet ASSY together with the syringe.
Blow the air from the syringe tip to take out the plunger and magnet ASSY.
There are two kinds of magnet ASSYs available.
Select appropriate plunger and magnet ASSY suitable for manufacturer’s syringe to be used.
For Iwashita Engineering’s plunger
Syringe capacity PART NO. Part name
30 cc LE6-M5F2K-100 MAGNET ASSY.(30 I/E)
For Musashi Engineering’s plunger
Syringe capacity PART NO. Part name
30 cc LE6-M5F2K-200 MAGNET ASSY.(30 M/E)
Magnet ASSY. attaching procedure
Push the magnet ASSY in the direction shown in the Fig. below until the part A is in contact with the
plunger.
Ma
g
net ASSY.
A
A
Iwashita Engineering’s
plunger
Musashi Engineering’s
plunger
Chapter 16 Dispenser
16-12
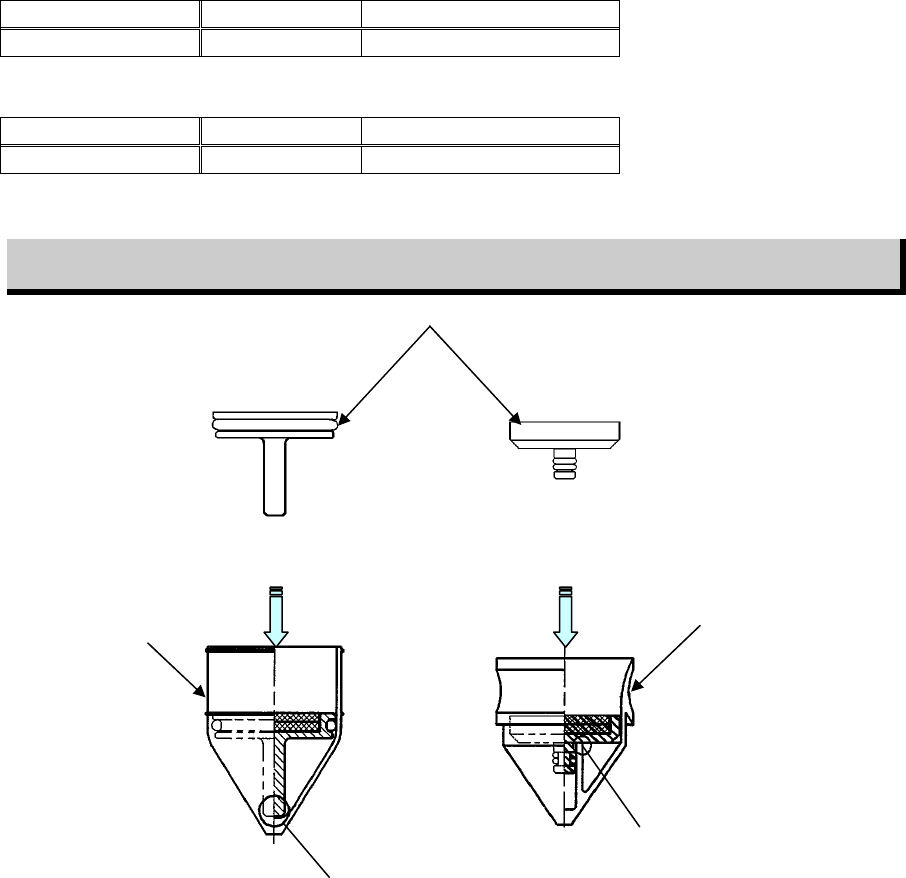
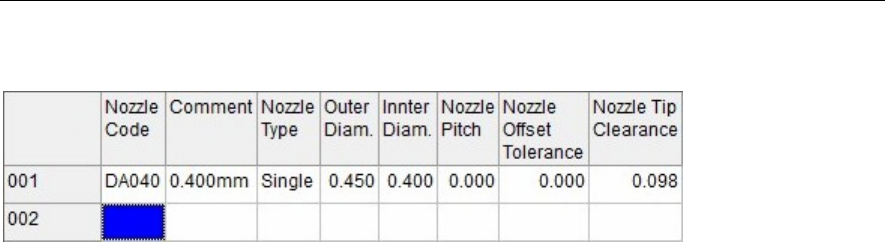
16-1-3-4 Dispense nozzle data
This dispense nozzle data contains data related to the nozzle.
Menu: Dispense Nozzle Data
Window:
Nozzle Code Enter a nozzle code.
Right-click this cell to select a nozzle code.
This nozzle code will link with the nozzle code of the syringe data.
Comment Enter a comment.
Nozzle Type Specifies this nozzles type ("Single" or "Twin").
Right-click on the item to select the type.
Outer Diam. Enter an outer diameter of the nozzle.
(Unit: mm)
Inter Diam. Enter an internal diameter of the nozzle.
(Unit: mm)
Nozzle Pitch Enter the nozzle pitch (distance between the centers of the 2 nozzles) for twin
nozzles.
Nozzle Offset Tolerance For twin nozzles, the nozzle offset from the dot station's dispense points is
measured, and an error occurs if the deviation amount for 2 dispense points
exceeds this tolerance value.
Nozzle Tip Clearance The nozzle tip clearance corresponding to the internal diameter of the nozzle
is set automatically.
If the internal diameter of the nozzle is changed, this numeric value may also
be changed.
See [Clearance Adjust Value] of the dispense data described previously.
(Unit: mm)

Chapter 16 Dispenser
16-13
16-2 Library copying
16-2-1 User library and master library copying
User and master libraries are provided for each type of data (component data, feeder data, supply data,
pallet data, tray data, nozzle data, etc.).
User-created data can be saved in user library, and this data can then be used in other programs.
The master library is a read-only library which contains standard operation data which was saved by us
prior to shipment.
The user and master libraries are normally hidden.
Data from the master library can be copied to the user library for use.
Menu: Program data > component data / feeder data / supply data / pallet data / tray data / nozzle data
Action:
① At each data screen, click the [Function] > [Library search] item, or simply click the [Library search]
icon.
The keyboard's [F3] key can also be used for this purpose.
② The user and master libraries display at the bottom half of the screen.
The user library is white, and the master library is gray.
③ Data can be copied between the top half of the screen (type data) and the lower half of the screen
(user & master libraries) by using the mouse's drag-and-drop function.
Drag and drop desired
data to copy it.
Master Library (gray)
Various data
User Librar
y
(
white
)
[Search Library] icon