M20_Ope_E - 第484页
Chapter 16 Dispenser 16-14 ④ The mouse's drag-and-drop function can also be used to copy data from the master libr ary to the user library. Note: Use care when copying, because overwriting will occu r if a same code…

Chapter 16 Dispenser
16-13
16-2 Library copying
16-2-1 User library and master library copying
User and master libraries are provided for each type of data (component data, feeder data, supply data,
pallet data, tray data, nozzle data, etc.).
User-created data can be saved in user library, and this data can then be used in other programs.
The master library is a read-only library which contains standard operation data which was saved by us
prior to shipment.
The user and master libraries are normally hidden.
Data from the master library can be copied to the user library for use.
Menu: Program data > component data / feeder data / supply data / pallet data / tray data / nozzle data
Action:
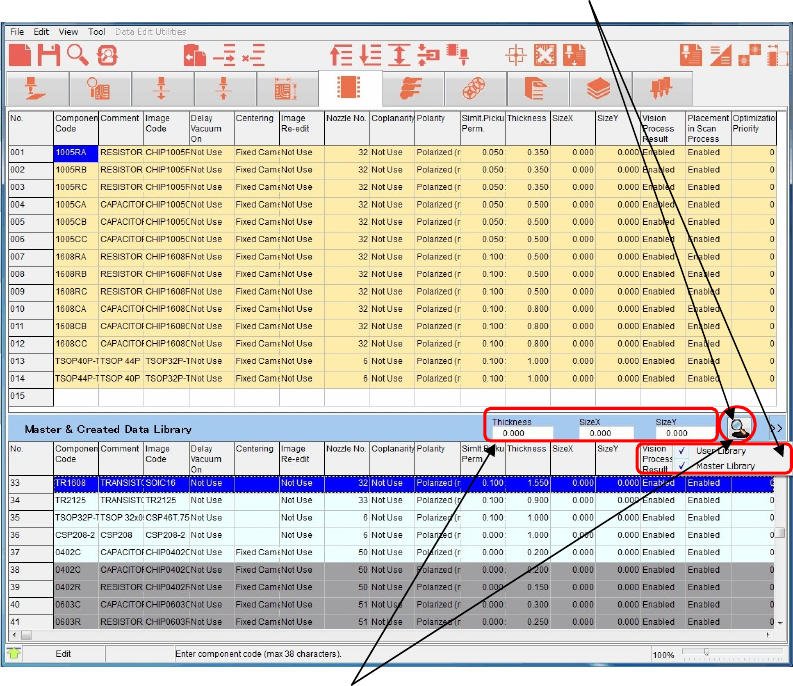
① At each data screen, click the [Function] > [Library search] item, or simply click the [Library search]
icon.
The keyboard's [F3] key can also be used for this purpose.
② The user and master libraries display at the bottom half of the screen.
The user library is white, and the master library is gray.
③ Data can be copied between the top half of the screen (type data) and the lower half of the screen
(user & master libraries) by using the mouse's drag-and-drop function.
Drag and drop desired
data to copy it.
Master Library (gray)
Various data
User Librar
y
(
white
)
[Search Library] icon
Chapter 16 Dispenser
16-14
④ The mouse's drag-and-drop function can also be used to copy data from the master library to the
user library.
Note: Use care when copying, because overwriting will occur if a same code name already exists at the copy
destination.
We therefore recommend changing the code name (rename) after copying component data.
Note: Data cannot be copied to the master library.
⑤ The user and master library display can be turned on and off.
To do this, click the [>>] button, then select (enter a check-mark) the library to be displayed.
The user and master libraries can also be displayed simultaneously.
A "sorting" function can be used by selecting (enter a check-mark) the [Auto sort] item, and then
clicking the <Search> button.
⑥ A search filter function is available.
Specify the "size", etc., then click the <Search> button to display the found candidates.
⑦ To turn the user and master library displays off at the lower half of the screen, click [Function] >
[Library search] again, or click the [Library search] icon.
The keyboard's [F3] key can also be used for this purpose.
[Hand Glass] button
[Hand Glass] button
Chapter 16 Dispenser
16-15
16-3 Dispense check
16-3-1 Dispense check
In this dispense check, the dispense status is captured by the teach camera and its image is processed to
check whether or not the dispense area is proper.
When the check result is determined as NG, it is fed back to the dispense conditions to automatically
correct the dispense area.
This process is called “dispense correction (retry)”.
16-3-1-1 Placement & mark (program) setting
Normally, the dispense check is performed while dispensing onto the dot station. However, when the
conditions, such as dispense material color and PCB color are satisfied, the dispense check is performed
even while dispensing onto the PCB.
Menu: Placement & Mark (program)
Action:
⑧ Right-click [Task] to select a desired task from the table shown below.
[Task] Dispense location
Dot Station Dot station
Dispense Check PCB
⑨ The following describes the dispense check with the dot station. So, select [Dot Station].
16-3-1-2 Dispense data setting
Menu: Dispense Data
Action:
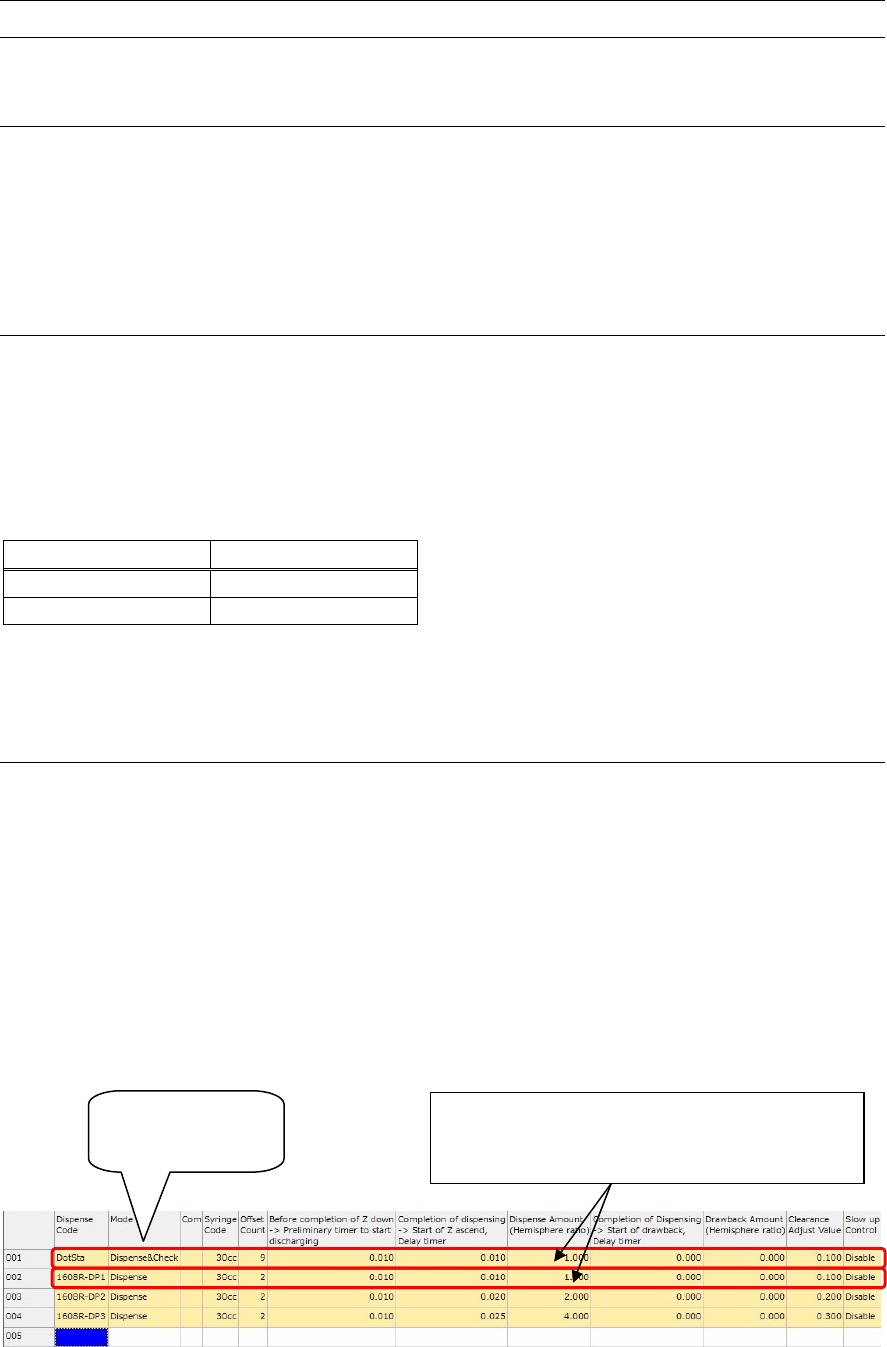
① Set the dispense conditions for the dispense check in the same manner as the normal dispense data.
Note: At this time, set the same conditions as the dispense conditions for dispensing onto the PCB.
This dispenses onto the PCB under the dispense conditions, the dispense check of which has been
completed.
(The concept is that the dispense amount which has been dispensed onto the dot station and checked is
directly copied onto the PCB.)
In particular, it is recommended to set the dispense conditions with the minimum dispense amount.
(This is intended to control the minimum dispense amount when viewed from the quality aspect.)
② Right-click [Mode] to select “Dispense & Check”.
Select “Dispense
& Check”.
Set the same dispense conditions as those for
dispensing PCB. In particular, set the dispense
conditions with the minimum dispense amount.