User Manual SIPLACE Linear Dipping Unit 2 X.pdf - 第40页
4 Operation 4.1 Settings in SIPLACE Pro 40 User Manual SIPLACE Linear Dipping Unit 2 X 05/2020 ► In SIPLACE Pro, click on the Setup tab (1) . ► Click on the Feeder Tree View tab (2) . ► Drag the relevant LDU from the t…

4 Operation
4.1 Settings in SIPLACE Pro
User Manual SIPLACE Linear Dipping Unit 2 X 05/2020 39
4 Operation
4.1 Settings in SIPLACE Pro
NOTICE
Target group: setup operator
The procedure described is a task that occurs irregularly and should only be carried out by
a trained operator with special knowledge (setup operator).
To use the LDU in a placement order, the following settings have to be defined in SIPLACE Pro be-
fore start-up:
●
Set up the LDU
●
Define the dipping plate
●
Assign the dipping plate to the LDU
●
Define flux material
●
Assign a flux material to the LDU
●
Set the parameters for the Flux Level Sensor
●
Dipping parameters for the components used:
– Flux material used
– Cavity depth
– Dipping sequence
– Pressing force when dipping
– Dwell time when dipping
– Travel profile when dipping
– Waiting time at placement
●
Processing Parameters for the flux used:
– Cicatrization time
– Curing time
– Flux level sensor values
– Dip margin
– Squeegee speed
– Number of squeegee cycles during warm-up
4.1.1 Setting up the LDU
●
Depending on the head and changeover table SIPLACE Pro checks whether the LDU can be
reached or not. A general limitation doesn’t exist.
●
SIPLACE Pro checks whether the LDU can be reached or not depending on the head and
table. There is no general limitation.
●
The LDU can be set up directly next to any feeder modules.
●
The LDU should not be configured in direct vicinity to feeder modules for very small compon-
ents.
●
It is recommended not to set up any linear feeder and stick feeder modules together with the
LDU on the same changeover table.
4 Operation
4.1 Settings in SIPLACE Pro
40 User Manual SIPLACE Linear Dipping Unit 2 X 05/2020
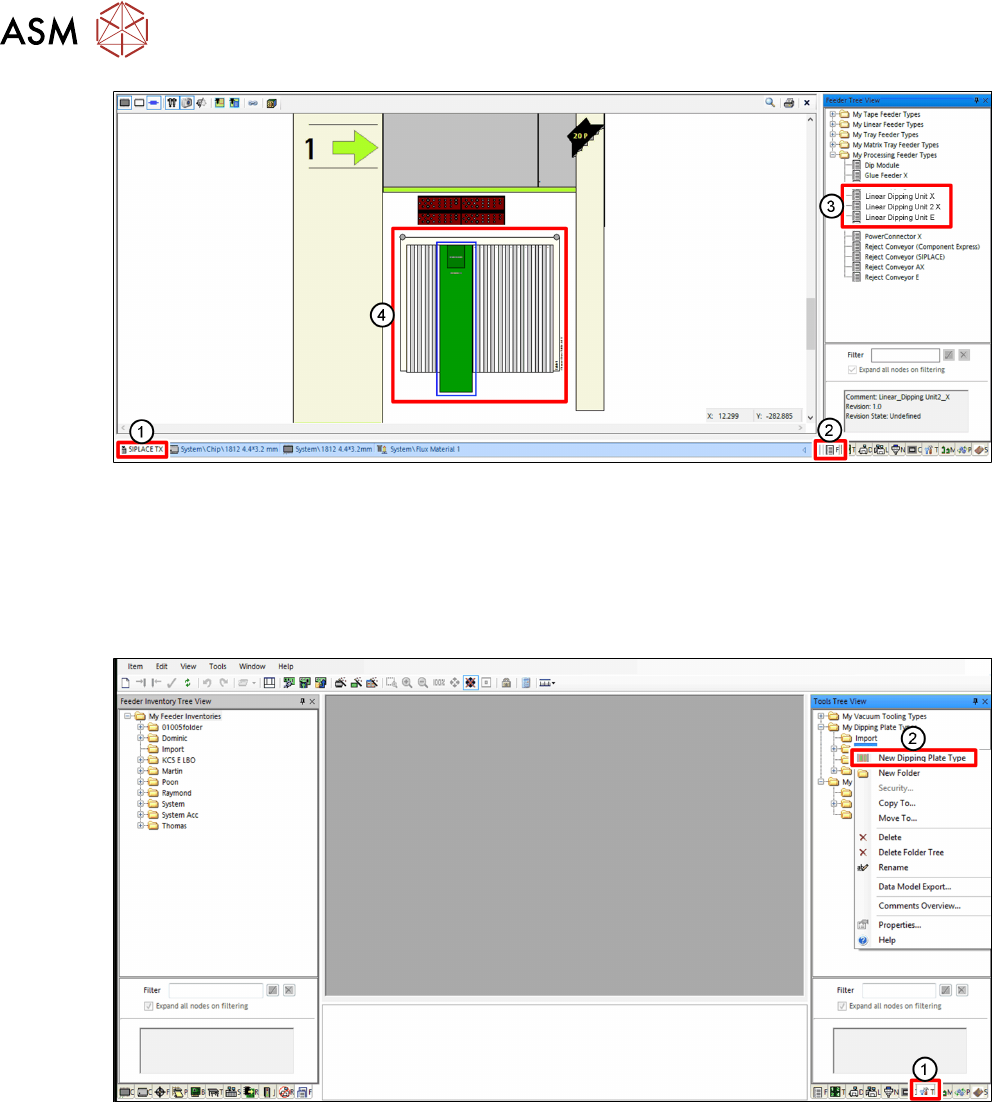
► In SIPLACE Pro, click on the Setup tab(1).
► Click on the Feeder Tree View tab(2).
► Drag the relevant LDU from the tree view(3) to the desired track of the changeover table(4).
4.1.2 Defining the dipping plate
Creating a dipping plate object
► In SIPLACE Pro, click on the Tools tab(1).
► In the Tools Tree View, right-click on the folder you want to add a new dipping plate to.
► Select New Dipping Plate Type from the menu(2).
There are 3 dipping plate types that can be used with the LDU 2 X:
●
Standard dipping plates with one cavity of a fixed depth
●
Special dipping plates with multiple cavities of fixed depths (cavities on one dipping plate can
have different sizes and depths)
●
Auto Cavity dipping plates with one cavity of an adjustable depth (only for LDU 2 X with Auto
Cavity option)

4 Operation
4.1 Settings in SIPLACE Pro
User Manual SIPLACE Linear Dipping Unit 2 X 05/2020 41
Defining a standard dipping plate
► In the Tools Tree View, select the dipping plate to be defined(1).
► In the Object Properties area, select Multiple Fixed Cavity Depths from the Plate Type
menu(2).