CP-842E-842ME System Reference-SYS-CP842-10E.pdf - 第63页
Machine System >> Basic Operation SYS-CP842-1.0E 4-27 3 T o manually change the X auto pick up of fset values, se lect the slot number of the slot to be changed, press [Settin gs] and the window shown below display…

Machine System >> Basic Operation
4-26
SYS-CP842-1.0E
Specifying Pick-up Offsets at the Machine
When a part cannot be successfully picked up using standard pick-up position offsets,
the operator can manually specify the offset at the machine.
Procedure
1 Press [Device Offsets] at the [Main] screen. The [Device Offsets] screen dis-
plays.
2 The XY orientation of the pick up position can be changed on the CP-842E/
842ME.
Under each slot number, the slot warning status and X and Y auto pick up offset
values display. Select a slot number on the device table displayed at the top of
the screen to display information for that slot (for CP-842ME, 1 to 40, for CP-
842E, 1 to 70). Press [Change] to toggle the display between Stage 1 and Stage
2.
NoteY pick up offsets cannot be edited manually.
1. To clear auto pick up offsets, select [Auto pick up offset X] or [Auto pick up offset Y] for
the corresponding slot and push [Clear auto pick up offsets].
Machine System >> Basic Operation
SYS-CP842-1.0E 4-27
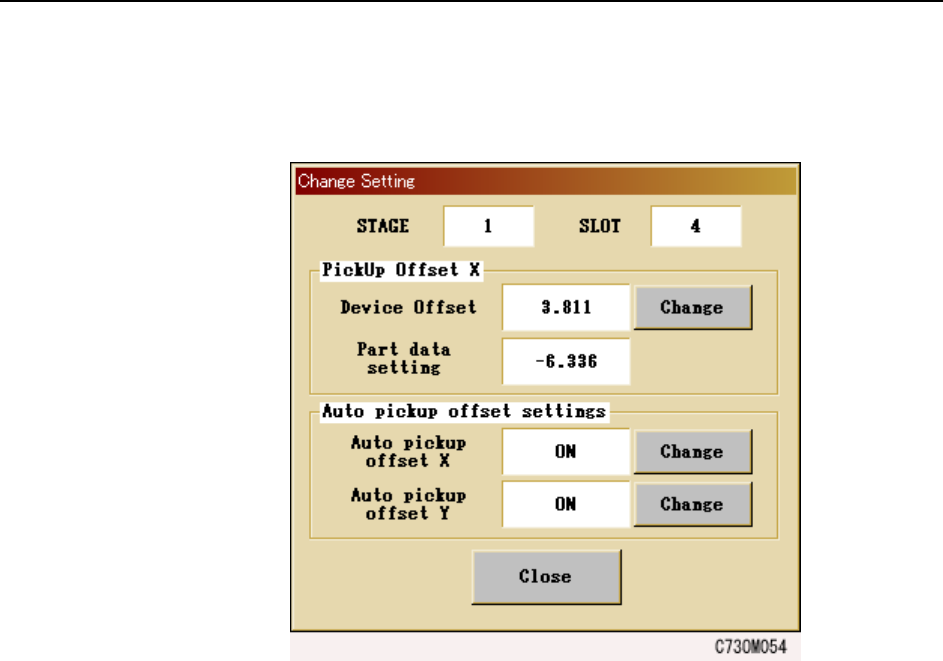
3 To manually change the X auto pick up offset values, select the slot number of
the slot to be changed, press [Settings] and the window shown below displays.
Push [Change] and enter the offset values via the numerical pad that displays.
Note: Pick up offset values set in part data and Auto pick up offset Y values cannot be
changed manually.
4 Whenever the auto pick up offset function for X or Y needs to be enabled or dis-
abled, press the [Change] button next to the [Auto pick up offset X] or [Auto pick
up offset Y] buttons. Select [OK] on the confirmation window that displays.
Note: When the [Auto pick up offset X] function is enabled, placing positions are reevaluated
and the necessary auto pick up offsets are performed, even when pick up offset val-
ues have been set in part data.

Machine System >> Basic Operation
4-28
SYS-CP842-1.0E
4.1.7 Setting the Production Quantity
The machine can be set to produce up to 65535 panels in automatic operation. This
setting can be made when the production program is transmitted from the host (refer
to your host system documentation), or using commands at the machine.
Procedure
1 Press [Program] at the [Main] screen, and then press [Chg Scheduled Panels].
The numeric keypad displays.
2 Enter a value at the numeric keypad and press [OK].
The specified production quantity displays at the [Program] screen in the
Scheduled Panels column and also at the Scheduled Panels item at the [Produc-
tion] screen when viewed in the default [Loader] display mode.
4.1.8 Stopping and Restarting the Machine
Stopping the machine in an emergency.
• Push any of the EMERGENCY STOP buttons on the machine.
When the EMERGENCY STOP button is pushed the 200V power supply to the
servo system is cut, and the machine stops immediately. When pushed, the but-
ton locks in position and must be turned in the direction of the arrows in order
to release it.
• When resuming operation, release the EMERGENCY STOP button, and then
press READY ON. Press the flashing START button to commence.
Stopping the machine at the end of the current cycle.
• Press the CYCLE STOP button.
The machine stops at the end of the current cycle. Pressing CYCLE STOP does
not cut the 200V power.
• Press the flashing START button to resume operation.
Stopping the machine after completing the current panel(s).
• Press [Finish Current Panels] at the [Production] screen.
The panel(s) currently being produced is completed and sent to the next
machine, then the machine stops and the START button is enabled.
• Push the START button to resume operation.