KE-750_MS.pdf - 第59页
1-2 Sub OCC Unit (1) Remove SEMS cap screws (1), (2) and remove camera bracket D. (2) Camera unit assy is held by the 4 SEMS cap scr ews (3) and light unit assy is held by the 2 SEMS cap screws (4). Remove connectors bef…
Chapter 4 OCC Unit
1. OCC Unit Replacement
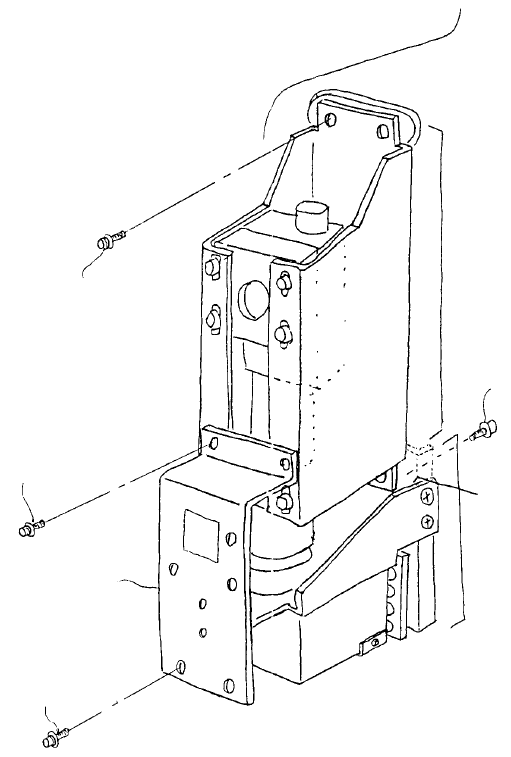
1-1 Main OCC Unit
(1) Remove SEMS cap screws (1), (2) and remove camera bracket D.
(2) Camera unit assy is held by the 4 SEMS cap screws (3) and light unit assy is held by the 2 SEMS
cap screws (4). Remove connectors before removing and replacing both assemblies.
(3) Reassemble in reverse sequence.
(4) After replacing camera unit assy, adjust focus and enter MS parameters. After replacing light unit
assy, adjust polarizing filter and OCC light. (Refer to 4 - 7 Summary of Readjustments Required
after Replacement.)
Camera bracket D
E3809725000
Left light unit ass
y
E38117250A0
SEMS cap screw x 2
SL6041092TN
SEMS cap screw x 2
SL6030692TN
SEMS cap screw x 4
SL6041092TN
SEMS cap screw x 2
SL6030892TN
Camera unit ass
y
E38017250A0
Head plate
Fig. 4-1-1
1-51
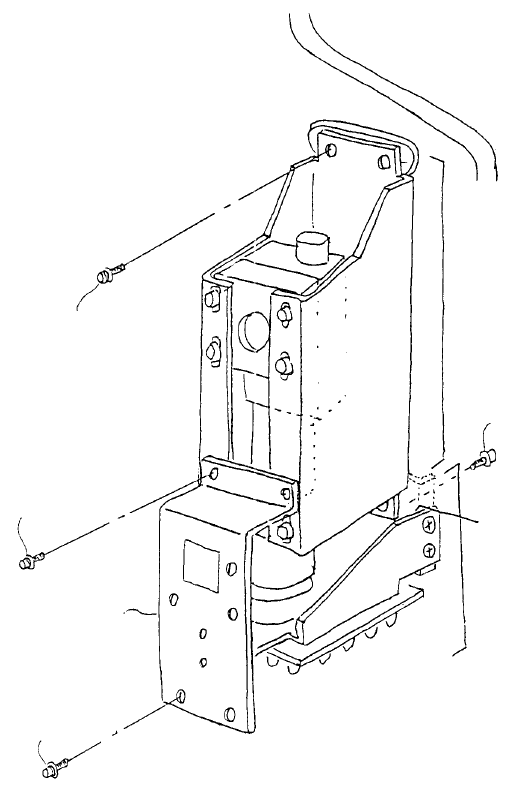
1-2 Sub OCC Unit
(1) Remove SEMS cap screws (1), (2) and remove camera bracket D.
(2) Camera unit assy is held by the 4 SEMS cap screws (3) and light unit assy is held by the 2 SEMS
cap screws (4). Remove connectors before removing and replacing both assemblies.
(3) Reassemble in reverse sequence.
(4) After replacing camera unit assy, adjust focus and enter MS parameters. After replacing light unit
assy, adjust polarizing filter and OCC light. (Refer to 4 - 7 Summary of Readjustments Required
after Replacement.)
Camera bracket D
E3809725000
Left light unit ass
y
E38117250A0
SEMS cap screw x 2
SL6041092TN
SEMS cap screw x 2
SL6030692TN
SEMS cap screw x 4
SL6041092TN
SEMS cap screw x 2
SL6030892TN
Camera unit ass
y
E38017250A0
Head plate
Fig. 4-1-2
1-52
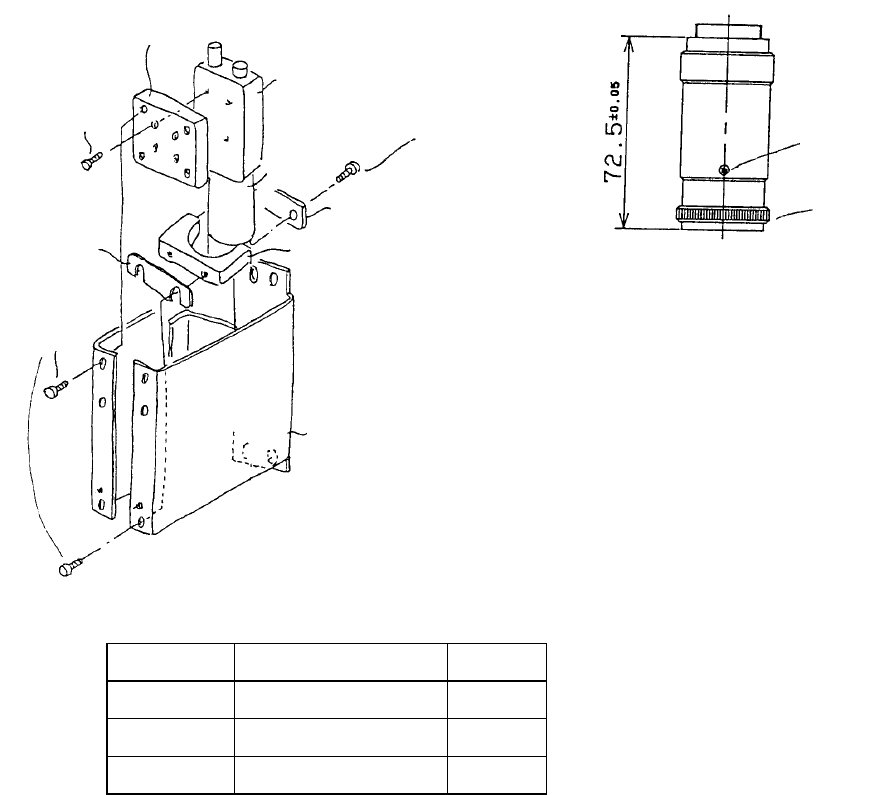
2. CCD Camera / Lens Replacement
(1) Follow the instructions in 4 - 1 to remove camera unit assy from head plate.
(2) Remove SEMS cap screws (1) holding CCD camera block and lens holder to replace. Set lens
length at 72.5 ア0.05mm (Dia. 4 - 2 - 2). (Refer to QA Table, OCC lens length.)
(3) Reassemble in reverse sequence. Select a shim from among A~D that does not squeeze lens.
(4) After replacing camera unit assy, adjust focus and enter MS parameters. (Refer to 4 - 7 Summary of
Readjustments Required after Replacement.)
Fig. 4-2-2
Loosen the 3 screws for (a) and
rotate knob. Adjust lens length to
72.5±0.05mm.
(a)
Knob
Camera U bracket
E3802725000
Lens hold plate
E3808721000
Lens holde
r
E3803721000
SEMS cap x 2 pcs.
SL6030692TN
Lens
E9618721000
CCD camera
E9617721000
SEMS cap screw x 6
SL6041092TN
Shims A, B, C, D
A
llen head scre
w
Use Locktite 242
SM60207252TP
CCD camera bloc
k
E3853715000
Shim A E3804721000 t0.05
Shim B E3805721000 t0.01
Shim C E3806721000 t0.3
Shim D E3807721000 t0.5
Select a shim from among A~D that does not squeeze lens. (Gap spec. is 0.5mm.)
Fig. 4-2-1
1-53