00198829-01_SM_X-Series-S_Hxxxx_EN.pdf - 第199页
7 Conveyor 7.6 Conveyor Belt, Belt Drive and Hexagonal Shaft Service Manual SIPLACE X-Series S (from Hxxxx) 01/2021 199 7.6 Conveyor Belt, Belt Drive and Hexagonal Shaft 7.6.1 Replacing the Toothed Belt (Conveyor Belt) P…
7 Conveyor
7.5 Width Adjustment, Clamps and Cylinder Unit
198 Service Manual SIPLACE X-Series S (from Hxxxx) 01/2021
7.5.14 Calibrating the adjustment unit
NOTICE
This chapter is valid for machines with dual conveyor (DC) only.
After completing all work to the width adjustment (adjustment unit, motor or belt of width adjust-
ment), you need to calibrate the adjustment unit before you configure the conveyor sides.
Procedure
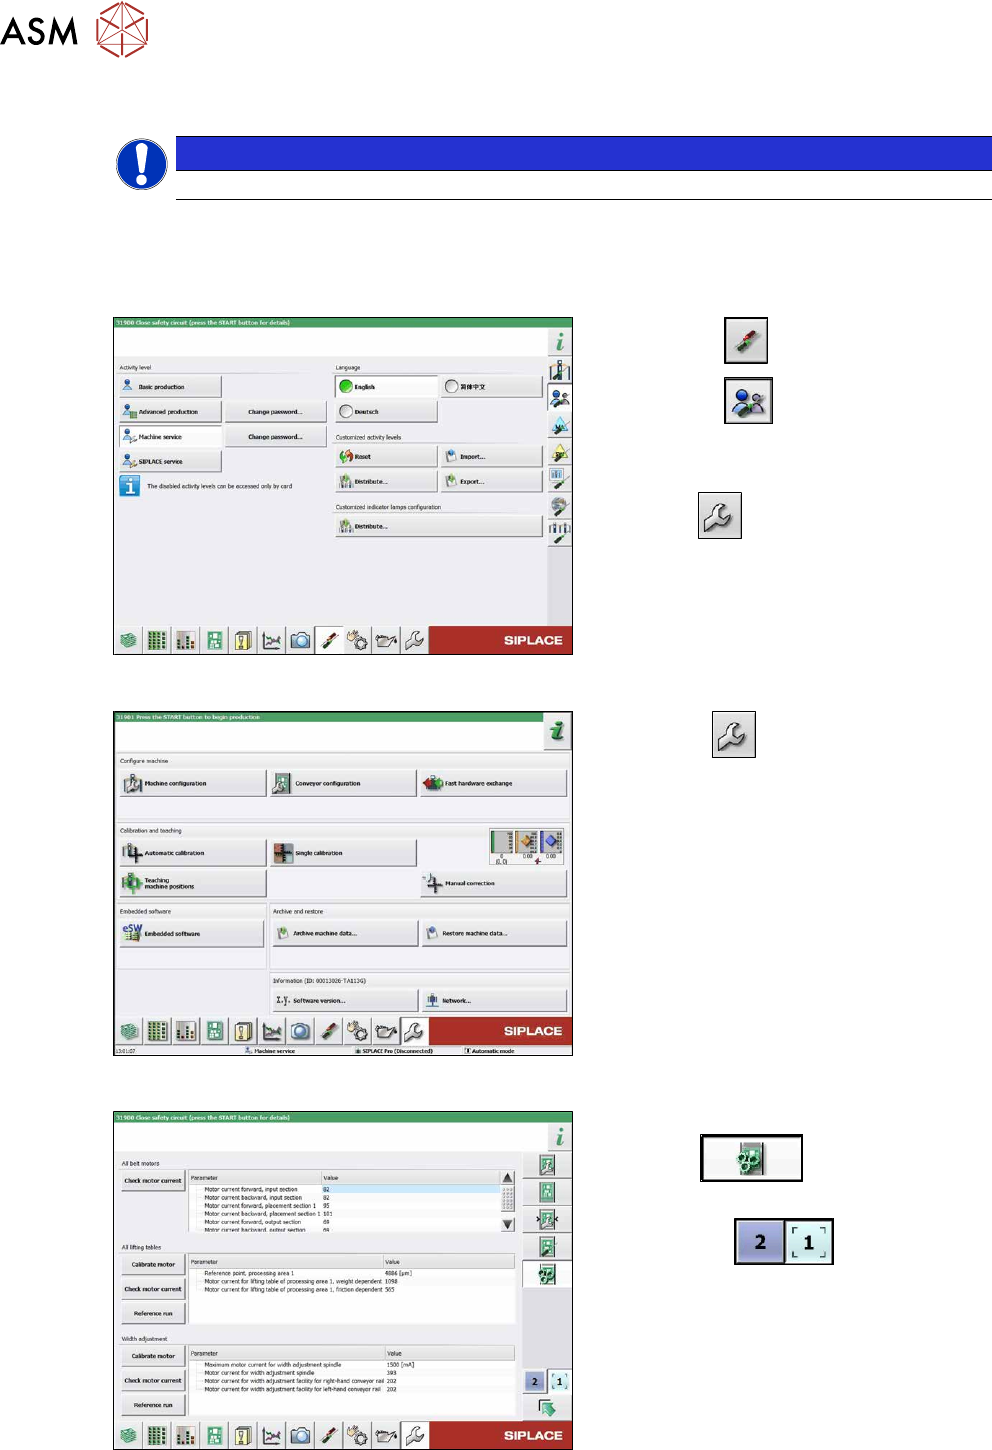
Fig.259: Select operator level
► Select the button.
► Select the button.
► Switch over to the operator level Ma-
chine service.
ð The button will be shown.
Fig.260: Service menu
► Click the button to open the Ser-
vice menu.
► Click on the Conveyor Configuration-
button.
Fig.261: Conveyor menu
► Click on the Initiate conveyor para-
meters button.
► Select the required conveyor track with
the buttons
.
► Go to the section Width adjustment
and select the button Calibrate motor.

7 Conveyor
7.6 Conveyor Belt, Belt Drive and Hexagonal Shaft
Service Manual SIPLACE X-Series S (from Hxxxx) 01/2021 199
7.6 Conveyor Belt, Belt Drive and Hexagonal Shaft
7.6.1 Replacing the Toothed Belt (Conveyor Belt)
Parts, equipment and tools
●
Toothed belt
Select the relevant toothed belt:
Fig.262: Toothed belt - default conveyor
Toothed belt (conveyor) – single/dual conveyor
Area Standard With I/O extension
1 Input area Synchronous belt L=753mm
[03094116‑xx]
Synchronous belt L=1239mm
[03093312‑xx]
2 PA1 Synchronous belt L=1500 mm [03093146-xx]
3 Center Synchronous belt L=1158 mm [03093314-xx]
4 PA2 Synchronous belt L=1500 mm [03093146-xx]
5 Output area Synchronous belt L=753mm
[03094116‑xx]
Synchronous belt L=1239mm
[03093312‑xx]
Fig.263: Toothed belt – single conveyor, heavy board 8kg
Toothed belt (conveyor) – single conveyor, heavy board 8kg
Area Toothed belt
1 Input area Synchronous belt L=1158 mm / 3 tensile members [03171845Sxx]
2 PA1 Synchronous belt L=1500 mm / 3 tensile members [03171844Sxx]
3 Center Synchronous belt L=1158 mm / 3 tensile members [03171845Sxx]
4 PA2 Synchronous belt L=1500 mm / 3 tensile members [03171844Sxx]
5 Output area Synchronous belt L=1158 mm / 3 tensile members [03171845Sxx]
●
If needed, bearing for hexagonal shaft SXa (plastic bearing) – pack of 10 [03092024-xx]
NOTICE
Checking the toothed belt
► Check the toothed belt regularly for wear (abrasion).
► If the weight of the boards transported is near the upper limit of 8 kg, it is advisable to
replace the toothed belt after one year, as a preventative measure.
7 Conveyor
7.6 Conveyor Belt, Belt Drive and Hexagonal Shaft
200 Service Manual SIPLACE X-Series S (from Hxxxx) 01/2021
Removal
► Use the software to move the conveyor sides into a position which allows you best access. As
an alternative, you can loosen the clamps for the relevant sides in dual conveyors.
7.2 "Loosening the Conveyor Side Clamps" [}162]
► Switch off the machine, disconnect it from the power supply and secure it to prevent
unauthorized reactivation.
1.2 "Preparatory work..." [}16]
► Loosen the hexagonal shaft on the belt drive or conveyor drive (motor), so that you can move
the shaft freely. To do this, dismantle the hexagonal shaft fixture on one side and the corres-
ponding plastic bearing on both sides.
7.6.6 "Replacing the hexagonal shaft" [}205]
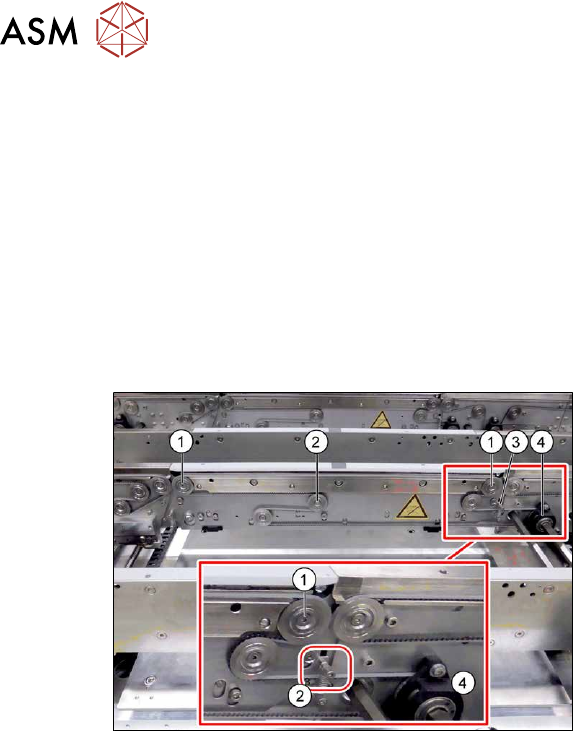
Fig.264: Toothed belt
► Loosen the movable idler pulley (2).
► Loosen the top two idler pulleys(1).
► Remove the screws fastening the belt
drive(4)
(or conveyor drive).
► If you replace a conveyor belt in the
placement area, you will also need to
loosen the top retaining screw (3)
on
the spring. Make sure that you do not
lose the spring and the bushing on the
screw. When you refit them, check the
bushing for correct orientation.
► Carefully unthread the conveyor belt.
Installation
Follow the removal instructions in reverse order for installation. Also observe the following instruc-
tions:
► Check the new toothed belt before fitting it. Hold it up high. It should hang loose and should
not twist.
► Make sure that you do not fold or otherwise damage the toothed belt.
► Make sure that the toothed belt is positioned accurately in the guidance on the motor shaft or
in the belt drive.
► If you have loosened the spring, check the bushing for correct orientation when you fit it back
again.
7.7.1 "Replacing the clamping unit (clamping plate), spacer disks and tension spring" [}207]
► When you tighten the movable roller, set the tension of the toothed belt correctly.
7.6.2 "Setting the belt tension (conveyor belt)" [}200]
7.6.2 Setting the belt tension (conveyor belt)
The precalculated values for setting the belt tension can be found in the following chapters.
In addition, the value for any section of the conveyor belt can be calculated using a formula (see
7.6.2.2
"Calculating the belt tension" [}202]).
7.6.2.1 Setting the Tension of the Conveyor Toothed Belt
Parts, equipment and tools
●
Belt tension device [00326015-xx]
●
With installed input/output extension option:
Assembly instructions "SIPLACE X-Series S input/output extension" [DE EN: 00197089-xx]