00198829-01_SM_X-Series-S_Hxxxx_EN.pdf - 第258页
8 Head exchange 8.3 Replacing the SIPLACE C&P20 A/M 258 Service Manual SIPLACE X-Series S (from Hxxxx) 01/2021 8.3 Replacing the SIPLACE C&P20 A/M NOTICE Vacuum test ► If required, perform a vacuum test before re…
8 Head exchange
8.2 Differentiation of the SIPLACE C&P20 head variants
Service Manual SIPLACE X-Series S (from Hxxxx) 01/2021 257
8.2 Differentiation of the SIPLACE C&P20 head variants
CAUTION
Do not confuse the different SIPLACE C&P20 head variants.
► As a rule, spare parts can only be used in the variant for which they are intended!
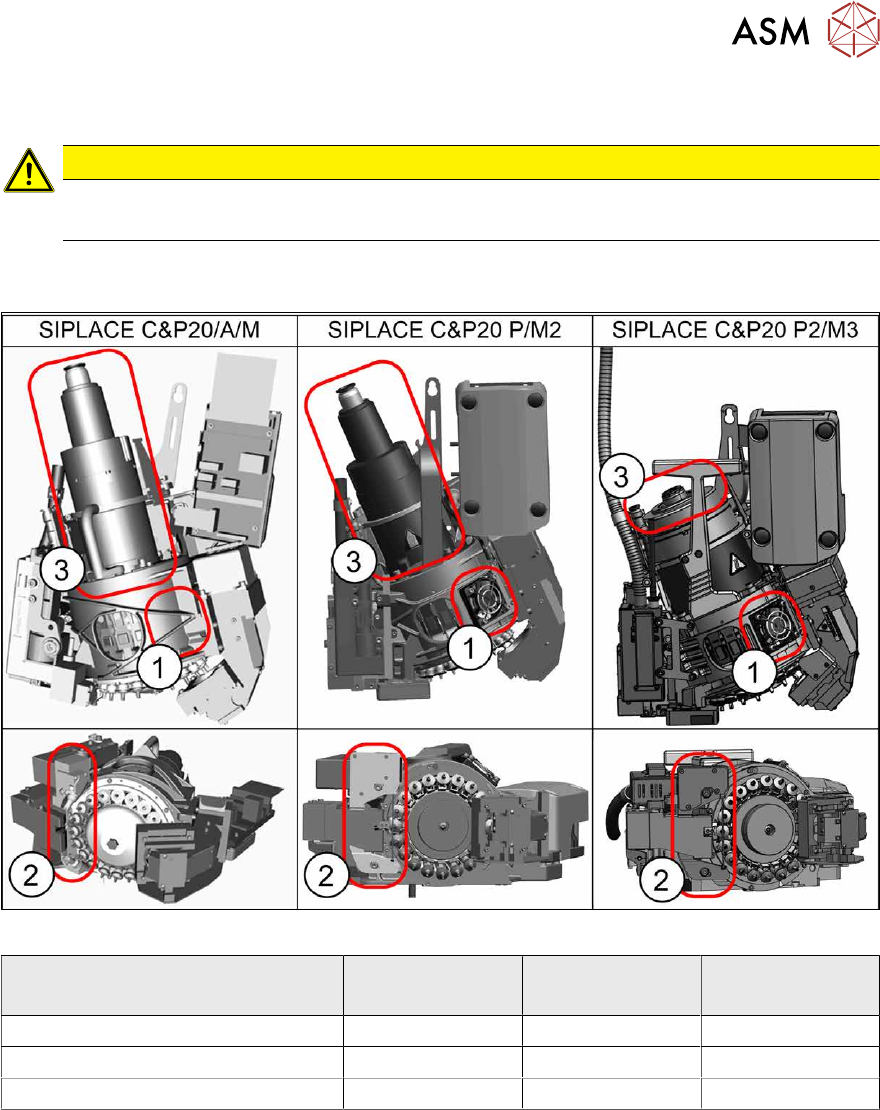
The various SIPLACE C&P20 variants vary in many details. The heads can be most easily differen-
tiated using these three features:
Fig.342: Differentiation of the SIPLACE C&P20 head variants
Head
Distinction criterium
SIPLACE
C&P20/A/M
SIPLACE
C&P20 P/M2
SIPLACE
C&P20 P2/M3
(1) Cooling fan Not present Present Present
(2) Component sensor design Narrow, high Wide, flat Wide, flat
(3) Holding circuit-connection design High High Flat

8 Head exchange
8.3 Replacing the SIPLACE C&P20 A/M
258 Service Manual SIPLACE X-Series S (from Hxxxx) 01/2021
8.3 Replacing the SIPLACE C&P20 A/M
NOTICE
Vacuum test
► If required, perform a vacuum test before removing the placement head.
Read the "Service manual Vacuum test at C&P placement head" [DE+EN:
00196101‑xx] for this.
NOTICE
Fast Hardware Exchange (FHE)
► Observe the instructions in section 8.1 "Fast Hardware Exchange" [}253] when ex-
changing a head.
Parts, equipment and tools
●
Select the placement head:
Head type Item no.
SIPLACE C&P20A 03058420-xx
SIPLACE C&P20M 03103108-xx
●
Torque screwdriver 1-5 Nm [03078400-xx]
●
Extension/straight TX20 [03073256-xx]
●
Bit holder for Torque Vario-S screwdriver [03078706‑xx]
●
Torx offset screwdriver TX8 [03080081-xx]
●
Calibration tool version SST23 [03034148-xx]
●
Protective hose for component sensor [03078596-xx]
●
If needed, for vacuum pump operation:
– Assembly instructions "Vacuum Pump SIPLACE X-Series S from Hxxxx" [00198599‑xx]
For additional work to the placement head:
●
Head mount [03056231‑xx]
●
Service manual "SIPLACE C&P20A/M" [DE:00197464‑xx] [EN:00197465‑xx]
●
Job card "Preventive Maintenance C&P20A/M" [DE:00197504‑xx] [EN:00197502‑xx] (other
languages available)
NOTICE
Troubleshooting for SIPLACE C&P20/A placement heads
Many placement heads of type C&P20 or C&P20A are submitted to the repair centers with
only minor defects. There are however relatively simple ways to fully restore functionality at
low material cost and time needed.
► Please read the technical information "Troubleshooting for the SIPLACE C&P20/A
placement head" [DE:TI2012‑06D01] [EN:TI2012‑06E01].
8 Head exchange
8.3 Replacing the SIPLACE C&P20 A/M
Service Manual SIPLACE X-Series S (from Hxxxx) 01/2021 259
Removal
► Switch off the machine, disconnect it from the power supply and secure it to prevent
unauthorized reactivation.
1.2 "Preparatory work..." [}16]
► Switch off the compressed air supply
5.2 "Disabling the compressed air supply" [}86]
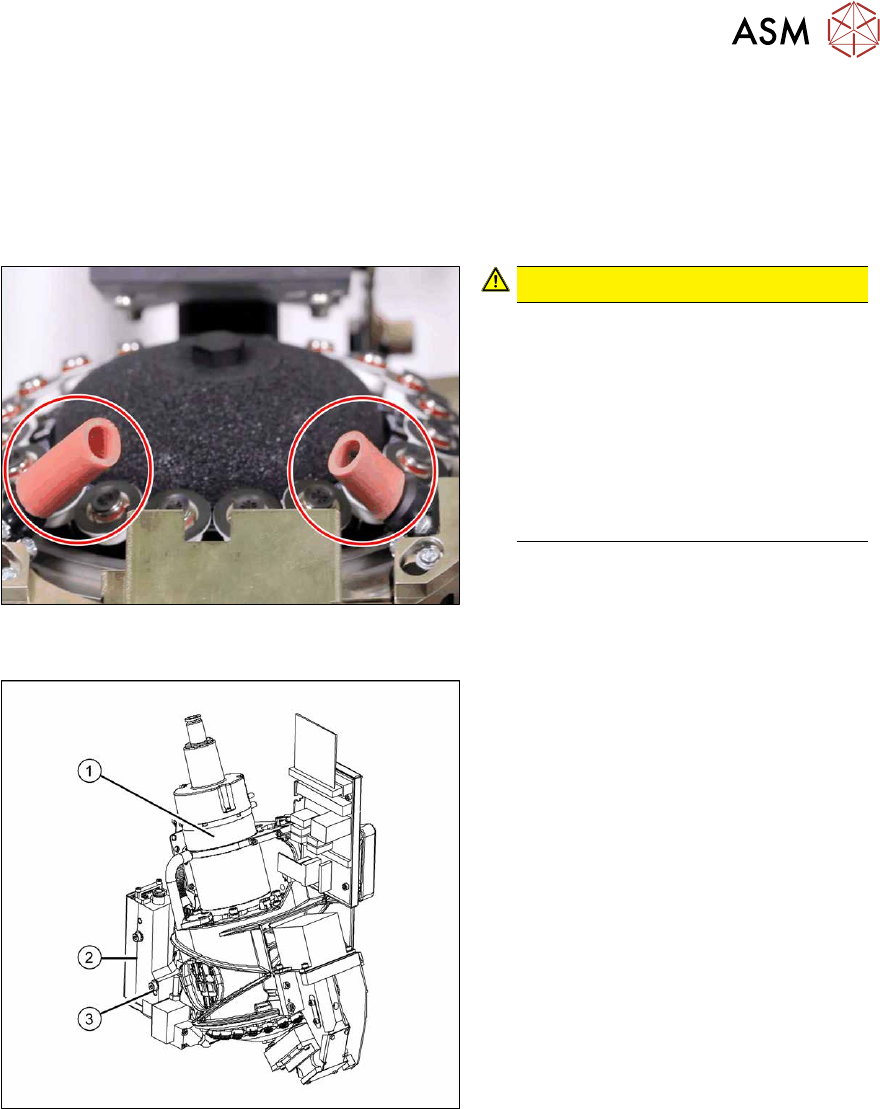
Fig.343: Hose on component sensor (example of C&P20 A
shown)
CAUTION!
The component sensor prisms, under-
neath the placement head, are easily
damaged. Take great care when dis-
mantling the head!
Protect the component sensor with two
hose sections. These are supplied with
the placement head or component
sensor and should be kept in the
machine service box. They are needed
each time you dismantle the head.
.
Fig.344: Removing the placement head
► Unplug the pneumatic connection(1).
► Disconnect the flat ribbon cable from
the placement head.
► Remove the screws fastening the strain
relief on the component camera cables
and carefully unplug the cables. While
unplugging the cables, press the
clamps on both sides of the connect-
ors.
► Loosen the two screws on the pressure
control valve (2)
.
► Undo the screw(3) from the pressure
control valve and swing the pressure
control valve to one side.
The head fastening screw near the
pressure control valve is now access-
ible.
► Unscrew all four M4 fastening screws with a long Torx key (TX20).
► Carefully lift the head out of the locating pins on the head plate.
► Placing the head into the head transport box
► If you need to perform further work on this placement head (e.g. replacing spare parts), fit the
placement head to the head mount [03056231-xx].