00198829-01_SM_X-Series-S_Hxxxx_EN.pdf - 第85页
5 Pneumatic System 5.1 Pneumatic System - Overview Service Manual SIPLACE X-Series S (from Hxxxx) 01/2021 85 5 Pneumatic System DANGER Observe User Manual ► Please observe the safety instructions in the user manual for a…

4 Electrics and control system
4.9 Replacing the I/O control unit
84 Service Manual SIPLACE X-Series S (from Hxxxx) 01/2021
LEDs Inputs X6qb [03052315-02] [03116049-01]
LED Color Status Signal name Description
H34 GN - DI31 Not used
H35 GN - DI30 Not used
H32 GN - DI29 Not used
H33 GN - DI28 Not used
H30 GN - DI27 Not used
H31 GN - DI26 Not used
H28 GN - DI25 Not used
H29 GN - DI24 Not used
LEDs Inputs X5qb [03052315-02] [03116049-01]
LED Color Status Signal name Description
H26 GN - DI23 Not used
H27 GN - DI22 Not used
H24 GN - DI21 Not used
H25 GN ON DI20 EMERGENCY STOP button released on location 2
H22 GN - DI19 Not used
H23 GN ON DI18 CO trolley docked in on location 2
H20 GN ON DI17 Hood closed on location 2
H21 GN - DI16 Not used
LEDs Inputs X4qb [03052315-02] [03116049-01]
LED Color Status Signal name Description
H18 GN ON DI15 Operating pressure reached
H19 GN - DI14 Not used
H16 GN - DI13 Not used
H17 GN ON DI12 EMERGENCY STOP button released on location 1
H14 GN ON DI11 PowerEnable signal from power supply
H15 GN ON DI10 CO trolley docked in on location 1
H12 GN ON DI9 Hood closed on location 1
H13 GN ON DI8 EMERGENCY STOP button released on WPC
LEDs Inputs X3qb [03052315-02] [03116049-01]
LED Color Status Signal name Description
H10 GN ON DI7 Vacuum pump switched on
H11 GN DI6 Not used
H8 GN ON DI5 Stop button actuated
H9 GN ON DI4 Start button actuated
H6 GN ON DI3 Temperature monitoring, ballast resistor
H7 GN ON DI2 Vacuum pump OK
H4 GN ON DI1 Control_ON signal active
H5 GN ON DI0 Safety circuit closed
5 Pneumatic System
5.1 Pneumatic System - Overview
Service Manual SIPLACE X-Series S (from Hxxxx) 01/2021 85
5 Pneumatic System
DANGER
Observe User Manual
► Please observe the safety instructions in the user manual for all work!
CAUTION
Switch off the compressed air supply
When working on the pneumatic system, always disconnect the machine from the com-
pressed air supply.
CAUTION
Use the correct blanking plugs
► Only use blanking plugs in the machine which match the manufacturer's compressed
air connection. A tight fit cannot be guaranteed for other blanking plugs.
► We recommend the use of blanking plugs made by Festo.
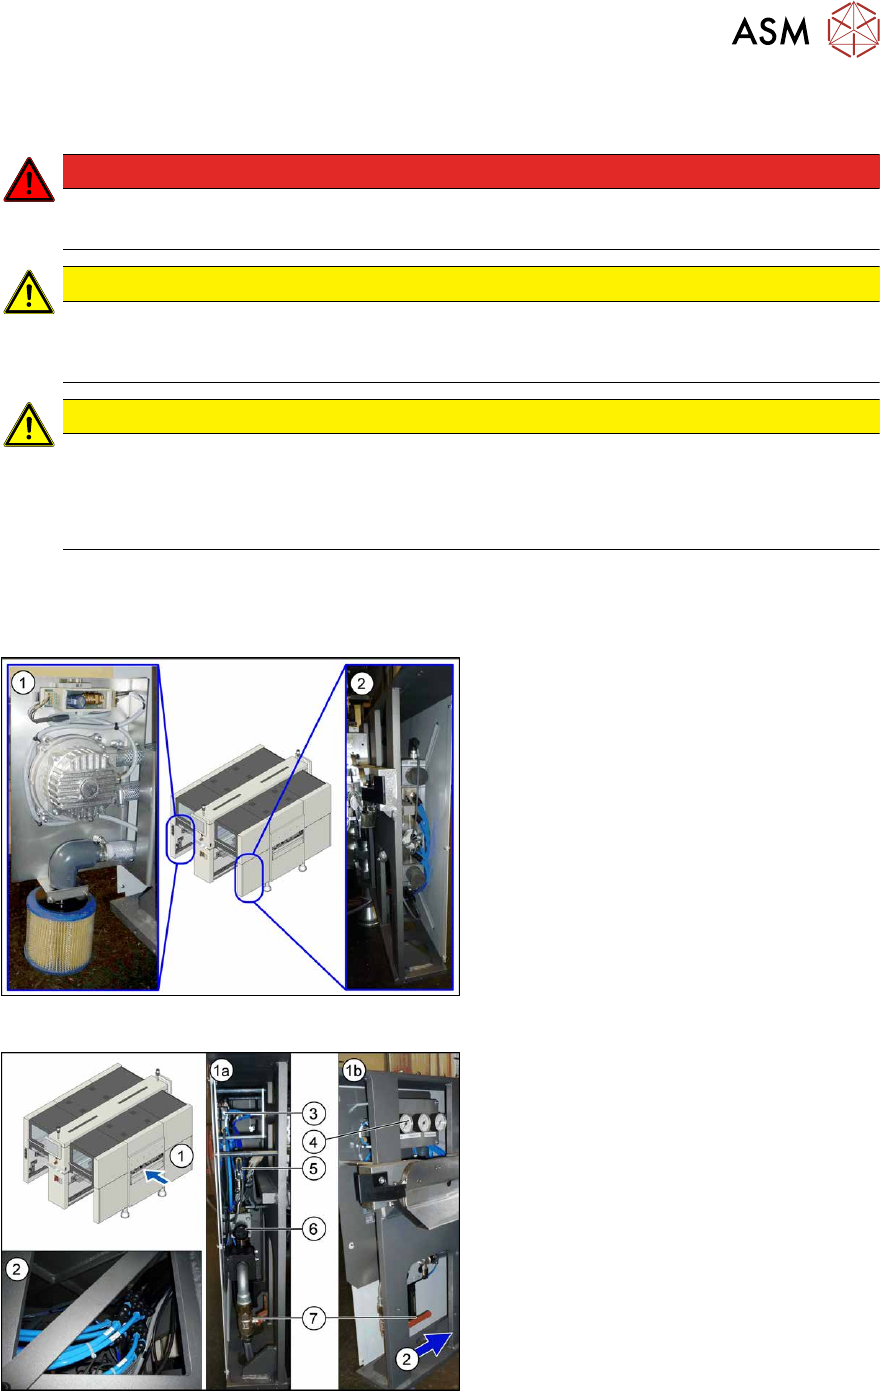
5.1 Pneumatic System - Overview
The pneumatic system is located at locations 1, 3 and 4, behind the side covers.
Fig.97: Pneumatics (location 3 and 4)
1. Location 3, behind the side cover:
Elmo blower with electrics, cooling air
filter
2. Location 4, behind the side cover:
Proportional controller for gantry group
placement heads PA1/PA2
Fig.98: Pneumatics (location 1)
1. Location 1, behind the side cover:
1a) View from front
1b) View from side
Connection coupling, main valve with
compressed air filter, compressed air
displays
2. Location 1, at the bottom, in the
machine base: compressed air connec-
tion for gantry trailing cable and
vacuum pump
3. 5/2 way valve [03062277-xx]
Main valve (X59) for NC, insert, conveyor
4. Manometer
5. 5/2 solenoid valve [00344974-xx]
Safety valve (X60) for tape cutter
6. Pressure regulator [03062103-xx]
7. Main valve
5 Pneumatic System
5.2 Disabling the compressed air supply
86 Service Manual SIPLACE X-Series S (from Hxxxx) 01/2021
5.2 Disabling the compressed air supply
CAUTION
Switch off the compressed air supply
The compressed air supply must always be switched off for all work on the pneumatic system.
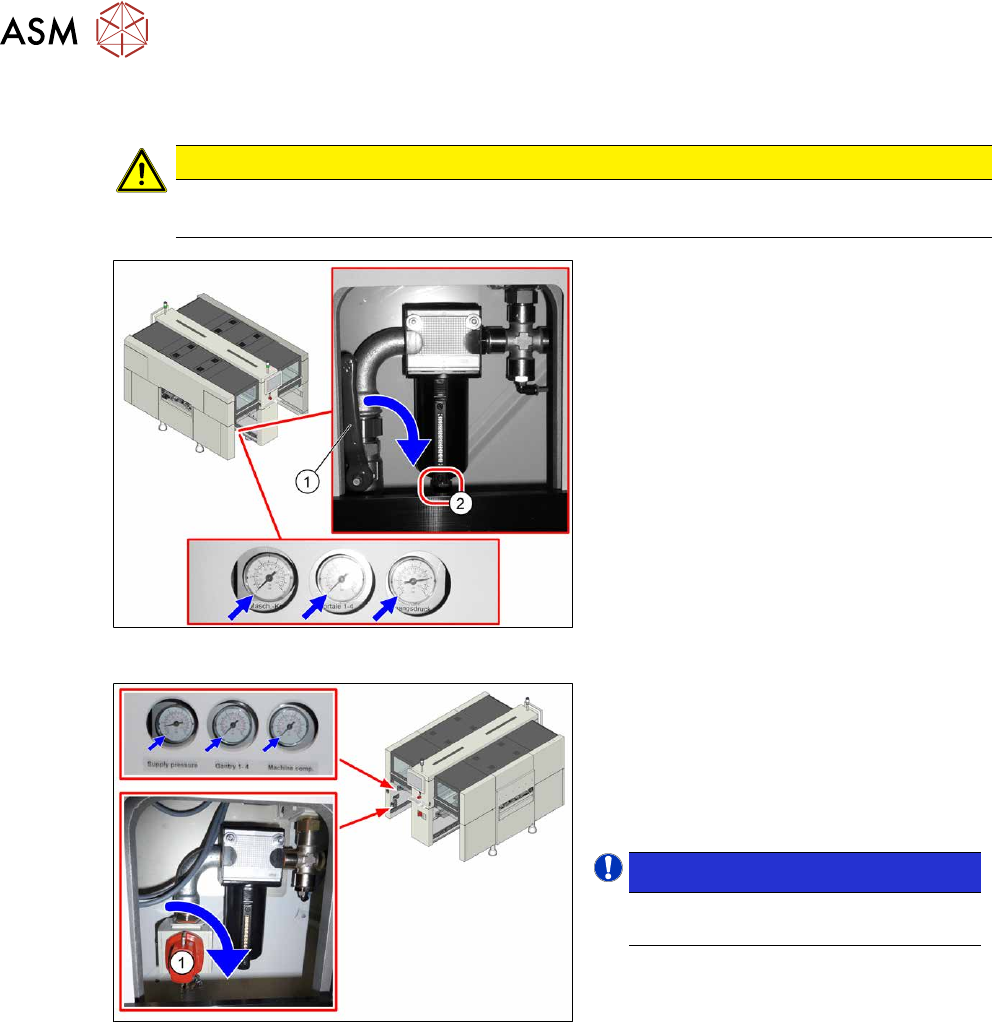
Fig.99: Disabling the compressed air supply (version 1)
Version 1:
► Push the lever (1) for the compressed
air supply down until it is positioned ho-
rizontally.
► Open the screw (2) on the inlet filter to
vent the system. Hold a cloth under-
neath to capture any escaping liquid.
Fig.100: Shutting off the compressed air supply (version 2)
Version 2:
► Push the switch (1) for the compressed
air supply by 90 degrees, until it is posi-
tioned horizontally.
► All pressure gauges must be set to
zero.
NOTICE!
Venting is performed automatically
in this version.
.
If you are working on cutters, you will need to vent these as follows: