00196497-07_SM_SXDX12_en.pdf - 第154页
Service Work Conveyor Conveyor 3.6. 4 Width Adjustment and Adjustment Unit 154 Service Manual SIPLACE SX1/SX2/DX1/DX2 FS02 Installation ► Remove the cover from the cable duct (2) . ► Remove the cover from the right conve…
Service Work Conveyor
3.6.4 Width Adjustment and Adjustment Unit Conveyor
Service Manual SIPLACE SX1/SX2/DX1/DX2 FS02 153
3.6.4
3.6.4 Width Adjustment and Adjustment Unit
Width Adjustment and Adjustment Unit
3.6.4.1
3.6.4.1 Replacing the Cylinder Unit on the Adjustment Unit (Width Adjustment) (DT only)
Replacing the Cylinder Unit on the Adjustment Unit (Width Adjustment) (DT only)
Parts, equipment and tools
There are 2 versions of the cylinder unit, one for the adjustment unit in the input area and one for the
adjustment unit in the output area.
▪ Cylinder unit 1 U2 [03069730-xx]
▪ Cylinder unit 2 U2 [03069731-xx]
Overview
Removal
► Use the software to move the conveyor sides into the position which allows you best access.
► Loosen the clamps on the conveyor sides (see "3.6.1 Loosening the Conveyor Side Clamps"
[ ➙ 143]).
► Switch off the machine, disconnect it from the power supply and secure it to prevent unauthorized
reactivation. Observe the instructions in section "1.2 Preparatory Work..." [ ➙ 13].
► Loosen the screws fastening the right-hand lifting table plate (viewed in the direction of transport)
and remove this lifting table plate.
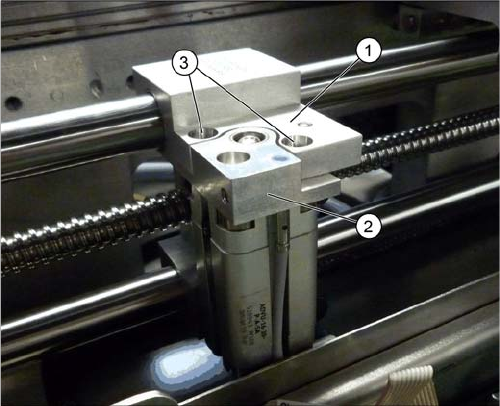
1. Adjustment unit
2. Cylinder unit
3. Screw fastening the cylinder unit

Service Work Conveyor
Conveyor 3.6.4 Width Adjustment and Adjustment Unit
154 Service Manual SIPLACE SX1/SX2/DX1/DX2 FS02
Installation
► Remove the cover from the cable duct (2).
► Remove the cover from the right conveyor control (1).
► Loosen the screw (6) fastening the cylinder unit (5)
and carefully pull the cylinder unit out of the adjust-
ment unit (4).
► Unthread the pneumatic and electrical connections
as far as the solenoid valve (3) or up to the conveyor
control (1) and unplug these. You may want to mark
the positions, to make clear assignment easier later
on. Open the corresponding cable ties to help you, if
needed.
► Remove the cylinder unit from the machine.
► Follow the removal instructions in reverse order for
installation. Also observe the following instructions:
CAUTION!
Installation instructions
When installed in the adjustment unit, the cylinder unit
has some play. Make sure that the cylinder unit is flush
with the adjustment unit. Align it with the parallel edge (3)
(viewed in the direction of transport).
Make sure that the cables and hoses do not rub against
any parts.
Replace any opened cable ties.
Service Work Conveyor
3.6.4 Width Adjustment and Adjustment Unit Conveyor
Service Manual SIPLACE SX1/SX2/DX1/DX2 FS02 155
3.6.4.2
3.6.4.2 Replacing the Short-Stroke Cylinder on the Adjustment Unit (Width Adjustment) [00356862-xx] (DC Only)
Replacing the Short-Stroke Cylinder on the Adjustment Unit (Width Adjustment) [00356862-xx]
(DC Only)
Parts, equipment and tools
▪ Short-stroke cylinder ADVU-16-20-P-A-SA [00356862-xx]
Overview
Removal
► Loosen the clamps on the conveyor sides (see "3.6.1 Loosening the Conveyor Side Clamps"
[ ➙ 143]).
► Switch off the machine, disconnect it from the power supply and secure it to prevent unauthorized
reactivation. Observe the instructions in section "1.2 Preparatory Work..." [ ➙ 13].
► Remove the cylinder unit from the machine (see "3.6.4.1 Replacing the Cylinder Unit on the Adjust-
ment Unit (Width Adjustment) (DT only)" [ ➙ 153]).
► Loosen the two screws of the short-stroke cylinder.
► Loosen the pneumatic connections. Mark their positions, to make clear assignment easier later on.
► Loosen the trailing cable down on the cylinder unit and "swing" this carefully to one side.
► Carefully pull the cylinder unit our of the adapter plate.
Installation
► Follow the removal instructions in reverse order for installation.
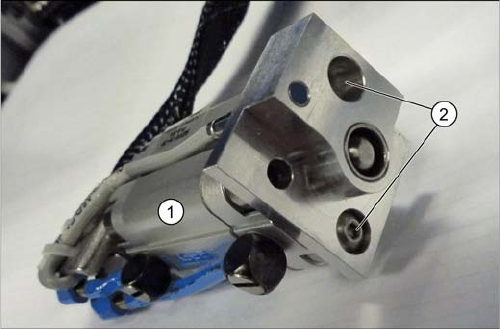
Overview cylinder unit
1. Short-stroke cylinder
2. Screws fastening the short-stroke cylinder