00196497-07_SM_SXDX12_en.pdf - 第276页
Settings Conveyor Settings 4.6.1 Belt Tension 276 Service Manual SIPLACE SX1/SX2/DX1/DX2 FS02 4.6.1.3 4 . 6 . 1 . 3 S e t t in g t h e T e n s io n o f t h e W id t h A d ju s t m e n t T o o t h e d B e lt Setting the T…
Settings
4.6.1 Belt Tension Conveyor Settings
Service Manual SIPLACE SX1/SX2/DX1/DX2 FS02 275
Setting
4.6.1.2
4.6.1.2 Setting the Tension of the Conveyor Toothed Belt
Setting the Tension of the Conveyor Toothed Belt
Setting
► Use the software to move the conveyor sides into the position which allows you best access. Alter-
natively, you can also loosen the conveyor side clamps on the dual conveyor (see "3.6.1 Loosening
the Conveyor Side Clamps" [ ➙ 143]).
► Switch off the machine, disconnect it from the power supply and secure it to prevent unauthorized
reactivation. Observe the instructions in section "1.2 Preparatory Work..." [ ➙ 13].
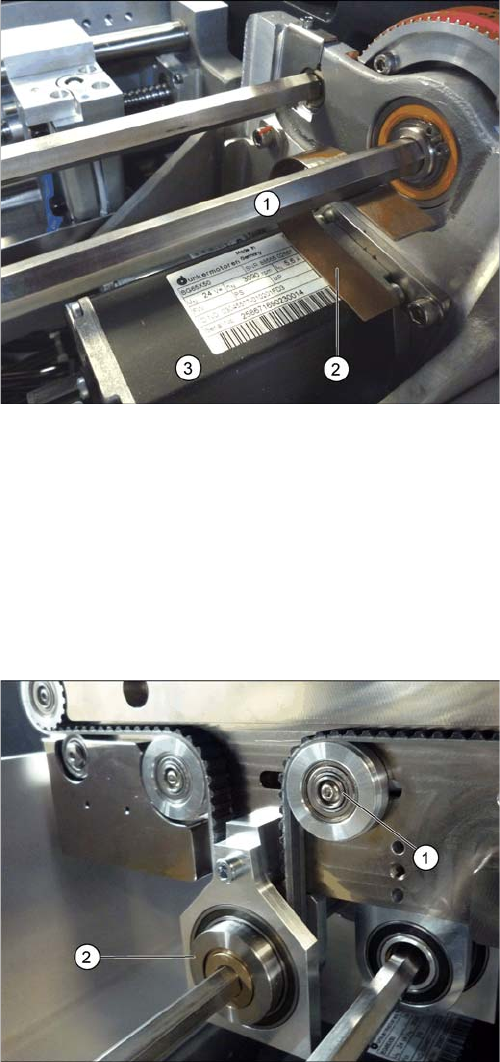
► Clamp the flat spiral spring (2) between the motor (3)
and the shaft above it (1). While doing so, push the
flat spiral spring as far as possible in the direction of
the conveyor side. The flat spiral spring must lie flush
on the motor, as shown in the diagram. The shaft
should be set so that its flat side is in the flat spiral
spring.
► Tighten the screws fastening the motor.
⇨ The tension of the flat spiral spring and the weight of
the motor should now have set the belt tension cor-
rectly to 250 +/-20 Hz.
► Set the tension of the conveyor toothed belt to 200 +/
-15 Hz. To do this, measure at the center, between
the flexible guide castor (1) and the tape drive (2).
Settings
Conveyor Settings 4.6.1 Belt Tension
276 Service Manual SIPLACE SX1/SX2/DX1/DX2 FS02
4.6.1.3
4.6.1.3 Setting the Tension of the Width Adjustment Toothed Belt
Setting the Tension of the Width Adjustment Toothed Belt
Overview
Setting
► Use the software to move the conveyor sides into the position which allows you best access. Alter-
natively, you can also loosen the conveyor side clamps on the dual conveyor (see "3.6.1 Loosening
the Conveyor Side Clamps" [ ➙ 143]).
► Switch off the machine, disconnect it from the power supply and secure it to prevent unauthorized
reactivation. Observe the instructions in section "1.2 Preparatory Work..." [ ➙ 13].
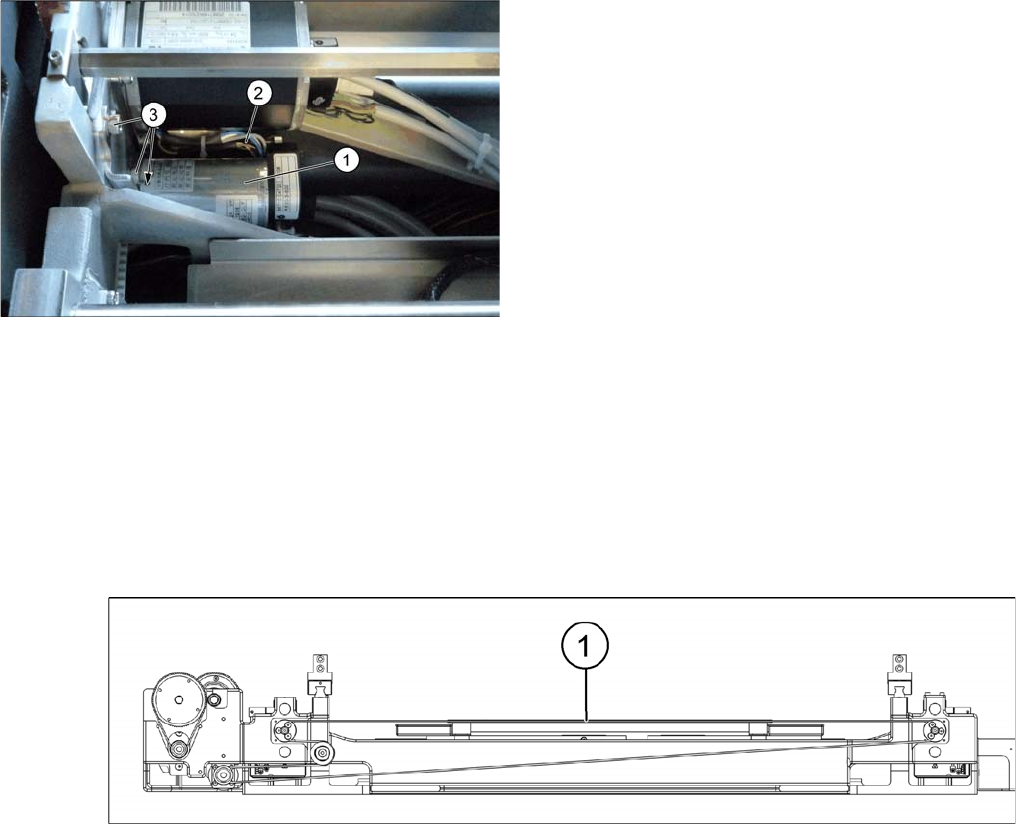
► Check the tension at the center (1) between the two deflection pulleys. The tension needs to be 20 +/
-2Hz.
► If the tension is not correct, loosen the screws fastening the drive unit and alter the tension. To in-
crease the tension, press the drive unit towards the output side and vice versa.
1. Drive unit of width adjustment
2. Electrical connections
3. Fastening screws
Settings
4.6.1 Belt Tension Conveyor Settings
Service Manual SIPLACE SX1/SX2/DX1/DX2 FS02 277
4.6.1.4
4.6.1.4 Calculating the Belt Tension
Calculating the Belt Tension
Example
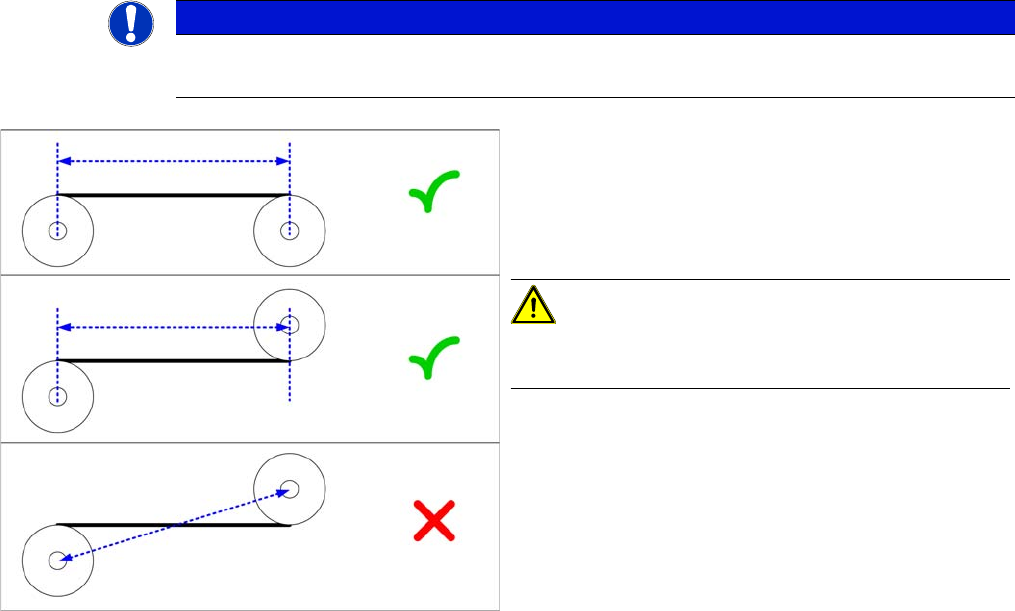
Distance between the rollers: 235 mm
Calculation:
20000/235 = 85 (exactly 85.106…)
10 % of 85.106… = 8.5106…
Result:
Belt tension: 85 +/-9 Hz
NOTICE
For conveyor belt only
This calculation only applies to the conveyor belt.
► Define the two deflection pulleys between which you
want to set the belt tension. If possible, avoid using
the idlers for this.
► Measure the distance between the two deflection pul-
leys parallel to the conveyor belt. (see diagram)
CAUTION!
Please note that it is not always possible to just measure
the deflection pulleys from center to center.
► Calculate the belt tension using the following formula:
(20000 / roller spacing [mm]) [Hz]
The permissible tolerance is always plus/minus 10 % of
the calculated value.