00196497-07_SM_SXDX12_en.pdf - 第38页
Service Work Conveyor Basic Machine 3.1.4 Exchanging the Gantry Changer Doors 38 Service Manual SIPLACE SX1/SX2/DX1/DX2 FS02 Removal Installation ► Follow the removal in structions in reverse order for installati o n. Al…

Service Work Conveyor
3.1.3 Flap Cover Stopper Basic Machine
Service Manual SIPLACE SX1/SX2/DX1/DX2 FS02 37
3.1.3
3.1.3 Flap Cover Stopper
Flap Cover Stopper
Parts, Equipment and Tools
▪ Stop left, cpl. [03113746-xx]
Stop right, cpl. [03113750-xx]
(repace: [03086295-xx] and [03072728-xx])
3.1.4
3.1.4 Exchanging the Gantry Changer Doors
Exchanging the Gantry Changer Doors
Parts, Equipment and Tools
Select the appropriate version:
Both versions are not compatible. The following parts are required for conversion:
Version 1:
▪ SX1/SX2:
Door left cpl. [03074871-xx] / Door right cpl. [03074867-xx]
– 2x Guide rail vertical, door [03074863-xx]
– 6x DIN EN ISO 7380-M3 x 6-A2-70 [03045194-xx]
▪ DX1/DX2:
Door left cpl. [03082494-xx] / Door right cpl. [03082911-xx]
– 2x Guide rail vertical, door [03074863-xx]
– 6x DIN EN ISO 7380-M3 x 6-A2-70 [03045194-xx]
Version 2:
▪ SX1/SX2, DX1/DX2:
Door left cpl. [03091950-xx] / Door right cpl. SX12/ DX12 [03089768-xx]
– 2x Guide rail vertical, door [03082793-xx]
– 6x DIN EN ISO 7380-M3 x 6-A2-70 [03045194-xx]
NOTICE
New flap cover stopper on SIPLACE SX1/2, DX1/2
Possible problems:
➢ Breakage of the rollers on the protective covers
➢ Improper closing of the flap covers
➢ Badly adjusted cover guidances or stoppers
► Also read the Technical Information "New stopper on folding covers for SIPLACE SX1 /
DX1" [DE: TI2014-04D05] [EN: TI2014-04E05].
► Read section "4.2.1 Setting the Machine Covers" [ ➙ 249].
NOTICE
Various versions
There are two gantry changer door versions. Installation and removal is described based on
version 1. For version 2, proceed in the same manner. Any differences will be explicitly indicat-
ed.
Door left Door right
Version 1 (keyboard at the monitor) 03074871-xx 03074867-xx
Version 2 (keyboard at the gantry changer door) 03091950-xx 03089768-xx
NOTICE
Observing the Technical Information
► Observe the Technical Information "New stopper on folding covers for SIPLACE SX1 /
DX1" [DE: TI2014-04D05] [EN: TI2014-04E05].
Service Work Conveyor
Basic Machine 3.1.4 Exchanging the Gantry Changer Doors
38 Service Manual SIPLACE SX1/SX2/DX1/DX2 FS02
Removal
Installation
► Follow the removal instructions in reverse order for installation. Also observe the following instruc-
tions:
NOTICE
Washers etc.
► Note all positions of washers, springs etc. to ensure their correct assignment later on.
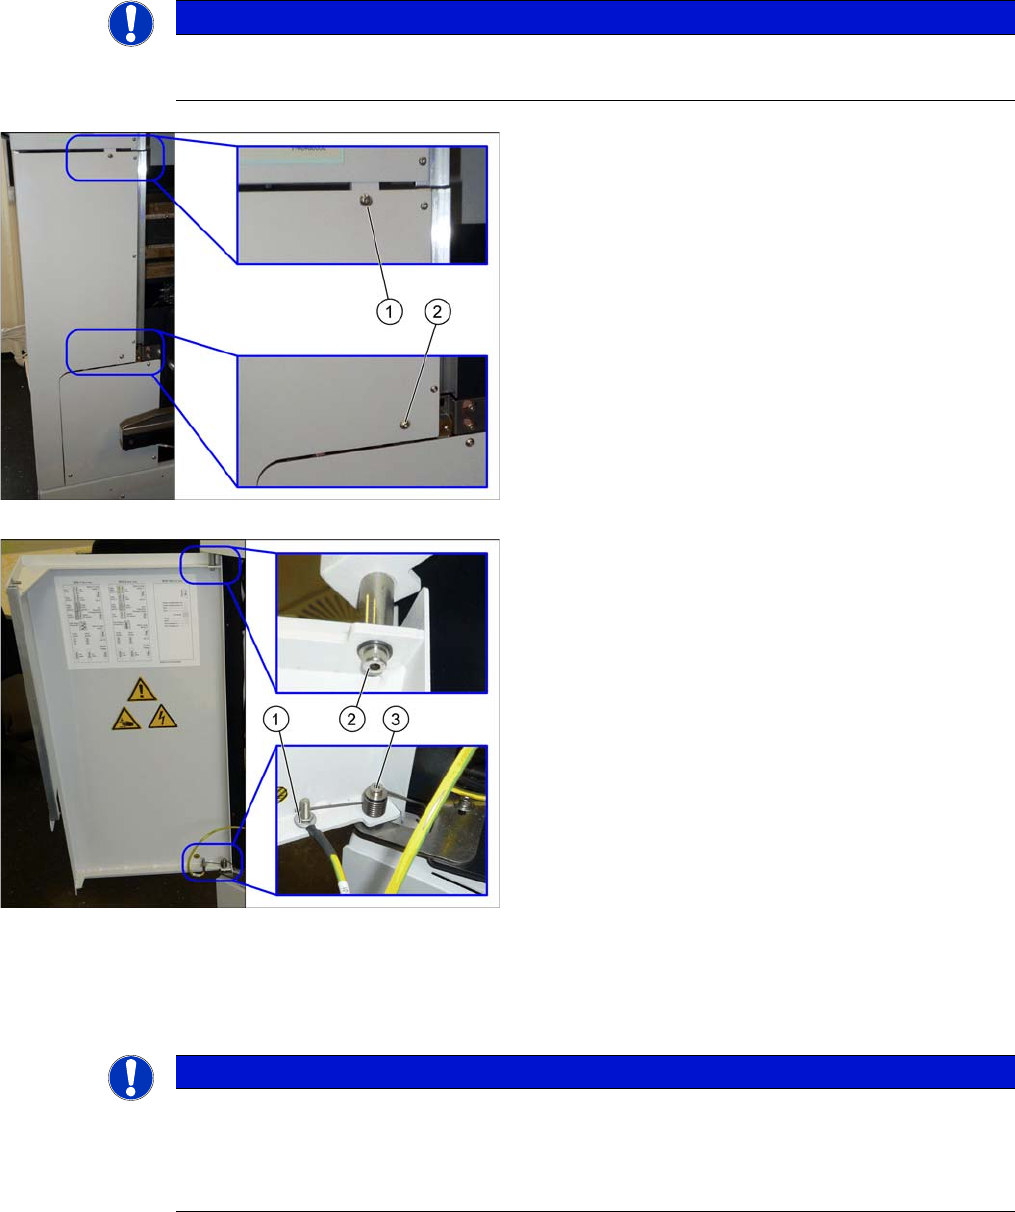
► Open the flap cover.
► Lift off the keyboard.
► Remove the two fastening screws (1) and (2) on the
gantry changer doors.
► Remove the fastening screw (1) of the grounding ca-
ble.
► Remove the lower fastening screw (3) of the gantry
changer door and lift off the spring.
► Remove the upper fastening screw (2) of the gantry
changer door.
Here, you find two washers: a smaller one on the side
of the screw head, a bigger one on the side of the cyl-
inder.
► Lift the gantry changer door out of the lower cylinder.
NOTICE
Installation instructions
► Make sure to insert the spring in the correct orientation (see figure above).
► Check and, if necessary, correct the setting of the cover guidance, the bottom stopper, and
the cover rollers (see "4.2.1 Setting the Machine Covers" [ ➙ 249]).

Service Work Conveyor
3.2.1 Electrical Checks Electrical System
Service Manual SIPLACE SX1/SX2/DX1/DX2 FS02 39
3.2
3.2 Electrical System
Electrical System
DANGER - Checking the power supply for absence of voltage
See also
3.4.15 Replacing the MGCU/GCU [ ➙ 104]
5 Description of the Circuit Boards [ ➙ 299]
3.2.1
3.2.1 Electrical Checks
Electrical Checks
For any electrical checks, please read the appropriate circuit diagram folder of your machine:
▪ SIPLACE SX1/SX2/DX1/DX2 detailed circuit diagrams [00196475-xx] (German/English)
See also
5.1.4 Fuse Connection Board [ ➙ 309]
3.2.2
3.2.2 Measuring Voltages at the Power Supply Unit
Measuring Voltages at the Power Supply Unit
DANGER - Voltages (wit hout SMPS)
Tools and Equipment Required
▪ Digital voltmeter, class 1, 5
▪ Test cable with test probes or terminals
▪ Circuit diagram folder for your machine
DANGER
Checking for absence of voltage!
► Before you start working, check the power supply for absence of voltage and observe the
waiting times!
DANGER
Voltages
There is a risk of dangerous touch voltages and short circuits occurring in power supplies which
have been made accessible and are connected for measurement purposes or bridge circuit
control.
Nonobservance of these safety instructions may cause injury to personnel and damage to the
machine!
Measurements may only be performed by specially trained service technicians, with appropri-
ate qualifications and expertise.
► Observe the instructions in section Safety Instructions for the Power Supply (Without
SMPS).