00196497-07_SM_SXDX12_en.pdf - 第39页
Service Work Conveyor 3.2.1 Electrical Checks Electrical System Service Manual SIPLACE SX1/SX2/DX1/DX2 FS02 39 3.2 3 . 2 E le c t r ic a l S y s t e m Electrical System DANGER - Checki ng the power su pply for absenc e o…
Service Work Conveyor
Basic Machine 3.1.4 Exchanging the Gantry Changer Doors
38 Service Manual SIPLACE SX1/SX2/DX1/DX2 FS02
Removal
Installation
► Follow the removal instructions in reverse order for installation. Also observe the following instruc-
tions:
NOTICE
Washers etc.
► Note all positions of washers, springs etc. to ensure their correct assignment later on.
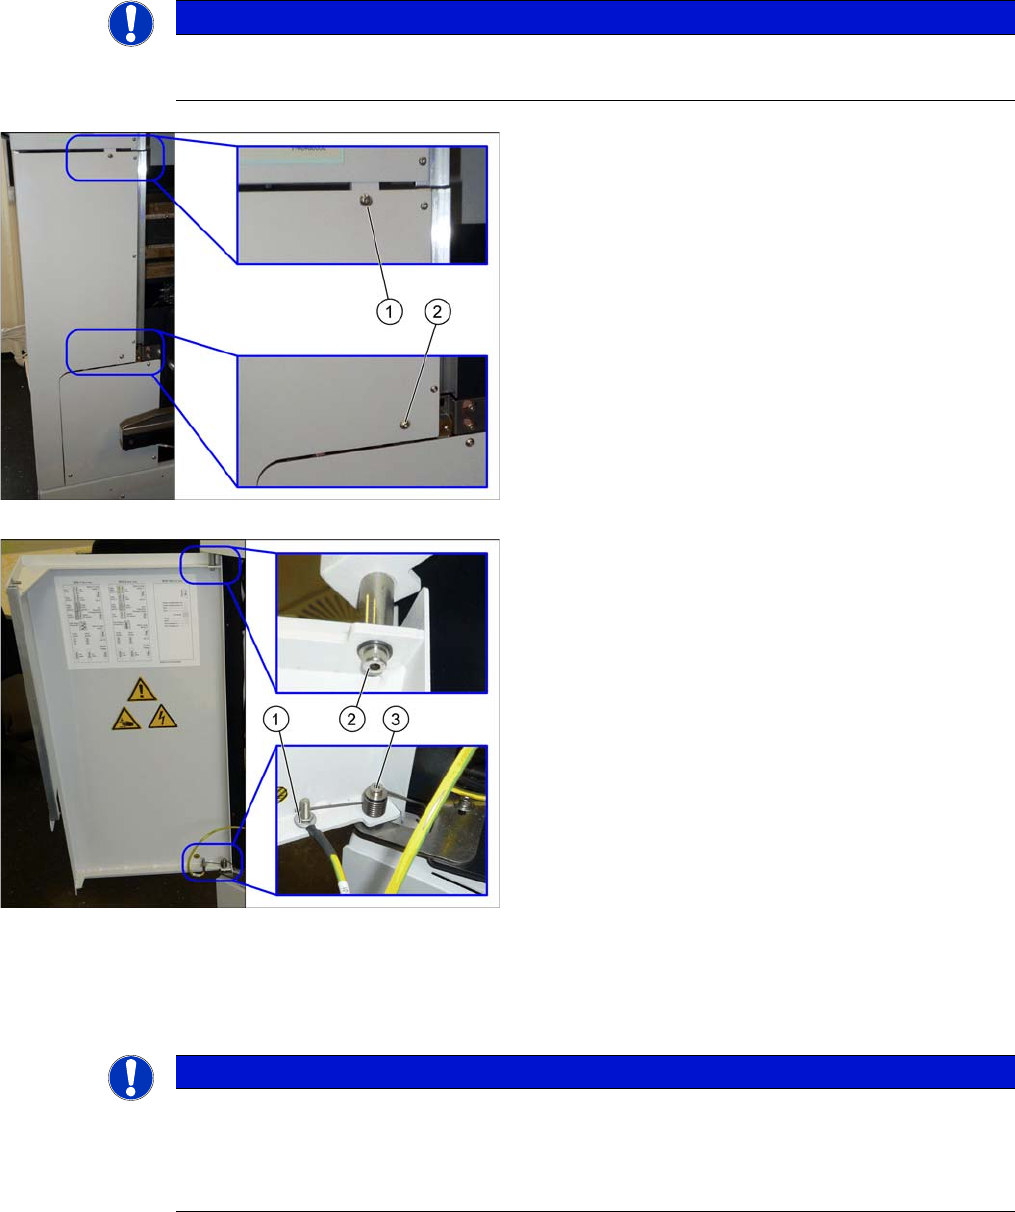
► Open the flap cover.
► Lift off the keyboard.
► Remove the two fastening screws (1) and (2) on the
gantry changer doors.
► Remove the fastening screw (1) of the grounding ca-
ble.
► Remove the lower fastening screw (3) of the gantry
changer door and lift off the spring.
► Remove the upper fastening screw (2) of the gantry
changer door.
Here, you find two washers: a smaller one on the side
of the screw head, a bigger one on the side of the cyl-
inder.
► Lift the gantry changer door out of the lower cylinder.
NOTICE
Installation instructions
► Make sure to insert the spring in the correct orientation (see figure above).
► Check and, if necessary, correct the setting of the cover guidance, the bottom stopper, and
the cover rollers (see "4.2.1 Setting the Machine Covers" [ ➙ 249]).

Service Work Conveyor
3.2.1 Electrical Checks Electrical System
Service Manual SIPLACE SX1/SX2/DX1/DX2 FS02 39
3.2
3.2 Electrical System
Electrical System
DANGER - Checking the power supply for absence of voltage
See also
3.4.15 Replacing the MGCU/GCU [ ➙ 104]
5 Description of the Circuit Boards [ ➙ 299]
3.2.1
3.2.1 Electrical Checks
Electrical Checks
For any electrical checks, please read the appropriate circuit diagram folder of your machine:
▪ SIPLACE SX1/SX2/DX1/DX2 detailed circuit diagrams [00196475-xx] (German/English)
See also
5.1.4 Fuse Connection Board [ ➙ 309]
3.2.2
3.2.2 Measuring Voltages at the Power Supply Unit
Measuring Voltages at the Power Supply Unit
DANGER - Voltages (wit hout SMPS)
Tools and Equipment Required
▪ Digital voltmeter, class 1, 5
▪ Test cable with test probes or terminals
▪ Circuit diagram folder for your machine
DANGER
Checking for absence of voltage!
► Before you start working, check the power supply for absence of voltage and observe the
waiting times!
DANGER
Voltages
There is a risk of dangerous touch voltages and short circuits occurring in power supplies which
have been made accessible and are connected for measurement purposes or bridge circuit
control.
Nonobservance of these safety instructions may cause injury to personnel and damage to the
machine!
Measurements may only be performed by specially trained service technicians, with appropri-
ate qualifications and expertise.
► Observe the instructions in section Safety Instructions for the Power Supply (Without
SMPS).
Service Work Conveyor
Electrical System 3.2.2 Measuring Voltages at the Power Supply Unit
40 Service Manual SIPLACE SX1/SX2/DX1/DX2 FS02
Preparation
► Reconnect the machine to the power supply.
► Switch the placement machine on again at the main switch and start it up.
Performing measurements
► Measure the required voltages.
CAUTION
Take care not to damage the supply lines!
Make sure that the main power cable and supply cables in the machine are not trapped and
that the insulation is not damaged.
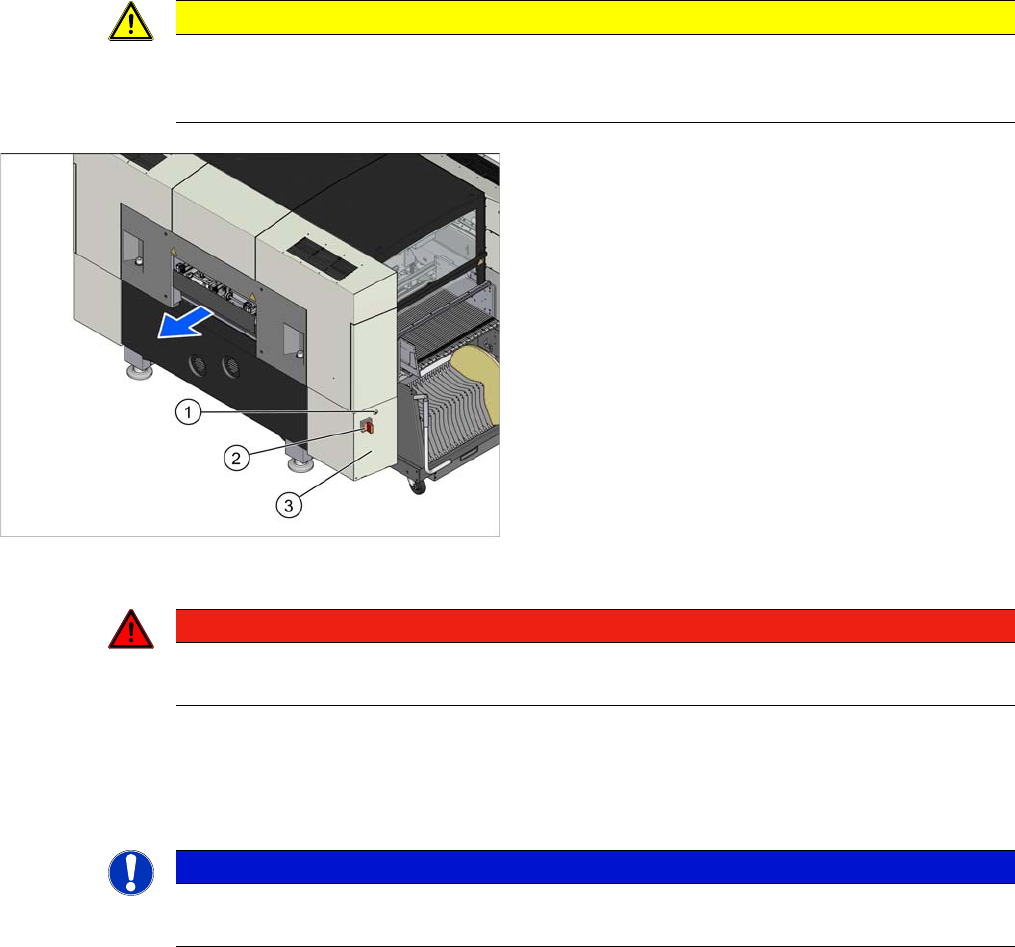
► End all placement operations on the machine.
► Switch the machine off at the main switch (2).
► Disconnect the machine from the main power supply.
► Open the lock (1) on the power supply cover (3).
► Pull the power supply out towards the front.
DANGER
Touch voltages
There may be dangerous touch voltages in the vicinity of the open power supply!
NOTICE
Voltages
Please refer to the relevant circuit diagram for your machine for details of the various voltages.