00192156-04.pdf - 第80页
Maintenance Maintenance Instr uctions F 10 Annual maintenance work 03/2003 US E dition 80 10 Annual mainten ance work 10

Maintenance Instructions F Maintenance
03/2003 US Edition 9 4-monthly maintenance jobs
79
Silencer 9
: Turn the silencer counter-clockwise to remove.
a Clean the holes to the Venturi nozzles with a cottonwool bud moistened with ethyl alcohol.
9
: Check the silencer for dirt.
If there are any signs of discoloration, replace the silencer and reverse the sequence described
above to fit.
9
Don't forget the O-ring. 9
9
9
: Check the plastic silencer mount for breaks (10000x head).
9
Assemble the vacuum generator 9
: Assemble the block with the Venturi nozzles and carefully screw tight.
9
s Attach the compressed air hoses once more.
To do this, use the pliers from the service box for the DLM 1 and DLM1-6 heads. 9
Make sure that the connections are seated correctly. 9
9
The hoses must engage correctly in the couplings. 9
9
9
: Fit the head cover.
: Use the Single Functions" menu to pick up the nozzles once more.
9
Test placement 9
The distance between the component camera and the PCB camera can be changed by separating
the front and back parts of the head. 9
9
: Carry out a test placement run to test whether the placement accuracy is still guaranteed.
: If the placement accuracy is not guaranteed, remeasure the placement head.
Maintenance Maintenance Instructions F
10 Annual maintenance work 03/2003 US Edition
80
10 Annual maintenance work
10

Maintenance Instructions F Maintenance
03/2003 US Edition 10 Annual maintenance work
81
10
You will need the following tools, equipment and consumables for the annual maintenance. 10
– Vacuum cleaner
– Set of hexagon socket spanners
– SIPLACE cleaning tissue (article no. 00315253-02)
– Grease cartridge with Urethyn E/M2 (article no.: 02101696-01)
10
: Select “Block manually” (status closed) on the station computer and click on OK (for dual con-
veyor track 1 / track 2).
The placement machine will continue to produce until the last PCB is complete and has left the
PCB conveyor.
: Switch the placement system off at the main switch.
: Open the protective hood.
10
10
: Move the gantry over the feeders. This will stop it outside your working area.
10
To move the gantry, take hold of the handle and push gently and carefully. 10
10
10
Vacuum beneath the lifting table 10
: Lift the lifting table out of the placement machine.
: Carefully vacuum the area beneath the lifting table.
10
10
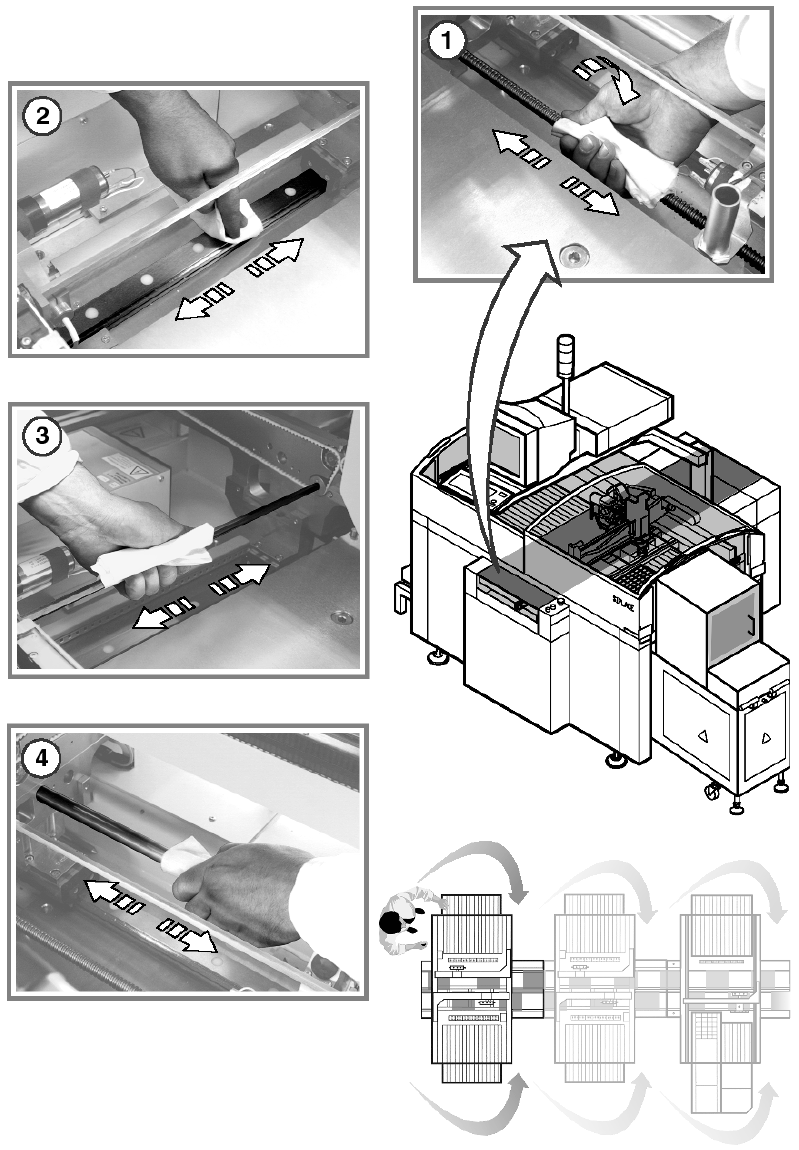
Clean and preserve the PCB conveyor 10
a Preserve the recirculating ball screw by running a SIPLACE cleaning tissue along the thread
of the screw.
s Preserve the sliding surfaces of the guide rails using a SIPLACE cleaning tissue.
d Preserve the hexagonal shafts using a SIPLACE cleaning tissue.
f Preserve the guide shafts of the PCB stopper using a SIPLACE cleaning tissue.
10