YSM10_Mainte_E.pdf - 第69页
3-2 3 Periodic maintenance items 1.1.2 Checking the nozzle leaf spring Inspect the nozzle holding status of the head periodically . • An unstable holding force at the nozzle leaf spring (hereafter "leaf spring"…
3-1
3
Periodic maintenance items
1. Weekly inspection
This section mainly describes weekly inspection and cleaning.
1.1 Nozzle inspection
A faulty buffing operation (spring action) or defective nozzle leaf spring may cause pickup errors. To prevent
this, inspect each nozzle.
1.1.1 Nozzle buffing area inspection
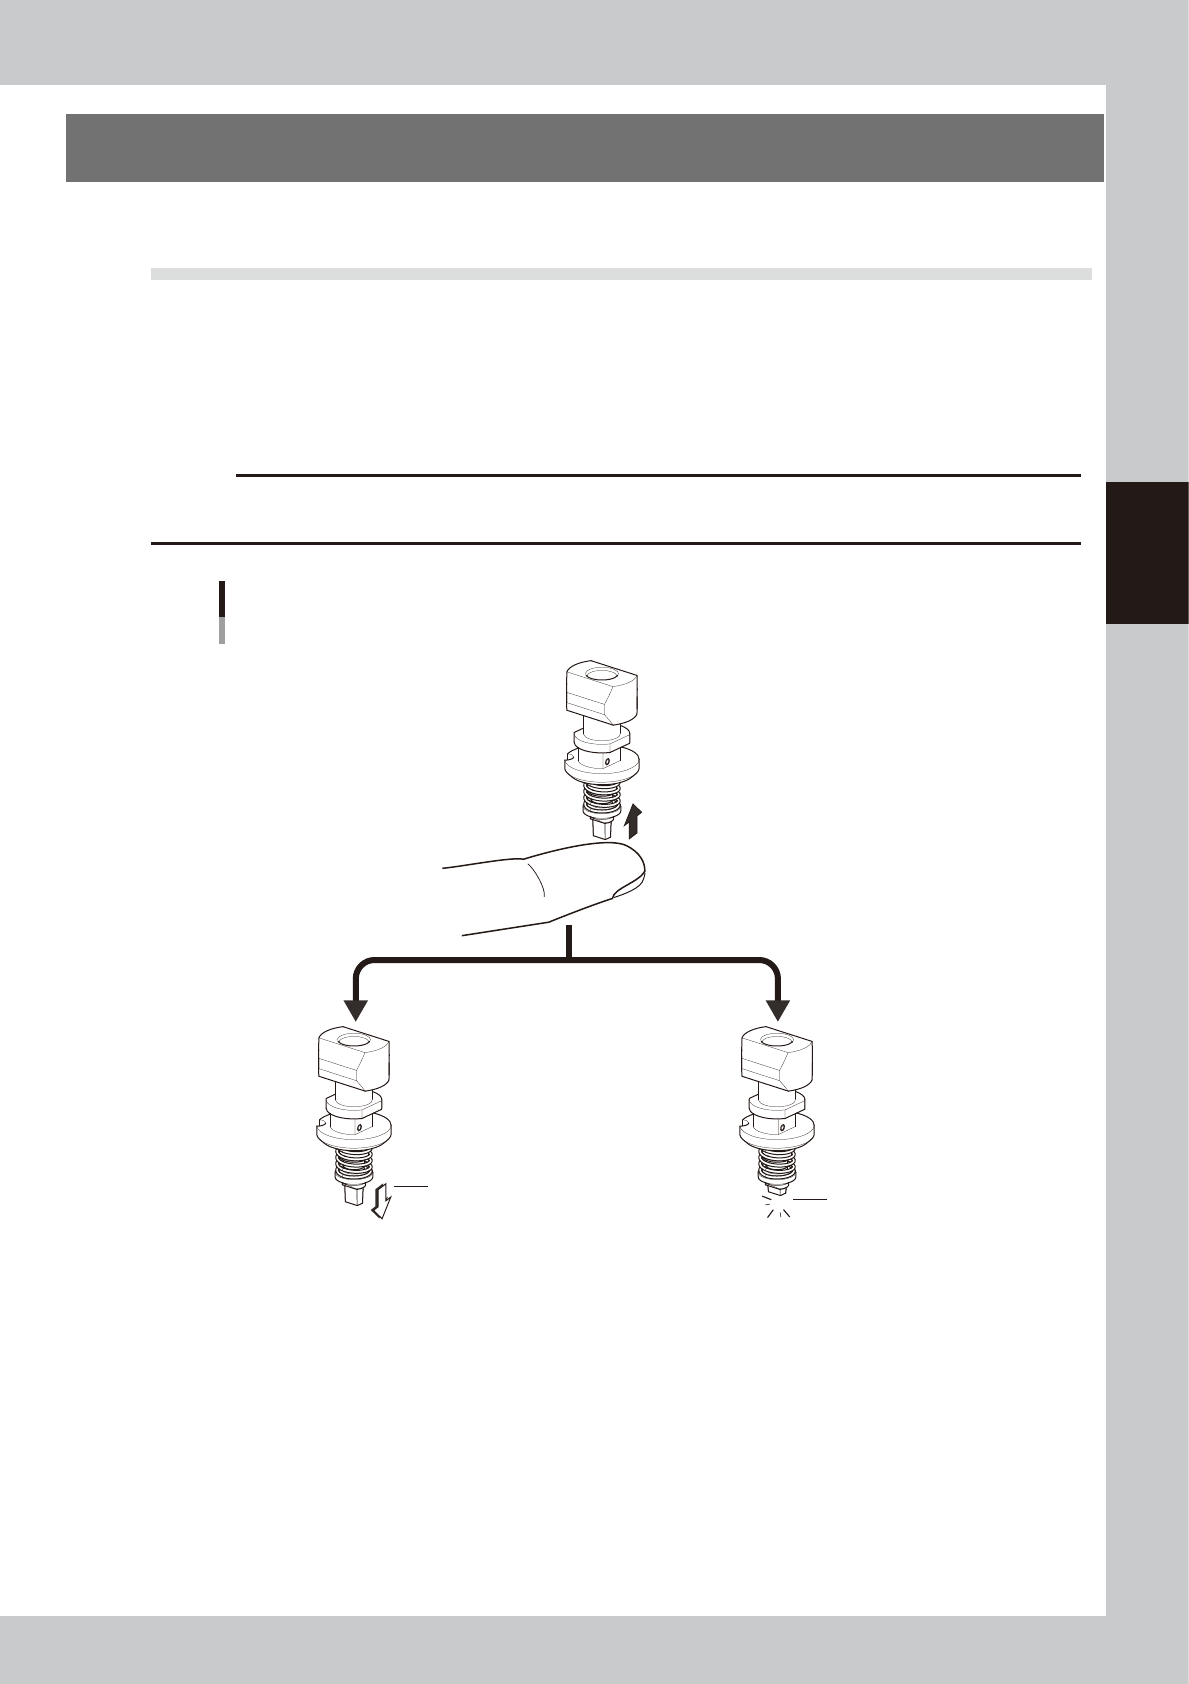
Check the spring action of the nozzles. Press on a nozzle and if it returns normally there is no problem.
However, if the return action is poor (sluggish) then pickup errors and recognition errors will occur.
c
CAUTION
When checking by pressing the nozzle tip, use care to avoid applying excessive force. The condition is normal if the
tip returns to its original position after being pressed in approximately 1mm.
Checking the nozzle spring action
Example showing type 302A nozzle
Press on the nozzle tip with your hand.
Returns to original
position.
Returns sluggishly
or does not return.
OK Fail
53300-KMG-00
3-2
3
Periodic maintenance items
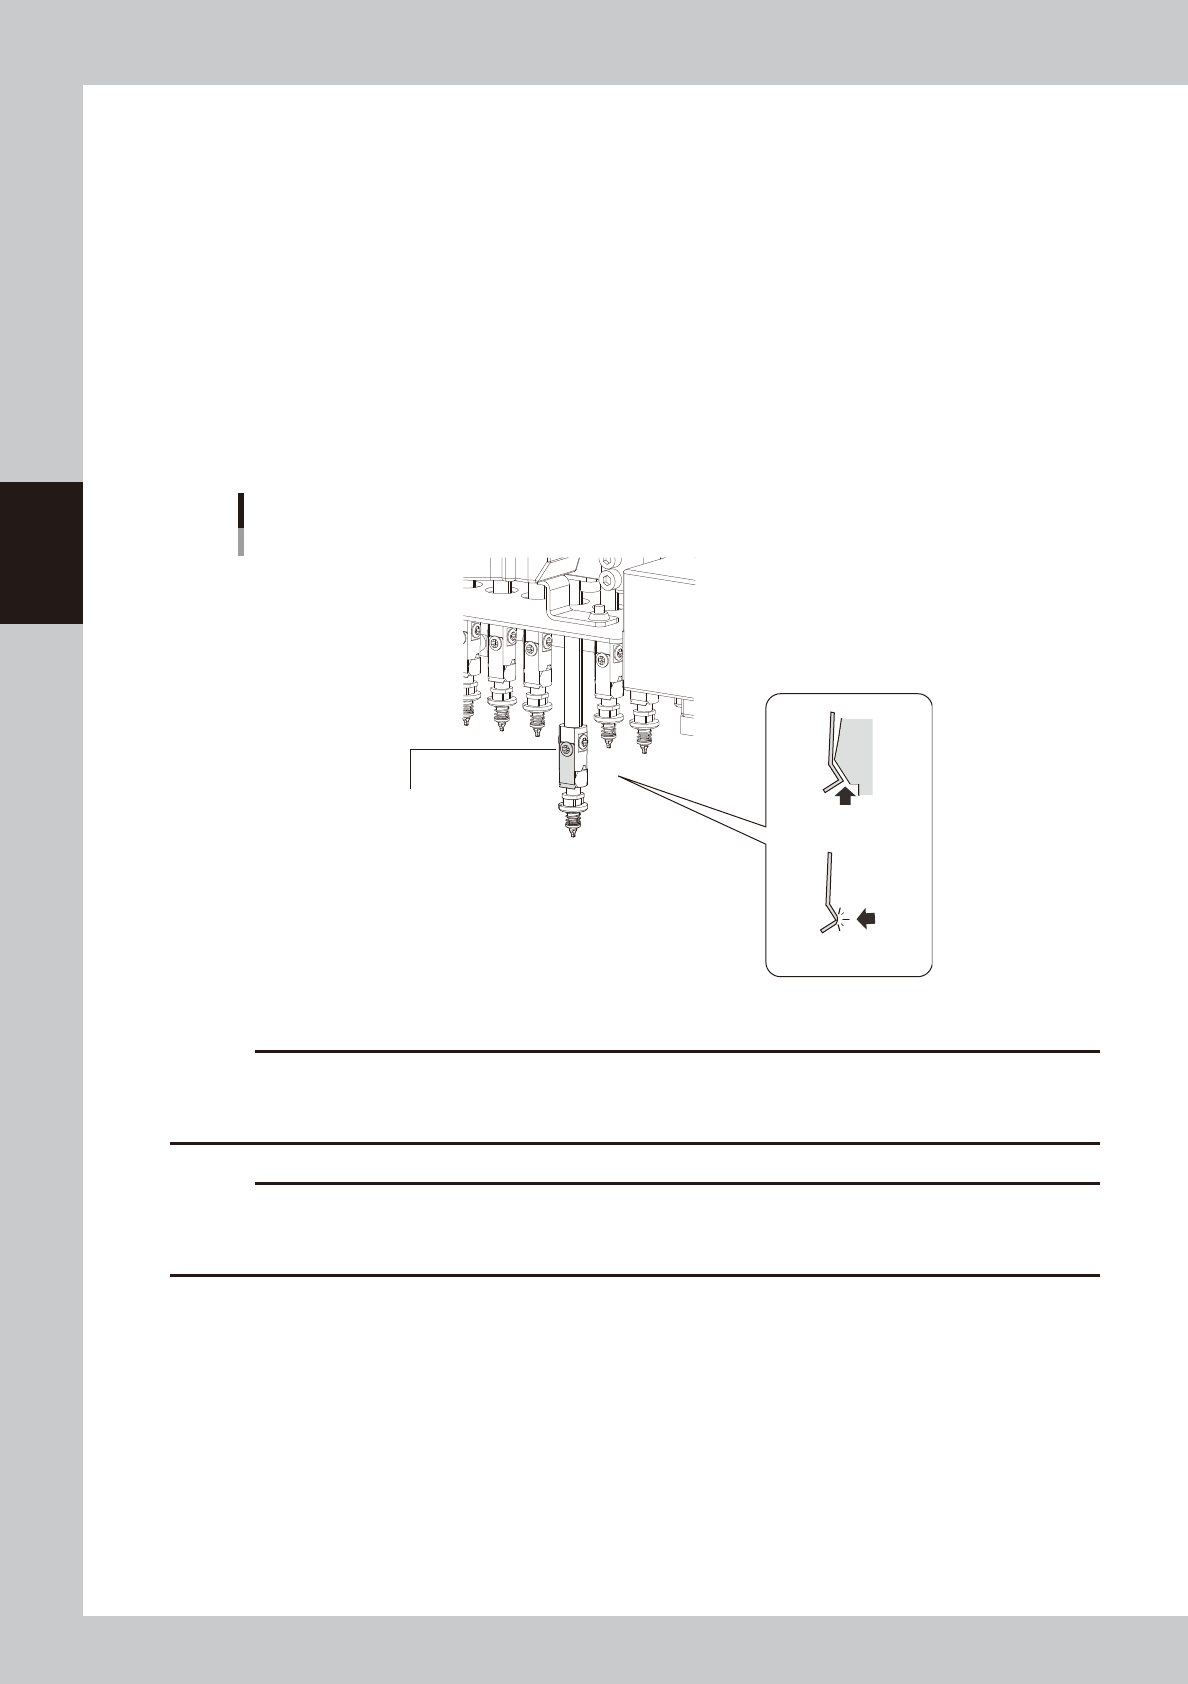
1.1.2 Checking the nozzle leaf spring
Inspect the nozzle holding status of the head periodically.
• An unstable holding force at the nozzle leaf spring (hereafter "leaf spring") can adversely affect pickup, recognition,
and mounting operations.
n
Leaf spring inspection points
Check the following points by removing the nozzle and reattaching it to the nozzle holder.
• The leaf spring should have enough gripping force.
• There should be no gap between the leaf springs and the nozzle.
• The leaf spring should not be deformed.
• The gripping part of the leaf spring should not be worn out.
• Mounting screw should be tightened.
Checking the leaf spring condition
Example of HM head
Mounting screw should be tightened.
There should be
no gap.
There should be no
deformation or wear.
53301-KMG-00
c
CAUTION
If any problem is found during the check work shown above, replace the leaf springs referring to chapter 6, "2.1
Replacing nozzle leaf springs".
As a rule, be sure to replace a pair of components even when only the leaf spring on one side deteriorates.
c
CAUTION
Return the nozzle you have removed to the head.
When the nozzle has been removed from the nozzle station, return it correctly to the storage position where the nozzle
has been removed.
3-3
3
Periodic maintenance items
1.2 Nozzle cleaning
The following describes how to clean and lubricate the Type 30X Group nozzles. Also, clean and lubricate the
Type31X Group nozzles in the same manner.
1.2.1 Cleaning and lubricating the nozzle buffing area
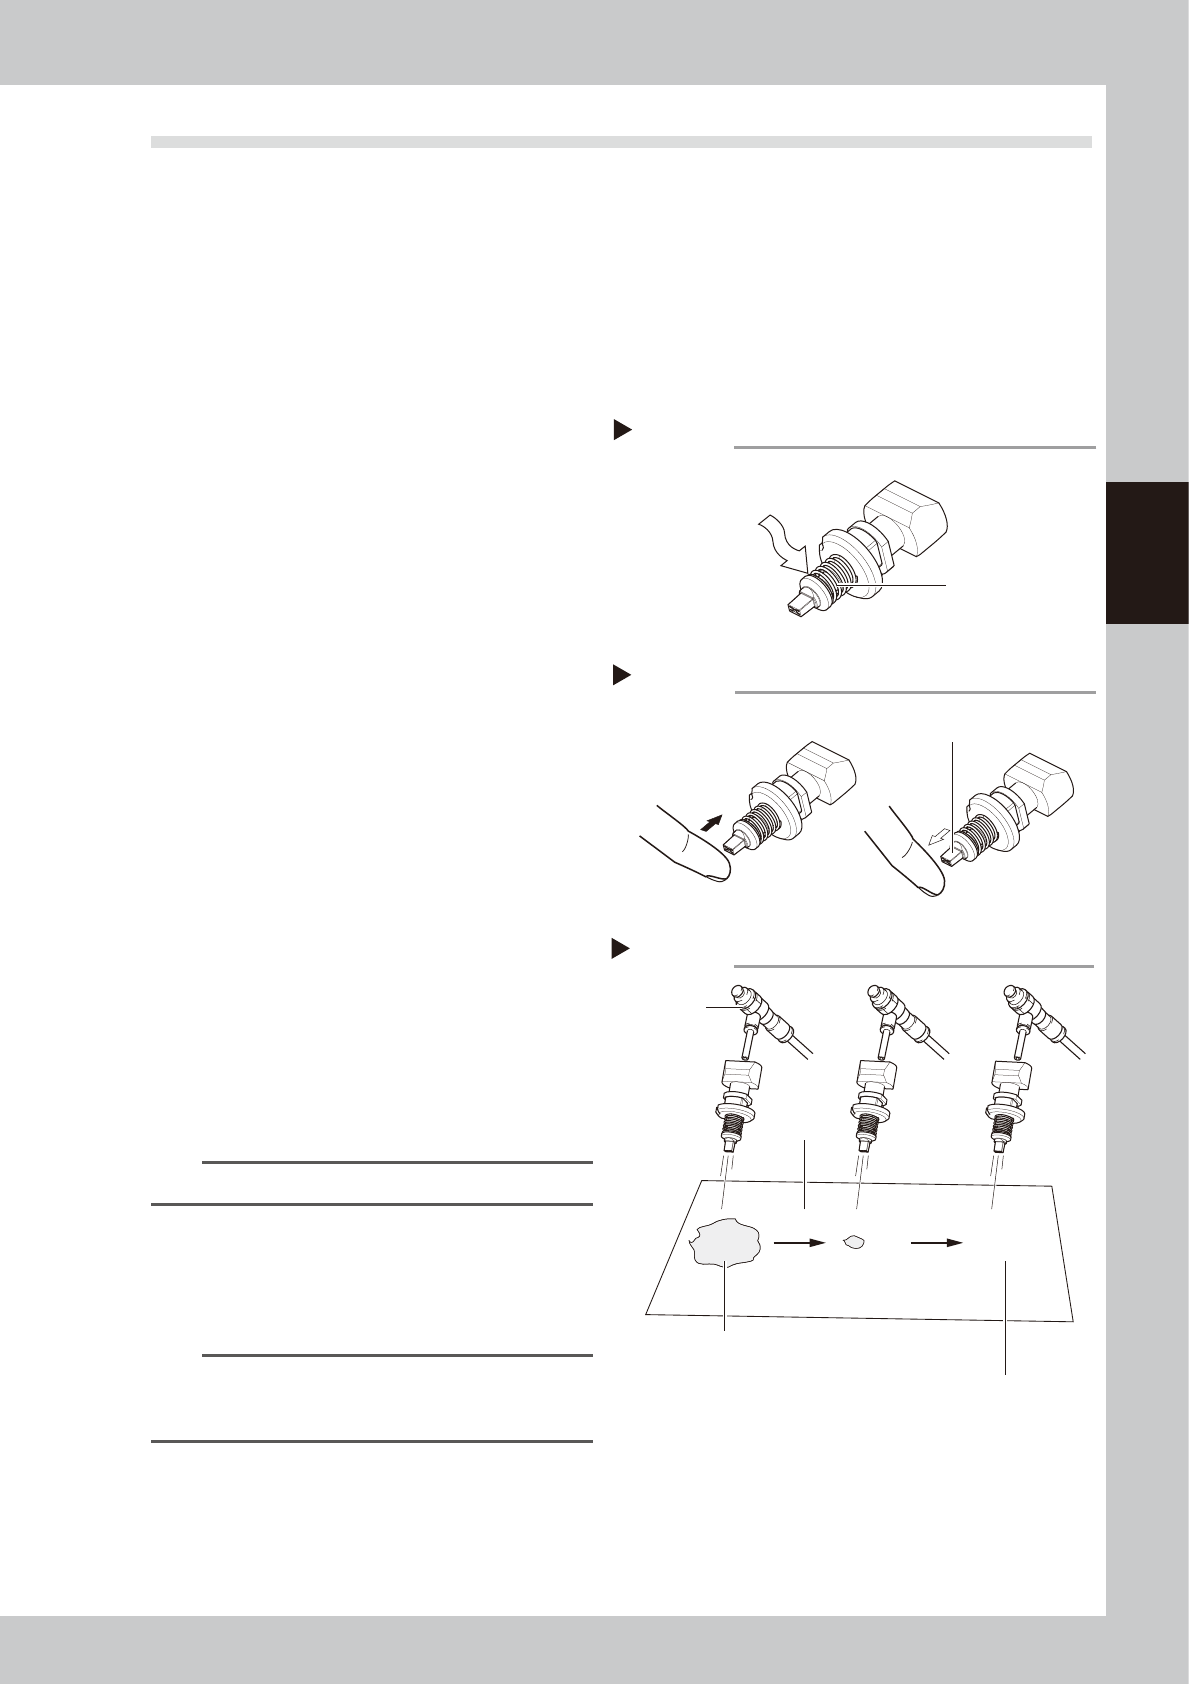
e
1
Remove the nozzle from the head.
1. Press the emergency stop button to open
the machine safety cover.
2. Remove the nozzle from the head. If the
machine is equipped with the nozzle
station, press the [Nozzle Stn Shutter]
button to open the nozzle station shutter
and remove the nozzle.
2
Clean the slide section.
Apply absolute ethanol to the slide section.
Push the nozzle tip several times to repeat
the buffing action (spring action) to clean
the slide section. After cleaning, blow
sufficient air to remove absolute ethanol.
3
Lubricate the slide section.
Using a precision screwdriver or similar tool
with a pointed tip, apply a small amount of
turbine oil (just enough so that it sinks in) to
the slide section.
53302-KMG-00
4
Check the buffing action (spring
action).
Push the nozzle tip several times to repeat
the buffing action and spread turbine oil.
Use a lint-free cleaning cloth to wipe away
excess oil from around the nozzle.
53303-KMG-00
5
Remove excess oil remaining in the
nozzle.
Air blow with the air blow tool for
approximately 5 seconds from the nozzle tip
side, and approximately 5 seconds from the
nozzle mounting side. Repeat this process a
few times to remove excess turbine oil
remaining in the nozzle.
n
NOTE
A thin coat of oil is enough to lubricate the slide section.
6
Check that the oil was removed.
Blow air through the nozzle again while
placing commercially-available oil blotting
paper over the opposite end of the nozzle,
and check for residual oil in the nozzle.
n
NOTE
Performing step 5 is usually sufficient to remove oil
remaining in the nozzle. However, if oil still remains then
blow air through the nozzle once again.
53304-KMG-00
7
Return the nozzle to its original
position.
Return the nozzle to the head or nozzle
station where the nozzle was removed.
Lubricating the slide section
Step 3
Buffing area
Use a precision screwdriver
to apply a small amount of
turbine oil.
Checking the spring action
Step 4
Spring action at nozzle tip
Checking for residual oil
Step 6
Oil will appear after blowing air (first time) for
about 5 seconds from the nozzle tip.
Repeat the air blow for about 5 seconds
each from the nozzle tip and from the
attachment side.
This task is finished when oil no
longer appears.
Oil blotting
paper
AIr blow tool