Oxford_DEEP_RIE_SOP.pdf - 第2页
Oxford Deep RIE SOP C.Gutierrez Page 2 11/24/2008 Bosch-120: calibrated Bosch et ch process 120 loops or less Bosch-480: calibrated Bosc h etch process 480 loops Clean: O 2 plasma chamber cleaning recipe o Approxim…
Oxford Deep RIE SOP
C.Gutierrez Page 1 11/24/2008
Purpose:
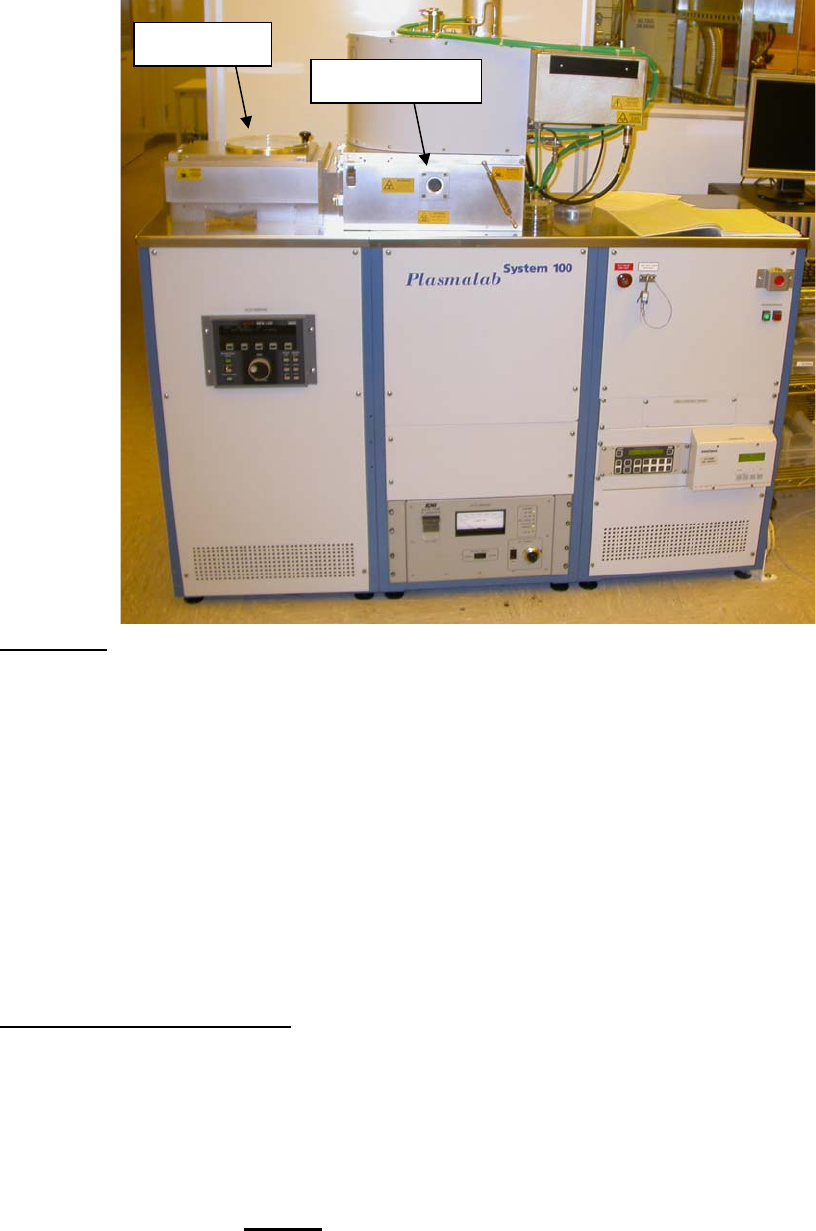
The Oxford PlasmaLab System 100 is used to etch deep anisotropic trenches in
silicon substrates using the patented Bosch process. An inductively coupled plasma
(ICP) generates a very dense plasma near the top of the electrode. A 2nd RIE
generator which is capacitively coupled to the wafer chuck is used to independently bias
the substrate. In this way, high selectivities and high etch rates can be obtained. The
Bosch process uses alternating depositions and etches to maintain very low undercut
and nearly vertical sidewalls. However a slight rippling of the sidewalls results from this
sequence (individual ripples are called “scallops”) and also results in the deposition of a
Telfon-like fluorocarbon polymer which must be removed subsequent to the etch. The
standard Bosch process chemistry can only etch silicon (or polysilicon/amorphous
silicon). The system is by default set up for processing 4 inch wafers.
IMPORTANT Guidelines:
• ONLY SILICON etching is permitted. Etching of other materials can compromise
the internal lining of the chamber leading to irreversible contamination and
degradation of etching efficiency. On a similar note, there is a single standard
recipe for etching silicon that all users will use. In the event that you would like
to create a new recipe, please consult the cleanroom manager or superuser and
obtain approval before
your run. You need to justify the purpose of the recipe.
o Available recipes:
Bosch-Condition: conditioning recipe (5 min)
Load lock
Etch Chamber

Oxford Deep RIE SOP
C.Gutierrez Page 2 11/24/2008
Bosch-120: calibrated Bosch etch process 120 loops or less
Bosch-480: calibrated Bosch etch process 480 loops
Clean: O
2
plasma chamber cleaning recipe
o Approximate etch rate for Bosch Process
120 Loops (0.3 μm/loop, 40 μm etch depth)
o Approximate etch mask selectivity
Photoresist – 50:1
Silicon dioxide – 100:1
• Masking materials are limited to standard photoresists and SiO
2
. Absolutely no
metals are permitted in the system as they can sputter and redeposit elsewhere.
The usage of metals a major cause of contamination in DRIE systems!
• In the event that you would like to etch a different material or try an alternative
masking material, please consult the cleanroom manager or superuser and
obtain approval before your run. You are responsible for justifying the new
materials and proving that the reacted by products are volatile.
• All samples must be mounted to a 4 inch wafer. If you would like to perform a
through-wafer etch on a 4 inch wafer, you are required to mount a 4 inch carrier
wafer since backside He cooling is used throughout etching. Users are
responsible for supplying their own 4 inch wafers.
• To mount a wafer, it is recommended that 4 small drops of photoresist are
applied to in a North, South, East, West arrangement between your substrate
and the 4 inch carrier. This will reduce the dissolution time of the photoresist
compared to the case where resist is spin coated across the entire carrier wafer
surface. In either case, bake the photoresist adhesive well to remove the solvent
and prevent your samples from bubbling up during the etch process. It is also
possible to substitute the photoresist with Fomblin oil. In all cases, use a
minimal amount for mounting your sample. There is He gas cooling applied to
the backside of the 4 inch wafer and applying a thick adhesive layer reduces the
heat transfer and thus cooling of your sample. This may result in degradation of
etch performance.
• If you are using a 4 inch wafer, remove the photoresist edge bead such that no
photoresist comes into contact with the wafer clamp. Photoresist can transfer
onto the clamp resulting in breakage of your wafer during handling by the
robotic arm. Transfer results due to heating and reflow of the resist during
extended etching processes. If photoresist is accidentally transferred to the
clamp, please let the cleanroom manager or superuser know immediately so that
it can be cleaned off.
• If you have metal anywhere on your sample, make sure the metal is not directly
exposed in the plasma at any time during the etch process.
• After long runs or many short runs, the chamber may get dirty as evidenced by a
poor base pressure (>5.0×10
-6
T). Do not proceed if the base pressure is too
high or the leak rate is too high (>.3 mT in 1 minute). Additionally a clean
Oxford Deep RIE SOP
C.Gutierrez Page 3 11/24/2008
process can be performed (recipe O
2
clean for 15 minutes) for every 8 hours of
etch.
• You are responsible for proper preparation of your samples prior to etching. This
means that you must descum in oxygen plasma and do an HF dip prior to
etching or you will run the risk of a failed etch and creating “micrograss.”
• If any problems occur, please let the cleanroom manager or superuser know
immediately.
I. Preparation:
1. Login and check status of machine from last user. (Please remember to write
down you login time)
2. Make sure sample is mounted on 4”wafer
3. If you are the first user of the day, a conditioning run is recommended.
4. Conditioning: Run the Bosch conditioning recipe.
II. Operation
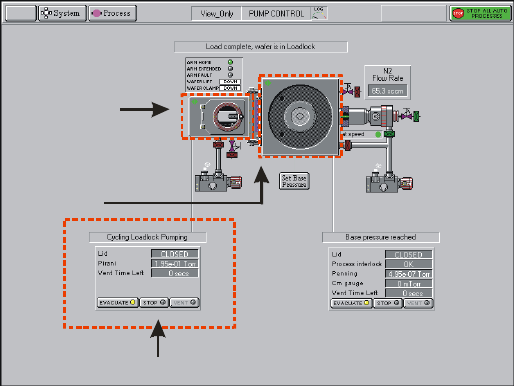
1. On pumping screen– Press STOP on the load lock control
Load lock control
Pumping Screen
Load Lock
Chamber
2. Press VENT – load lock will enter the venting cycle ~2 minutes
3. Open load lock and mount sample with flat of wafer flush again the guide pins
4. Close load lock – Press STOP, Press EVACUATE
5. Dialog box will ask for wafer name. Enter a name for the wafer and press OK. A
wafer icon will appear in the load lock. This is only way to tell the software that
a wafer is in the loadlock. If there is no wafer. Press CANCEL. This tells the
software there is no wafer in the loadlock.
6. Wait for pumping screen to say “load lock cycling”
7. Switch to recipe screen by clicking on Process Æ Recipes.
8. Select LOAD and load appropriate recipe. Left click each step of the recipe, you
can edit the step.