Oxford_DEEP_RIE_SOP.pdf - 第4页
Oxford Deep RIE SOP C.Gutierrez Page 4 11/24/2008 (i) Left click on the repeat step and type in the number of lo ops to control the etch depth for your process. (ii) No more than 120 loops before a 30 min chiller cool in…
Oxford Deep RIE SOP
C.Gutierrez Page 3 11/24/2008
process can be performed (recipe O
2
clean for 15 minutes) for every 8 hours of
etch.
• You are responsible for proper preparation of your samples prior to etching. This
means that you must descum in oxygen plasma and do an HF dip prior to
etching or you will run the risk of a failed etch and creating “micrograss.”
• If any problems occur, please let the cleanroom manager or superuser know
immediately.
I. Preparation:
1. Login and check status of machine from last user. (Please remember to write
down you login time)
2. Make sure sample is mounted on 4”wafer
3. If you are the first user of the day, a conditioning run is recommended.
4. Conditioning: Run the Bosch conditioning recipe.
II. Operation
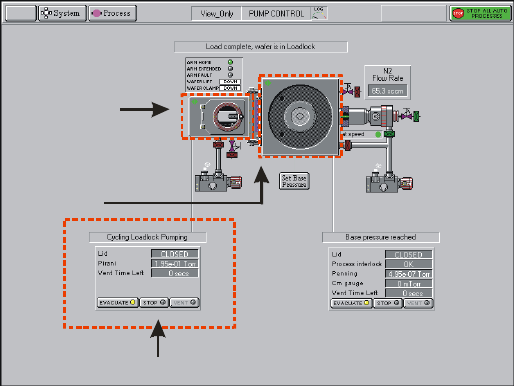
1. On pumping screen– Press STOP on the load lock control
Load lock control
Pumping Screen
Load Lock
Chamber
2. Press VENT – load lock will enter the venting cycle ~2 minutes
3. Open load lock and mount sample with flat of wafer flush again the guide pins
4. Close load lock – Press STOP, Press EVACUATE
5. Dialog box will ask for wafer name. Enter a name for the wafer and press OK. A
wafer icon will appear in the load lock. This is only way to tell the software that
a wafer is in the loadlock. If there is no wafer. Press CANCEL. This tells the
software there is no wafer in the loadlock.
6. Wait for pumping screen to say “load lock cycling”
7. Switch to recipe screen by clicking on Process Æ Recipes.
8. Select LOAD and load appropriate recipe. Left click each step of the recipe, you
can edit the step.

Oxford Deep RIE SOP
C.Gutierrez Page 4 11/24/2008
(i) Left click on the repeat step and type in the number of loops to control the
etch depth for your process.
(ii) No more than 120 loops before a 30 min chiller cooling step is required.
9. Adjust recipe if needed
Auto Run
Load
Recipe
10. Select RUN - This will automatically load the wafer and start running the recipe.
Once recipe is complete, the system will automatically unload wafer back to the
load lock.
11. Keep on eye on the chiller for the ICP generator. The temperature interlock will
trip at 40ºC and the circuit breaker will need to be reset. ICP power of <1000W
should minimize heat overloading.
Chiller Cool Step
Oxford Deep RIE SOP
C.Gutierrez Page 5 11/24/2008
Chiller and the temperature monitor
12. VENT load lock (steps 1-2) and unload sample
13. EVACUATE load lock (steps 4-5). When prompted for wafer ID, press cancel to
indicate there is no wafer loaded. Remove your wafer.
14. Log off software
15. Log off in log book (Please remember to write down the log off time and total
usage time)
III. Measuring Samples
1. Shallow etches <60 microns can be measure on with the Dektak. Deeper etches
can be measured with the digital depth gauge (next to the furnace).
IV. Cold Start
1. Make sure mains power is back on
2. Go into the chase and make sure the chillers are turned on.
3. Turn on the PLC power by pressing the green button on the front of the machine
4. Go to the pumping screen and check status of chamber. Most likely it will need
to be pumped down.
5. If the pumps are not on (no smoke coming out of pump icon) then they need to
be turned on by clicking on the pump icons for both the load lock and the
chamber. The light beside the turbo pump icon will blink yellow when the turbo
is accelerating and will be a solid green when pump is at full speed. Press stop
and evacuate to initiate the pump down once pumps are fully turned on.
6. Do not manually open or close the valves that connect to the chamber. Pump
down should occur automatically. Manual valve operation requires contacting the
Oxford rep.
7. It takes about 15 minutes for the chamber to warm up after power-ON
NOTE : Chamber roughing is to about 90 mTorr