BBP31智能标识标签打印机-快速入门指南.pdf - 第6页
7_Y1257329A_BBP31 Qui ck Start7_ASIA_ZS_ZT_JA_EN_KO _Bla nk.fm Page 6 Friday, September 30, 20 11 11:16 AM
Unpacking
Verify that all of the items shown are in the box. If an item is
missing or appears to be defective, contact Brady technical
support immediately.
Included in the box:
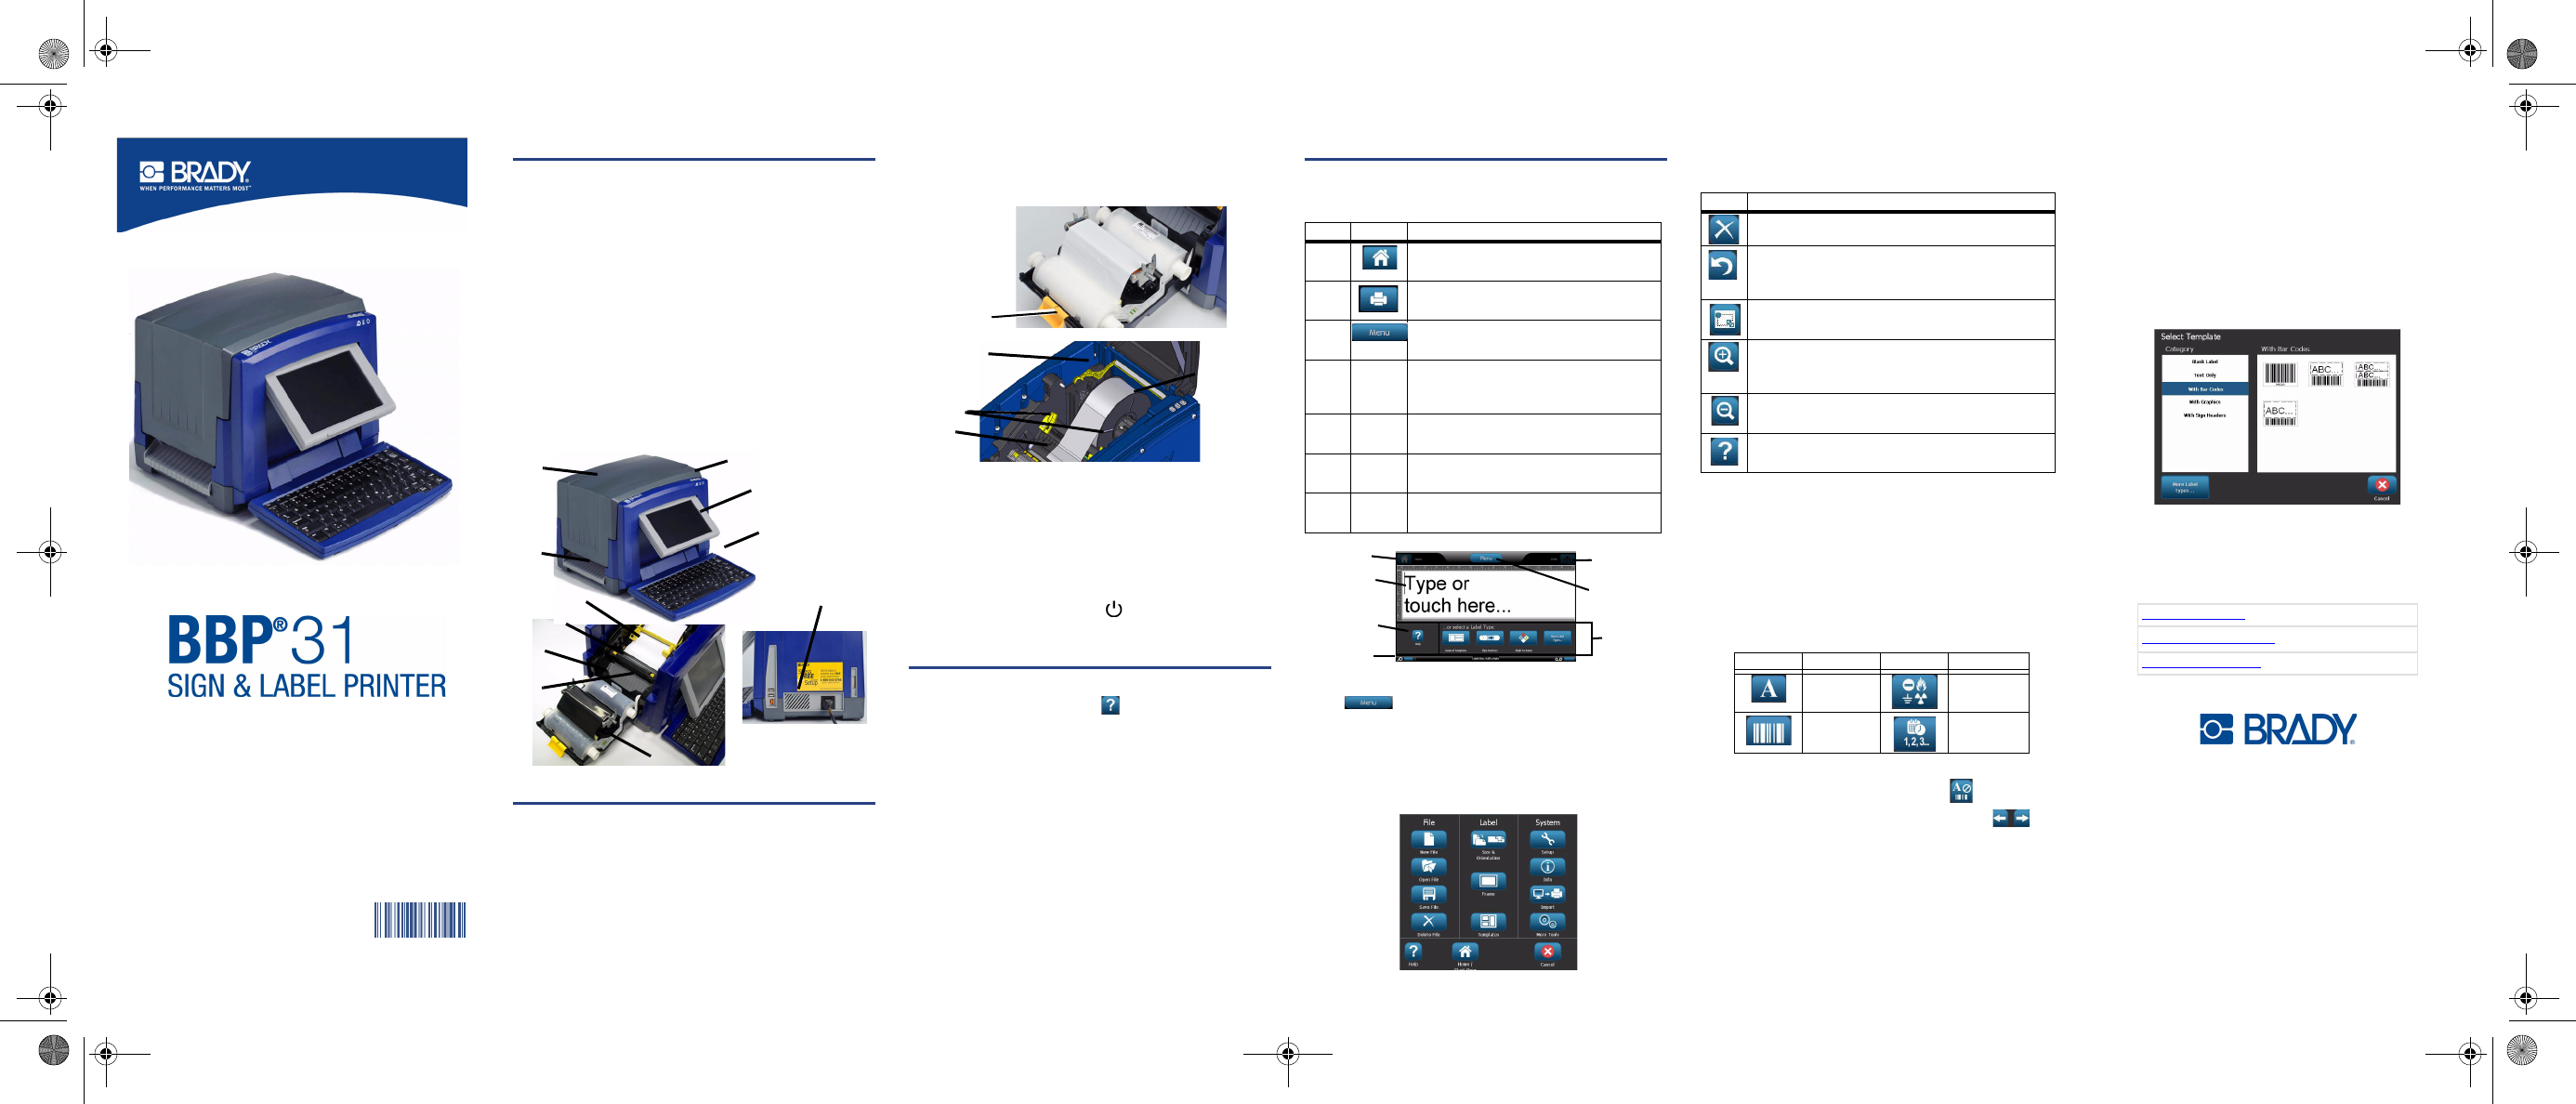
Components
Installation and Setup
Install Ribbon and Media
1. Open enclosure cover.
2. Release ribbon latch and swing ribbon cover open.
3. Move yellow wiper blade to far right (when facing display).
4. Move yellow media guides to full-open.
5. Insert media cartridge until spindle ends rest in slots of
media holder.
6. Push media from top of roll through media guides until ~.25
in. (6.35 mm) from cutter entrance.
7. Move wiper blade and media guides back into position over
media.
8. Place ribbon cartridge with ribbon over print head and
latch on right, then snap into place.
9. Close and latch ribbon cover, then close enclosure cover.
Connect Power
1. Remove printer and power cord from packaging box.
2. Plug power cord into printer and into AC power outlet.
Printer automatically powers on.
3. After initial start, press Power to apply or remove
power.
Getting Started
Get Help
Get Help at any time by touching . In addition, an electronic
user guide is included on the product CD.
Use the Touchscreen
For best results, use a fingernail or stylus to select objects on
the touchscreen.
Work with Objects
• Touch an object to work with it. The control panel will
display available options for that object.
• Move object by firmly pressing and dragging finger or
stylus on the screen.
• Size objects using either the Size buttons or the sizing
handles (toggles with the Size button in the To o l s section).
• Press More Options to scroll through the available object
formatting options.
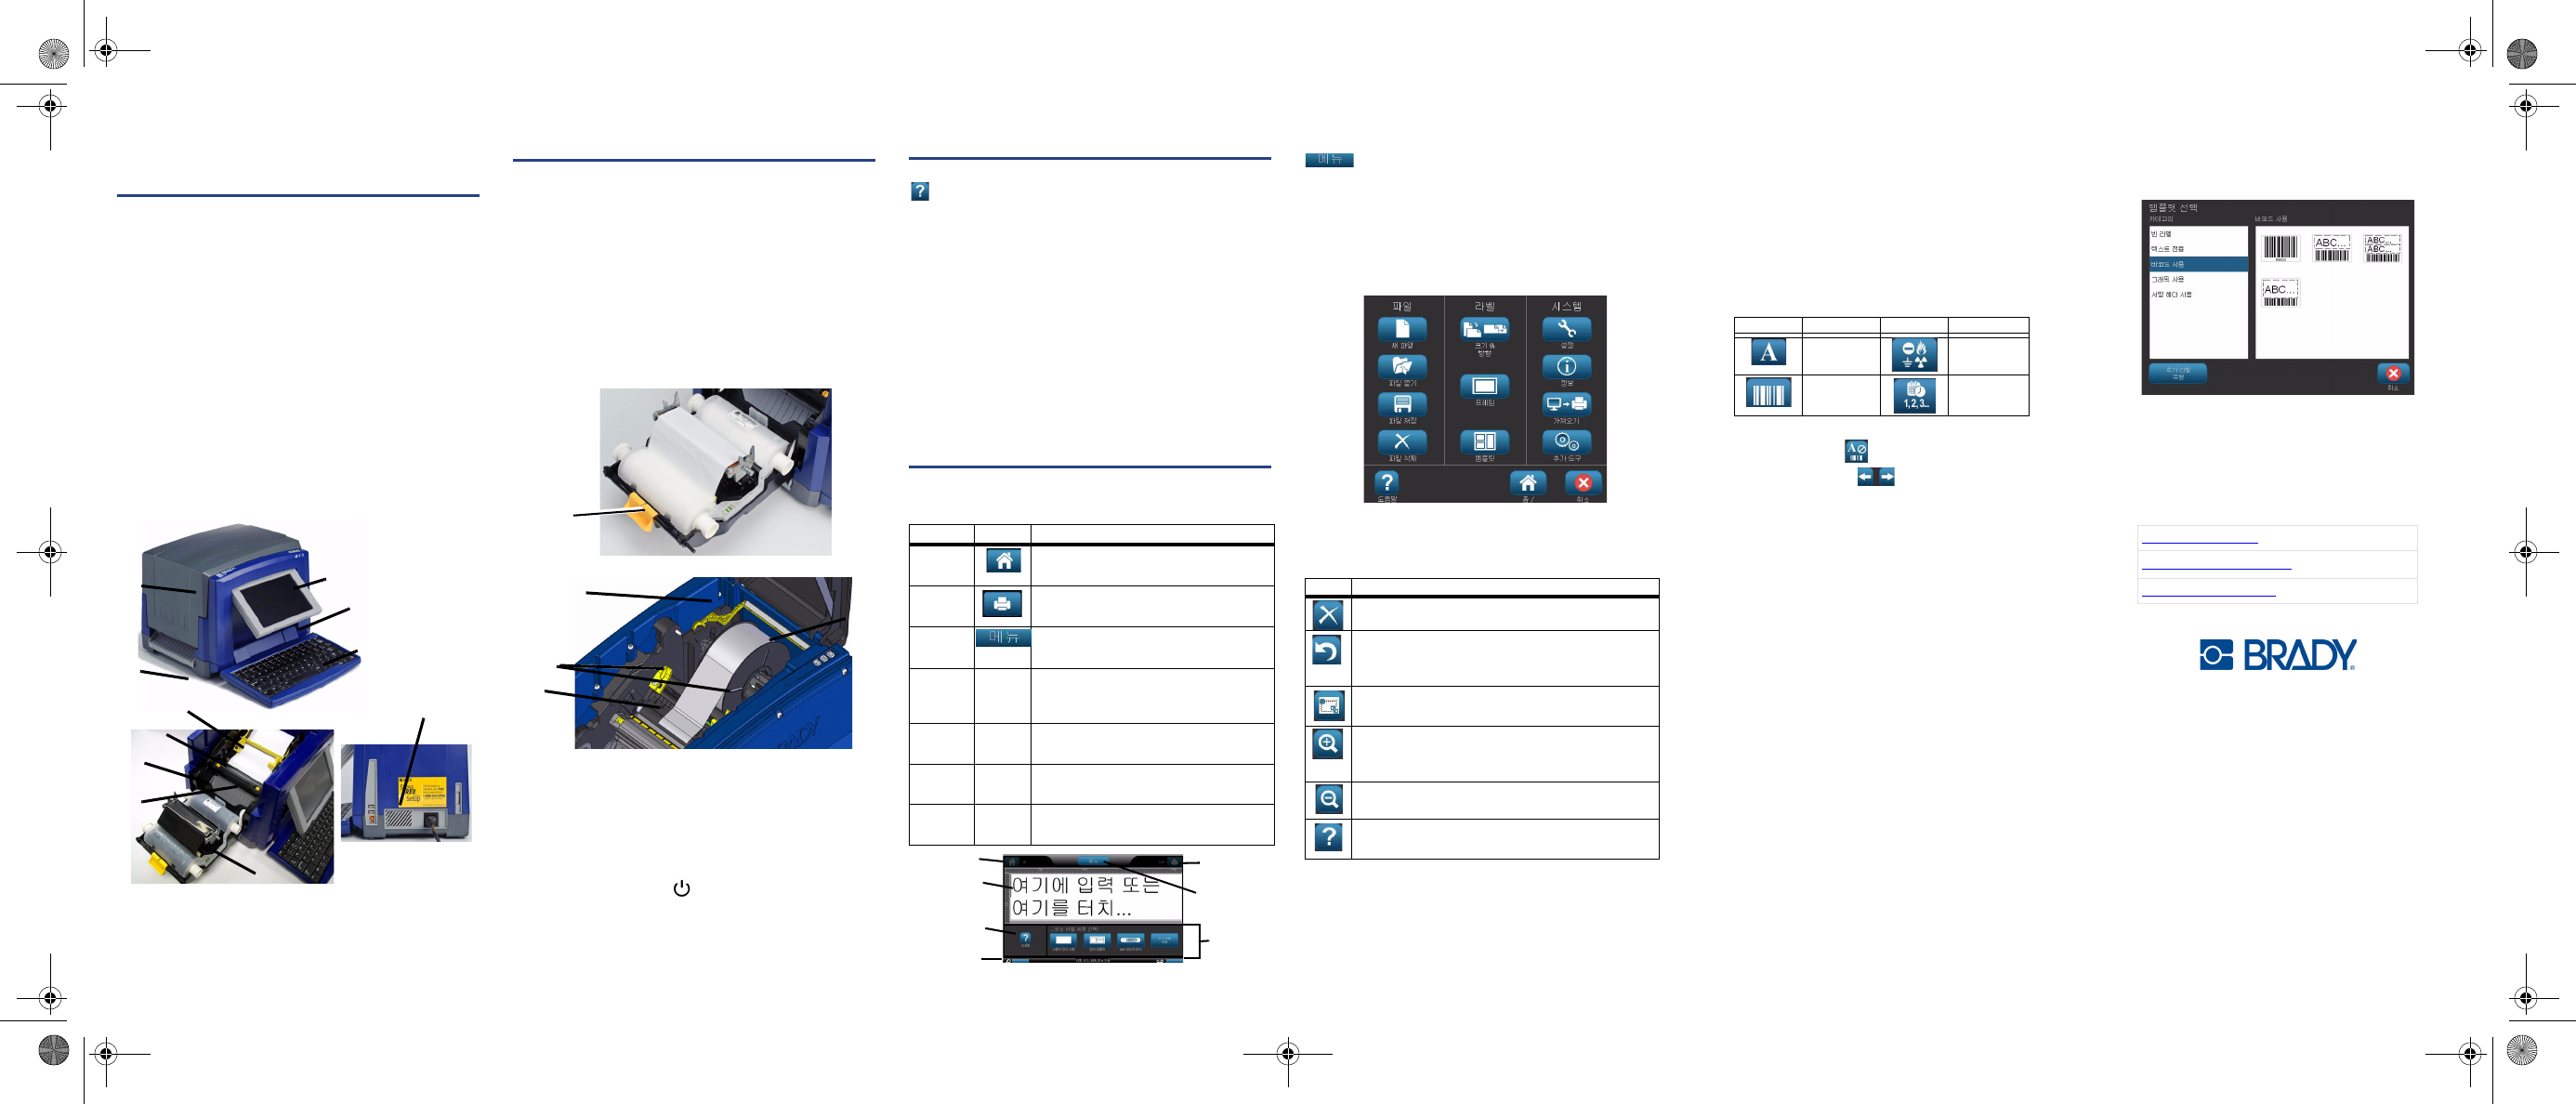
Menus
Home
The Home screen automatically displays when you power on
the printer. The main sections are:
Menu Screen
Touch to display the Menu options window:
• File: Create new, open existing, save or delete.
• Label: Change size and orientation, add a frame around
label, or choose a template.
• System: Set up or view printer information (e.g., Software
version), import data, or get more tools.
Tools Section
Tools for working with labels. The Tools section appears only
when editing a label (i.e., not on the home screen):
Control Panel
Contains information specific to the object selected or the
function being performed.
To access the panels:
• From Home Screen: Provides access to all label types.
Press an icon to display templates for selected label type.
• From Add Object Screen: Touch a blank area of the label
to display options. Also displays when you press Add
Object from other panels.
• With Object Selected: Provides options for editing an
object. From this panel, you can press to return to the
Add Objects screen, or press the More Options
buttons to scroll through additional options.
Create a Text Label
1. From Home screen, type label text. The entered text
automatically resizes to fill the label.
2. To edit text, touch any text-editing option(s).
Create a Custom Label
1. Touch Editor window.
2. From Add Object panel, insert an object:
• Text: Enter desired text.
• Barcode: Type data value, then touch a Symbology
option.
• Graphic: Select a graphic.
• Serial & Date/Time Stamp: Add a serialization or Date/
Time stamp to each label.
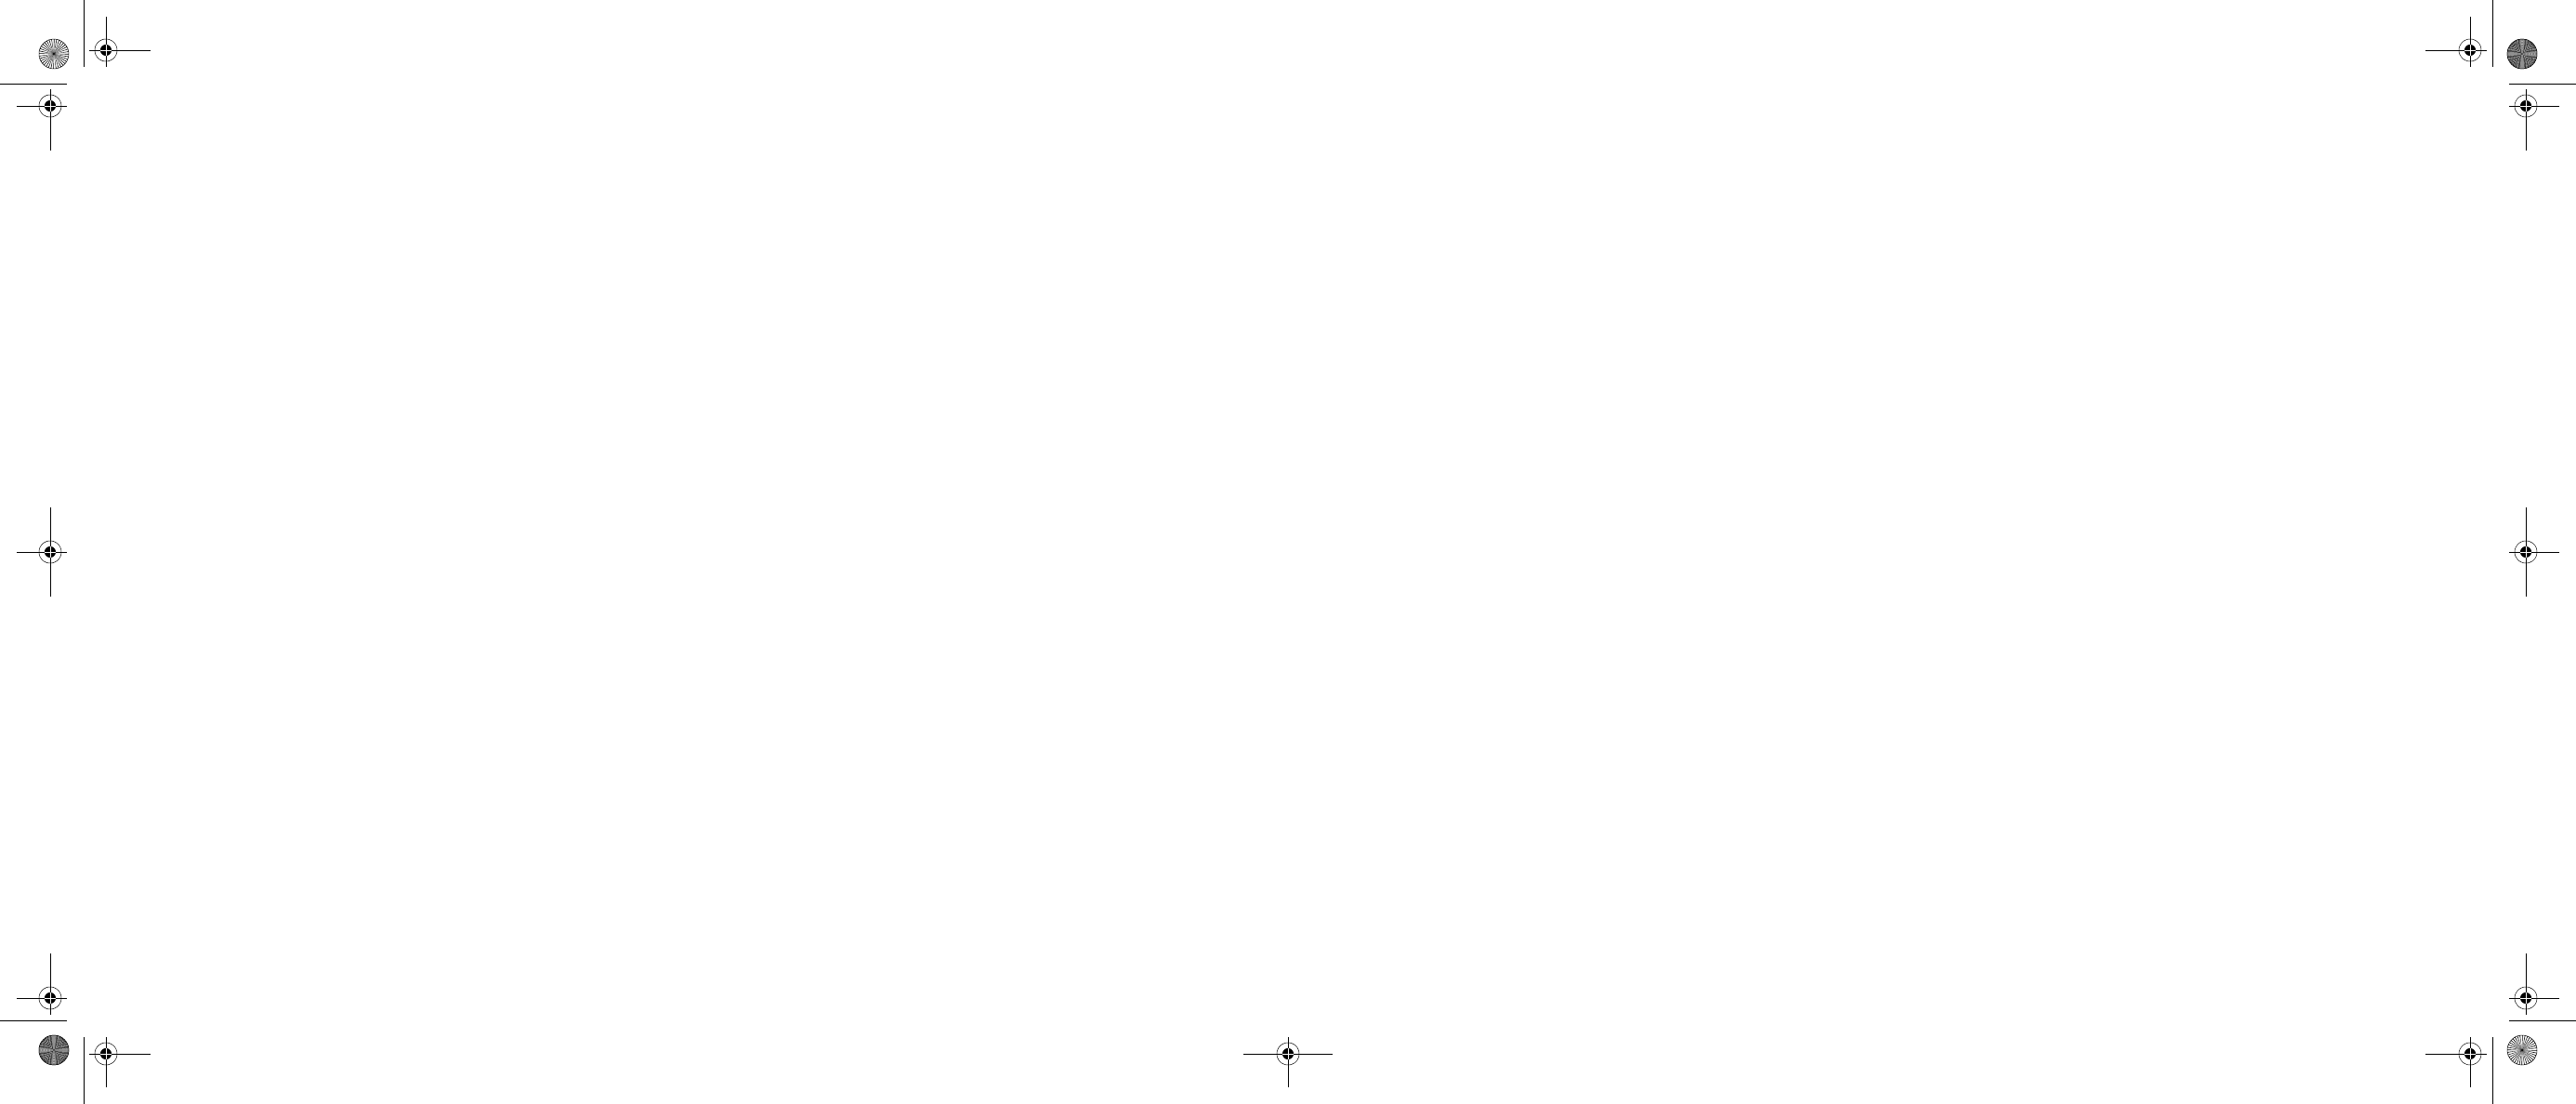
Create Label using a Template
1. From Home screen, touch General Templates.
2. Choose a category and template.
3. Touch each object to add text or graphics.
Technical Support
All Rights Reserved.
www.bradycorp.com
©2011 Brady Worldwide, Inc.
Quick Start Guide
快速入门指南
開梱
クイック スタート ガイド
快速入門指南
Y1257329 A
• Printer • USB Cord
• Product CD • Quick Start Guide
• Power Cord • Cleaning Kit
1 Keyboard & Stylus 2 Display (with touchscreen)
3 Power Button 4 Enclosure Cover
5 Label Exit 6 Media Guides
7 Media 8 Ribbon Cartridge
9 Cutter 10 Ribbon Cover
11 Power, USB and Expansion Ports
2
1
4
5
9
6
7
11
10
8
3
2
3
6
4
5
Item # Icon Description
1 Home: Returns to Home screen from
anywhere in the application.
2 Print: Prints label currently displayed in
editor window.
3 Menu: Displays File, Label and System
options.
4Editor
Window
Label editing area. Type, touch or select
objects to display, add and edit in this
window.
5 Tools
Section
Provides Object Sizing, Delete, Undo,
Zoom In/Out and Help buttons.
6 Control
Panel
Provides options for adding and working
with objects on your label.
7 Status
Bar
Shows current label size and indicators for
remaining ribbon and media.
1
3
2
4
5
6
7
Icon Description
Deletes selected object.
Undo a limited number of actions. Button is greyed
out if no undo action is available. There is no redo
option.
Toggles display of sizing handles to change size or
rotation of selected object.
Zoom In increases the view of the objects in the
display. Scroll arrows appear if the objects are
zoomed larger than the available display area.
Zoom Out decreases the view of the objects on the
display.
Displays the context help based on which control
panel is currently displayed.
Icon Description Icon Description
Text Graphic
Barcode Serial &
Date/Time
www.bradyid.com (Americas)
www.bradyeurope.com
(Europe)
www.bradycorp.com
(Asia Pacific)
7_Y1257329A_BBP31 Quick Start7_ASIA_ZS_ZT_JA_EN_KO_Blank.fm Page 4 Friday, September 30, 2011 11:16 AM
빠른 시작 안내서
포장 풀기
상자 안에 표시된 항목이 모두 들어 있는지 확인하십시오 .
빠진 항목이 있거나 항목에 결함이 있으면 즉시 Brady 기술
지원팀으로 문의하십시오 .
상자 내용물 :
구성요소
설치 및 설정
리본 및 용지 설치
1. 엔클로저 커버를 엽니다 .
2. 리본 래치를 풀면 스윙 리본 커버가 열립니다 .
3. 노랑색 와이퍼 블레이드를 맨 오른쪽 ( 디스플레이를 볼
때 ) 으로 이동시킵니다 .
4. 노랑색 용지 가이드를 완전 열림 위치로 이동시킵니다 .
5. 스핀들 끝이 용지 홀더의 슬롯에 안착될 때까지 용지 카
트리지를 삽입합니다 .
6. 커터 진입부로부터 ~.25 in. (6.35mm) 지점이 될 때까지
롤 위에서 용지 가이드를 통해 용지를 밀어 넣습니다 .
7. 와이퍼 블레이드와 용지 가이드를 다시 용지 위의 위치
로 이동합니다 .
8. 리본을 포함한 리본 카트리지를 프린트헤드 위에 놓고
오른쪽의 래치에 건 다음 제 자리에 고정시킵니다 .
9. 리본 커버를 닫아 건 다음 , 엔클로저 커버를 닫습니다 .
전원 연결
1. 포장 상자에서 프린터와 전원 코드를 꺼냅니다 .
2. 프린터와 AC 전원 콘센트에 전원 코드를 꽂습니다 .
프린터에 자동으로 전원이 공급됩니다 .
3. 맨 처음 시작 후 , 전원 을 눌러 전원을 켜거나 끕니다
.
시작하기
도움말 보기
를 터치하여 언제든지 도움말을 볼 수 있습니다 . 또한 ,
전자 사용자 안내서가 제품 CD 에 들어 있습니다 .
터치스크린 사용
최상의 결과를 위해 손톱이나 스타일러스를 사용하여 터치
스크린의 개체를 선택하십시오 .
개체 관련 작업
• 개체를 터치하여 관련 작업을 수행합니다 . 제어판에 해
당 개체에 사용할 수 있는 옵션이 표시됩니다 .
• 화면에 손가락이나 스타일러스를 꼭 눌러서 끌면
개체
가 이동합니다 .
• 크기 버튼 또는 크기 조정 핸들 ( 도구 섹션의 크기 버튼
으로 전환 ) 을 사용하여 개체의 크기를 조정합니다 .
•
추가 옵션을 눌러 사용 가능한 개체 서식 옵션을 스크
롤합니다 .
메뉴
홈
프린터의 전원을 켜면 자동으로 홈 화면이 표시됩니다 .
기본 섹션은 다음과 같습니다 .
메뉴 화면
를 터치하여 메뉴 옵션 창을 표시합니다 .
• 파일 : 새 파일을 만들거나 , 기존 파일을 열거나 저장
또는 삭제합니다 .
• Label( 라벨 ): 크기와 방향을 변경하고 , 라벨 주변에
프레임을 추가하거나 템플릿을 선택합니다 .
•
시스템
:
프린터
정보
(
예
:
소프트웨어
버전
)
를
설정하
거나
보고
,
데이터를
가져오거나
추가
도구를
가져옵니다
도구 섹션
라벨 관련 작업을 수행하기 위한 도구입니다 . 도구 섹션
은 라벨을 편집할 때만 나타납니다 ( 홈 화면에는 나타나
지 않음 ).
제어판
선택한 개체 또는 수행 중인 기능에 특정한 정보를 포함합
니다 .
패널에 액세스하려면 :
• 홈 화면에서 : 모든 라벨 유형에 액세스할 수 있습니
다 . 아이콘을 누르면 선택한 라벨 유형에 대한 템플릿
이 표시됩니다 .
• 개체 추가 화면에서 : 라벨의 빈 영역을 터치하면 옵션
이 표시됩니다 . 다른 패널에서 개체 추가를 눌러도 표
시됩니다 .
• 개체 선택 상태 : 개체를 편집하기 위한 옵션을 제공합
니다 . 이 패널에서 을 눌러 개체 추가 화면으로 돌
아가거나 , 추가 옵션 버튼를 눌러 추가 옵션을
스크롤할 수 있습니다 .
텍스트 라벨 만들기
1. 홈 화면에서 라벨 텍스트를 입력합니다 . 입력한 텍스트
의 크기가 라벨을 채우도록 자동으로 조정됩니다 .
2. 텍스트를 편집하려면 텍스트 편집 옵션을 누르십시오 .
사용자 정의 라벨 만들기
1. 편집기 창을 터치합니다 .
2. 개체 추가 패널에서 개체를 삽입합니다 .
• 텍스트 : 원하는 텍스트를 입력합니다 .
•
바코드 : 데이터 값을 입력한 다음 바코드 스타일을
터치합니다 .
•
그래픽 : 그래픽을 선택합니다 .
•
시리얼 및 날짜 / 시간 소인 : 시리얼화 또는 날짜 /
시간 소인을 각 라벨에 추가합니다 .
템플릿을 사용하여 라벨 만들기
1.
홈 화면에서 일반 템플릿을 터치합니다 .
2. 카테고리 및 템플릿을 선택합니다 .
3. 각 개체를 터치하여 텍스트 또는 그래픽을 추가합니다 .
기술 지원
All Rights Reserved.
www.bradycorp.com
2011 Brady Worldwide, Inc.
• 프린터 •USB 코드
• 제품 CD • 빠른 시작 안내서
• 전원 코드 • 클리닝 키트
1. 키보드 및 스타일러스 2. 디스플레이 ( 터치스크
린 포함 )
3. 전원 버튼 4. 엔클로저 커버
5. 라벨 출구 6. 용지 가이드
7. 용지 8. 리본 카트리지
9. 커터 10.리본 커버
11. 전원 , USB 및 확장 포트
2
1
4
5
9
6
7
11
10
8
3
2
3
6
4
5
항목 번호 아이콘 설명
1
Home( 홈 )
: 애플리케이션 어디에서든
지 홈 화면으로 돌아갑니다 .
2
인쇄
: 편집기 창에 현재 표시된 라벨을
인쇄합니다 .
3
메뉴 (Menu)
: 파일 , 라벨 및 시스템
옵션을 표시합니다 .
4
편집
기 창
라벨 편집 영역입니다 . 개체를 입력 , 터
치 또는 선택하여 이 창에서 표시 ,
추가 및 편집합니다 .
5
도구
섹션
개체 크기 조정 , 삭제 , 실행 취소 , 확
대 / 축소 및 도움말 버튼을 제공합니다 .
6
제어판
라벨에 개체를 추가하고 관련 작업을 수
행하기 위한 옵션을 제공합니다 .
7
상태
표시줄
현재의 라벨 크기 및 남은 리본과 용지
의 양에 대한 표시기를 보여줍니다 .
1
3
2
4
5
6
7
아이콘 설명
선택한 개체를 삭제합니다 .
제한된 수의 작업을 실행 취소합니다. 실행 취소할
작업이 없는 경우 버튼은 회색으로 표시됩니다 . 다
시 실행 옵션은 없습니다 .
크기 조정 핸들 표시를 전환하여 선택한 개체의 크
기나 회전을 변경합니다 .
확대는 디스플레이에서 개체 보기를 확대합니다 .
개체가 표시할 수 있는 영역보다 더 크게 확대되면
스크롤 화살표가 나타납니다 .
축소는 디스플레이에서 개체 보기를 축소합니다 .
제어판이 현재 표시된 상황에 따른 도움말을 표시
합니다 .
아이콘 설명 아이콘 설명
텍스트 그래픽
바코드 시리얼 및
날짜 / 시간
www.bradyid.com ( 미국 )
www.bradyeurope.com ( 유럽 )
www.bradycorp.com ( 아시아 태평양 )
7_Y1257329A_BBP31 Quick Start7_ASIA_ZS_ZT_JA_EN_KO_Blank.fm Page 5 Friday, September 30, 2011 11:16 AM
7_Y1257329A_BBP31 Quick Start7_ASIA_ZS_ZT_JA_EN_KO_Blank.fm Page 6 Friday, September 30, 2011 11:16 AM