TS1212.pdf - 第4页
7 7. TROUBLE SHOOTING PROBLEM POSSIBLE CAUSE CORRECTION Fluid pressure too low Increase fluid pressure Operating pressure too low Increase air press ure to 50 psi (3.4 bars) Dispense tip clogged or damaged Replaced tip F…
5
5. SET UP INSTRUCTIONS
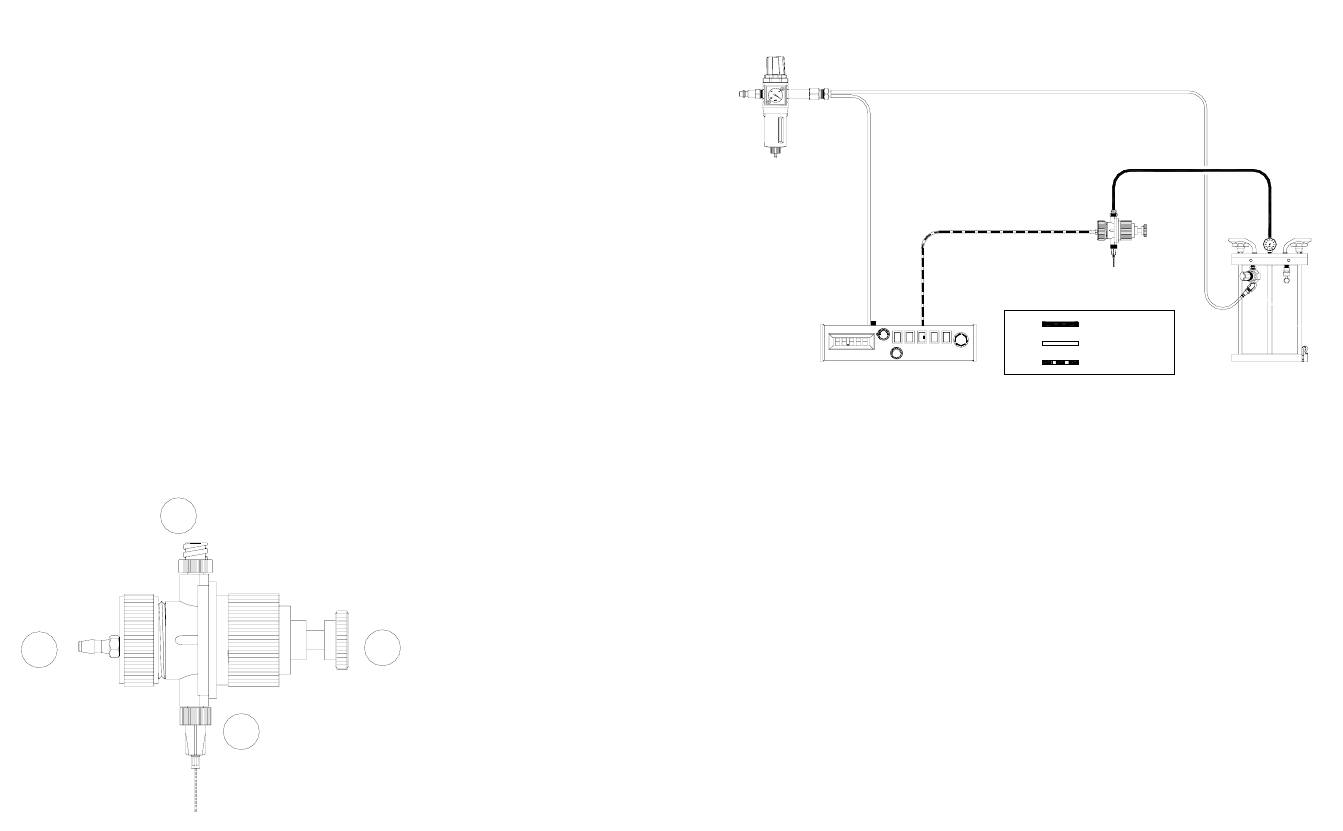
Refer to Figure 3.0
1. Install a new pinch tube in the valve. Following instructions in
Section 6. “Pinch tube replacement” on page 8.
2. If desired, mount the valve to the bracket included.
3. Connect fluid feed line to valve inlet port (1).
4. Install valve actuating air line to air inlet port (2)
5. Connect valve air line to an approved valve controller.
6. Set the fluid reservoir pressure. Do not exceed 60 psi (4.1bars)
7. Make sure all connections are tight
8. Place container under the valve outlet and activate the valve until the
fluid flows steady.
9. Attach appropriate dispense tip to the luer lock outlet fitting (3).
The amount of fluid that flows through the valve is determined by:
• Flow control adjustment- Turn adjustment screw (4)
counterclockwise to increase fluid flow rate and clockwise to
decrease fluid flow rate.
• Length of actuation, set at controller (Valve open time).
• Fluid reservoir pressure.
• Dispensing tip size.
Figure 3.0
1
2
3
4
6
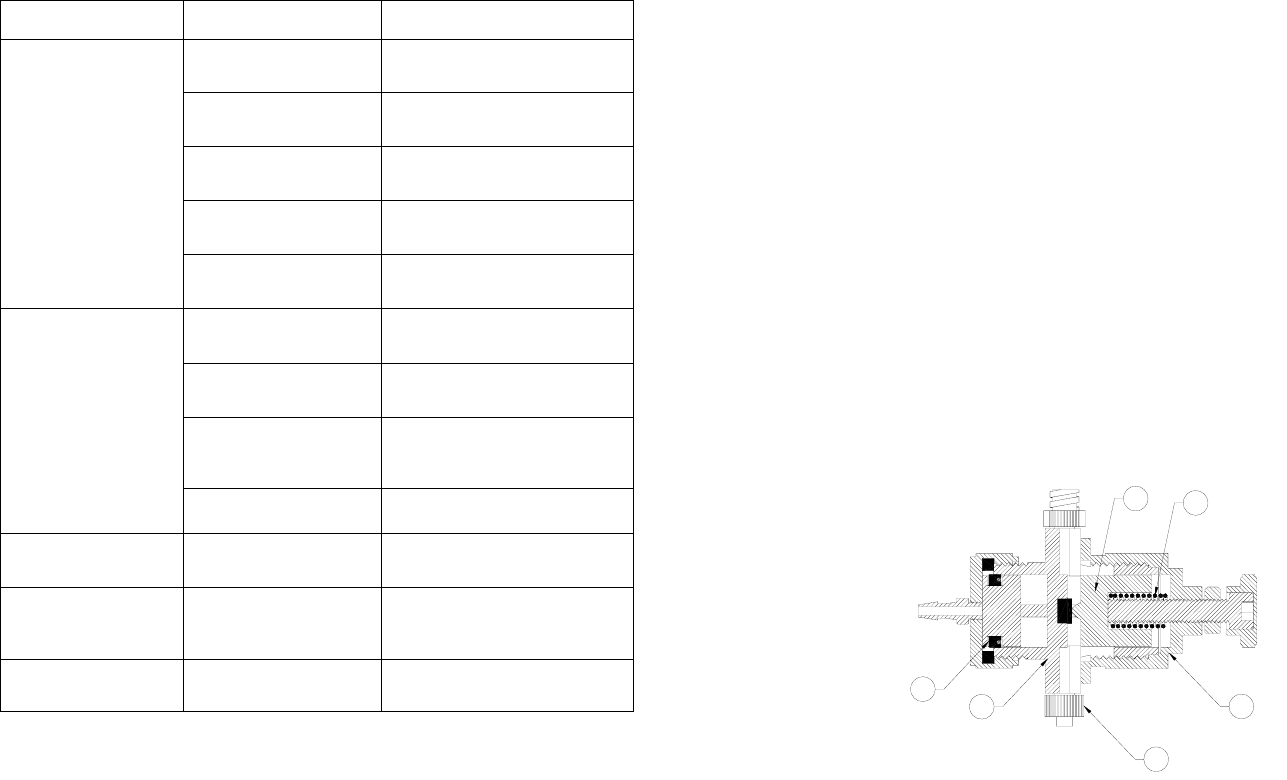
6. TYPICAL SYSTEM SET UP
Figure 4.0
PULSED AIR
CONSTANT AIR
MATERIAL
PLANT AIR MUST BE PROPERLY
FILTERED AND DRY. IF NOT, SPECIFY
A 5-MICRON FILTER REGULATOR.
FLUID FEED SYSTEM
TECHCON SYSTEMS TS5130
CONTROLLER OR EQUIVALENT
TS1212
PINCH TUBE VALVE
7
7. TROUBLE SHOOTING
PROBLEM POSSIBLE CAUSE CORRECTION
Fluid pressure too low Increase fluid pressure
Operating pressure too
low
Increase air pressure to 50 psi
(3.4 bars)
Dispense tip clogged or
damaged
Replaced tip
Fluid cured in pinch
tube
Replace with new tube
No Fluid Flow
The stroke adjustment
closed
Open stroke adjustment
counterclockwise
Fluid pressure
fluctuating
Make sure fluid pressure is
constant
Valve operating
pressure is too low
Increased valve pressure to 50
psi (3.4 bars)
Valve open time is not
consistent
Check to make sure the valve
controller is providing a
consistent output
Inconsistent
Fluid Flow
Air trapped in fluid line Purge valve
Decrease in fluid flow
Pinch tube lose its
flexibility
Replace with new tube
Fluid drools after the
valve closes,
eventually stopping
Air trapped in fluid line Purge valve
Steady drip
Pinch tube is not
installed properly
Re-install tube, follow
instructions
8
8. PINCH TUBE REPLACEMENT
CAUTION: Make sure the fluid pressure is released before disassemble the
valve.
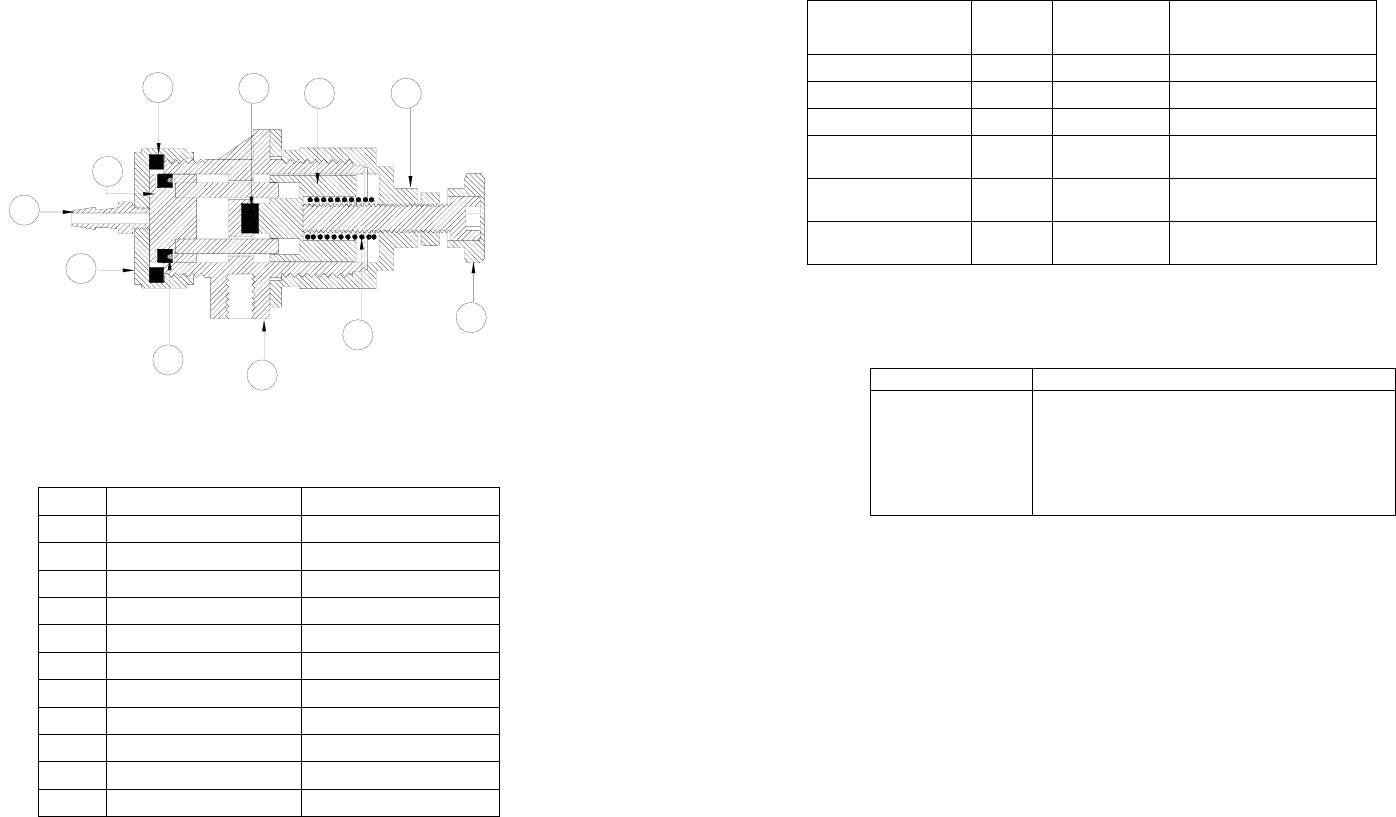
Refer to figure 5.0
1. Release fluid pressure.
2. Disconnect fluid line.
3. Disconnect valve air line.
4. Remove the valve cap (1), the spring (6) and the shut off piston (5)
5. Lift the two ends of the tube (2) out of the grooves of the valve body (3).
6. Hold the pinch tube at the female luer lock fitting and pull it out of the valve
body.
7. Dispose the used pinch tube in an appropriate waste container.
8. Install a new pinch tube by inserting the male fitting of the tube through the
valve body.
9. Snapped the both ends of the pinch tube into the groove of the valve body.
10. Reinstall the shut off piston, the spring and the flange.
Figure 5.0
4
6
2
1
5
3
9
9. SPARE PARTS AND ACCESSORIES
9.1 SPARE PARTS:
Figure 6.0
No. Part number Description
1 TSD922-19 Air Fitting
2 1212-000-003 Cylinder Cap
3 TSD1399-1 Cup Seal
4 1212-000-001 Body
5 TSD1150-5 Spring
6 1212-002-000 Adjustment Knob
7 1212-000-002 Flange
8 1212-000-004 Shut off Piston
9 1212-000-005 Pinch cushion
10 1212-000-007 Gasket
11 1212-003-000 Piston
3
10
4
6
2
1
8
11
9
7
5
10
Replacement Tube:
PART NUMBER FITTING
I.D. INCH
(MM)
MATERIAL
1212-004-000PK M X F 0.07 (1.78) LDPE NATURAL
1212-004-002PK M X F 0.100 (2.54) LDPE NATURAL
1212-004-002BPK M X F 0.100 (2.54) LDPE BLACK
1212-004-100PK M X F 0.125 (3.18)
POLYURETHANE
NATURAL
1212-004-200PK M X M 0.125 (3.18)
POLYURETHANE
NATURAL
1212-004-100BPK M X F 0.125 (3.18)
POLYURETHANE
BLACK
9.2 ACCESSORIES
Bench mounting kit:
PART NUMBER DESCRIPTION
918-033-000
918-000-012
1212-000-008
Production master stand
Rod clamp
Mounting rod
(These three components are needed to make a
bench mounting stand)