manual-na103-na104-updating-kits-0033002_ID-243966_EN.pdf - 第5页
¥ ø 0,3 ø 0,6 0,3 2,5 0,2 x 0,1 NAE Contr ol Unit POR T 2 ROBOT PEDAL 2 NAE Contr ol Unit POR T 2 ROBOT PEDAL 2 ROBOT C115 C11 C105 / C105 / C115 19:29 19:29 Port 2 Actual T emp. 25ºC NT105 ºC Power 45% Selected 350º…
¥
ø 0,3
ø 0,6
0,3
2,5
0,2 x 0,1
NAE
Control Unit
PORT
2
ROBOT
PEDAL
2
NAE
Control Unit
PORT
2
ROBOT
PEDAL
2
ROBOT
C115
C11
C105 /
C105 / C115
19:29
19:29
Port
2
Actual Temp. 25ºC
NT105
ºC
Power
45%
Selected 350ºC
350
Port
2
NT105
Hibernation
19:29
Port
2
Actual Temp. 25ºC
AN115
Hibernation
19:29
ºC
Power
45%
Selected 350ºC
350
Port
2
AN115
No
Yes
NAE
Control Unit
PORT
2
ROBOT
PEDAL
2
PORT
1
PEDAL
2
NAE
Control Unit
PORT
2
ROBOT
PEDAL
2
NAE
Control Unit
PORT
2
ROBOT
PEDAL
2
ROBOT
C115
C11
C105 /
C105 / C115
19:29
19:29
Port
2
Actual Temp. 25ºC
NT105
ºC
Power
45%
Selected 350ºC
350
Port
2
NT105
Hibernation
19:29
Port
2
Actual Temp. 25ºC
AN115
Hibernation
19:29
ºC
Power
45%
Selected 350ºC
350
Port
2
AN115
No
Yes
NAE
Control Unit
PORT
2
ROBOT
PEDAL
2
PORT
1
PEDAL
2
NAE
Control Unit
PORT
2
ROBOT
PEDAL
2
NAE
Control Unit
PORT
2
ROBOT
PEDAL
2
ROBOT
C115
C11
C105 /
C105 / C115
19:29
19:29
Port
2
Actual Temp. 25ºC
NT105
ºC
Power
45%
Selected 350ºC
350
Port
2
NT105
Hibernation
19:29
Port
2
Actual Temp. 25ºC
AN115
Hibernation
19:29
ºC
Power
45%
Selected 350ºC
350
Port
2
AN115
No
Yes
NAE
Control Unit
PORT
2
ROBOT
PEDAL
2
PORT
1
PEDAL
2
NAE
Control Unit
PORT
2
ROBOT
PEDAL
2
NAE
Control Unit
PORT
2
ROBOT
PEDAL
2
ROBOT
C115
C11
C105 /
C105 / C115
19:29
19:29
Port
2
Actual Temp. 25ºC
NT105
ºC
Power
45%
Selected 350ºC
350
Port
2
NT105
Hibernation
19:29
Port
2
Actual Temp. 25ºC
AN115
Hibernation
19:29
ºC
Power
45%
Selected 350ºC
350
Port
2
AN115
No
Yes
NAE
Control Unit
PORT
2
ROBOT
PEDAL
2
PORT
1
PEDAL
2
NAE
Control Unit
PORT
2
ROBOT
PEDAL
2
NAE
Control Unit
PORT
2
ROBOT
PEDAL
2
ROBOT
C115
C11
C105 /
C105 / C115
19:29
19:29
Port
2
Actual Temp. 25ºC
NT105
ºC
Power
45%
Selected 350ºC
350
Port
2
NT105
Hibernation
19:29
Port
2
Actual Temp. 25ºC
AN115
Hibernation
19:29
ºC
Power
45%
Selected 350ºC
350
Port
2
AN115
No
Yes
NAE
Control Unit
PORT
2
ROBOT
PEDAL
2
PORT
1
PEDAL
2
0,7
3,5
Ø2,5
Ø2,5
¥
Spoon
1
Conformal
Coating
Removal
Blade
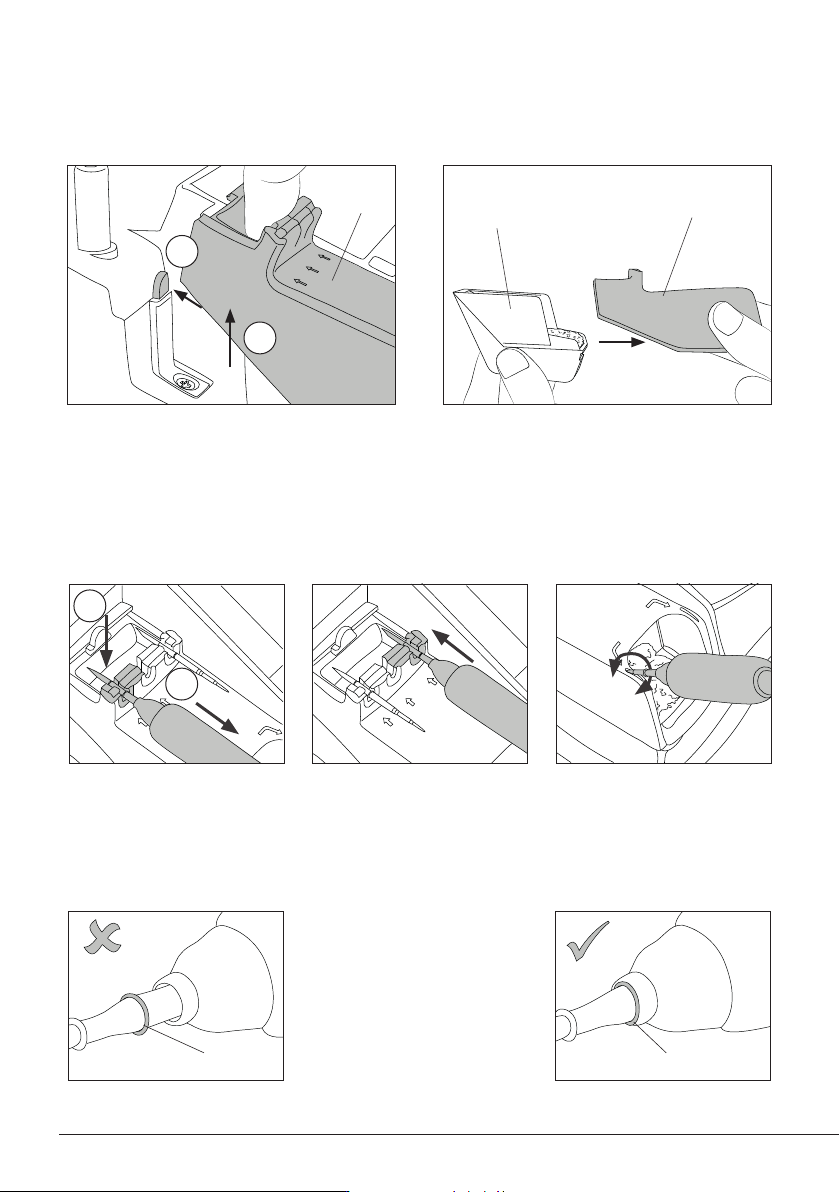
Changing Cartridges
Save time and change cartridges safely without having to switch the station off.
Removing Inserting Aligning
Place the cartridge into the
extractor slot (1) and pull
the handle to remove the
cartridge (2).
Push the new cartridge into
the handle until the reference
ring*.
Use the holes to rotate the
cartridges for proper alignment.
*Important
It is essential to insert the
cartridges up to the re-
ference ring for a proper
connection.
Reference
Ring
1
2
Compatible Cartridges
Nano Handle NT115 works with C115 cartridges. Find the model that best suits your soldering needs
at www.jbctools.com
Conical
Chisel
Bevel
Knife
Conical
bent
Reference
Ring
NT115
NT115/NP115
HT420/HT470
T245
WS440
NH HEATER HOSE
HT420
HT420
HT420
NT115
NT115/NP115
HT420/HT470
T245
WS440
NH HEATER HOSE
HT420
HT420
HT420
NT115
NT115/NP115
HT420/HT470
T245
WS440
NH HEATER HOSE
HT420
HT420
HT420
Hold this way
so that the tab
can slide
New Grip
Fitter
To remove the fitters, hold the
grip and pull the fitters out. Use
pliers if necessary.
Push the grip with the fitters
onto the nano handle.
Assembling GripInserting Fitters
Replace the grips easily using the included fi tters as shown in the following pictures.
Soft foam grips for NT115 Nano Handles ensure better manual control of the handle and greater
comfort when working.
Soft Foam Grips are available in 3 different colors:
N8662 green N3308 blue N3309 black
Ref. 0018662 (incl. 4x grips) Ref. 0023308 (incl. 4x grips) Ref. 0023309 (incl. 4x grips)
Changing Soft Foam Grips
Removing Fitters
Insert the fitters into the new
grip.
Nano
Handle
NAE
Control Unit
PORT
2
ROBOT
PEDAL
2
NAE
Control Unit
PORT
2
ROBOT
PEDAL
2
ROBOT
C115
C11
C105 /
C105 / C115
19:29
19:29
Port
2
Actual Temp. 25ºC
NT105
ºC
Power
45%
Selected 350ºC
350
Port
2
NT105
Hibernation
19:29
Port
2
Actual Temp. 25ºC
AN115
Hibernation
19:29
ºC
Power
45%
Selected 350ºC
350
Port
2
AN115
No
Yes
NAE
Control Unit
PORT
2
ROBOT
PEDAL
2
PORT
1
PEDAL
2
NAE
Control Unit
PORT
2
ROBOT
PEDAL
2
NAE
Control Unit
PORT
2
ROBOT
PEDAL
2
ROBOT
C115
C11
C105 /
C105 / C115
19:29
19:29
Port
2
Actual Temp. 25ºC
NT105
ºC
Power
45%
Selected 350ºC
350
Port
2
NT105
Hibernation
19:29
Port
2
Actual Temp. 25ºC
AN115
Hibernation
19:29
ºC
Power
45%
Selected 350ºC
350
Port
2
AN115
No
Yes
NAE
Control Unit
PORT
2
ROBOT
PEDAL
2
PORT
1
PEDAL
2
Changing the Splashguard
Press backward the tap (1) to remove the
cleaning system (2) from the station.
Remove the splashguard from the drawer and
insert the new one.
Put the cleaning system back to the station.
2
1
Drawer
Splashguard
Cleaning
System
Changing Cartridges on NT115 Handle
4
¥
ø 0,3
ø 0,6
0,3
2,5
0,2 x 0,1
NAE
Control Unit
PORT
2
ROBOT
PEDAL
2
NAE
Control Unit
PORT
2
ROBOT
PEDAL
2
ROBOT
C115
C11
C105 /
C105 / C115
19:29
19:29
Port
2
Actual Temp. 25ºC
NT105
ºC
Power
45%
Selected 350ºC
350
Port
2
NT105
Hibernation
19:29
Port
2
Actual Temp. 25ºC
AN115
Hibernation
19:29
ºC
Power
45%
Selected 350ºC
350
Port
2
AN115
No
Yes
NAE
Control Unit
PORT
2
ROBOT
PEDAL
2
PORT
1
PEDAL
2
NAE
Control Unit
PORT
2
ROBOT
PEDAL
2
NAE
Control Unit
PORT
2
ROBOT
PEDAL
2
ROBOT
C115
C11
C105 /
C105 / C115
19:29
19:29
Port
2
Actual Temp. 25ºC
NT105
ºC
Power
45%
Selected 350ºC
350
Port
2
NT105
Hibernation
19:29
Port
2
Actual Temp. 25ºC
AN115
Hibernation
19:29
ºC
Power
45%
Selected 350ºC
350
Port
2
AN115
No
Yes
NAE
Control Unit
PORT
2
ROBOT
PEDAL
2
PORT
1
PEDAL
2
NAE
Control Unit
PORT
2
ROBOT
PEDAL
2
NAE
Control Unit
PORT
2
ROBOT
PEDAL
2
ROBOT
C115
C11
C105 /
C105 / C115
19:29
19:29
Port
2
Actual Temp. 25ºC
NT105
ºC
Power
45%
Selected 350ºC
350
Port
2
NT105
Hibernation
19:29
Port
2
Actual Temp. 25ºC
AN115
Hibernation
19:29
ºC
Power
45%
Selected 350ºC
350
Port
2
AN115
No
Yes
NAE
Control Unit
PORT
2
ROBOT
PEDAL
2
PORT
1
PEDAL
2
NAE
Control Unit
PORT
2
ROBOT
PEDAL
2
NAE
Control Unit
PORT
2
ROBOT
PEDAL
2
ROBOT
C115
C11
C105 /
C105 / C115
19:29
19:29
Port
2
Actual Temp. 25ºC
NT105
ºC
Power
45%
Selected 350ºC
350
Port
2
NT105
Hibernation
19:29
Port
2
Actual Temp. 25ºC
AN115
Hibernation
19:29
ºC
Power
45%
Selected 350ºC
350
Port
2
AN115
No
Yes
NAE
Control Unit
PORT
2
ROBOT
PEDAL
2
PORT
1
PEDAL
2
NAE
Control Unit
PORT
2
ROBOT
PEDAL
2
NAE
Control Unit
PORT
2
ROBOT
PEDAL
2
ROBOT
C115
C11
C105 /
C105 / C115
19:29
19:29
Port
2
Actual Temp. 25ºC
NT105
ºC
Power
45%
Selected 350ºC
350
Port
2
NT105
Hibernation
19:29
Port
2
Actual Temp. 25ºC
AN115
Hibernation
19:29
ºC
Power
45%
Selected 350ºC
350
Port
2
AN115
No
Yes
NAE
Control Unit
PORT
2
ROBOT
PEDAL
2
PORT
1
PEDAL
2
0,7
3,5
Ø2,5
Ø2,5
¥
Spoon
1
Conformal
Coating
Removal
Blade
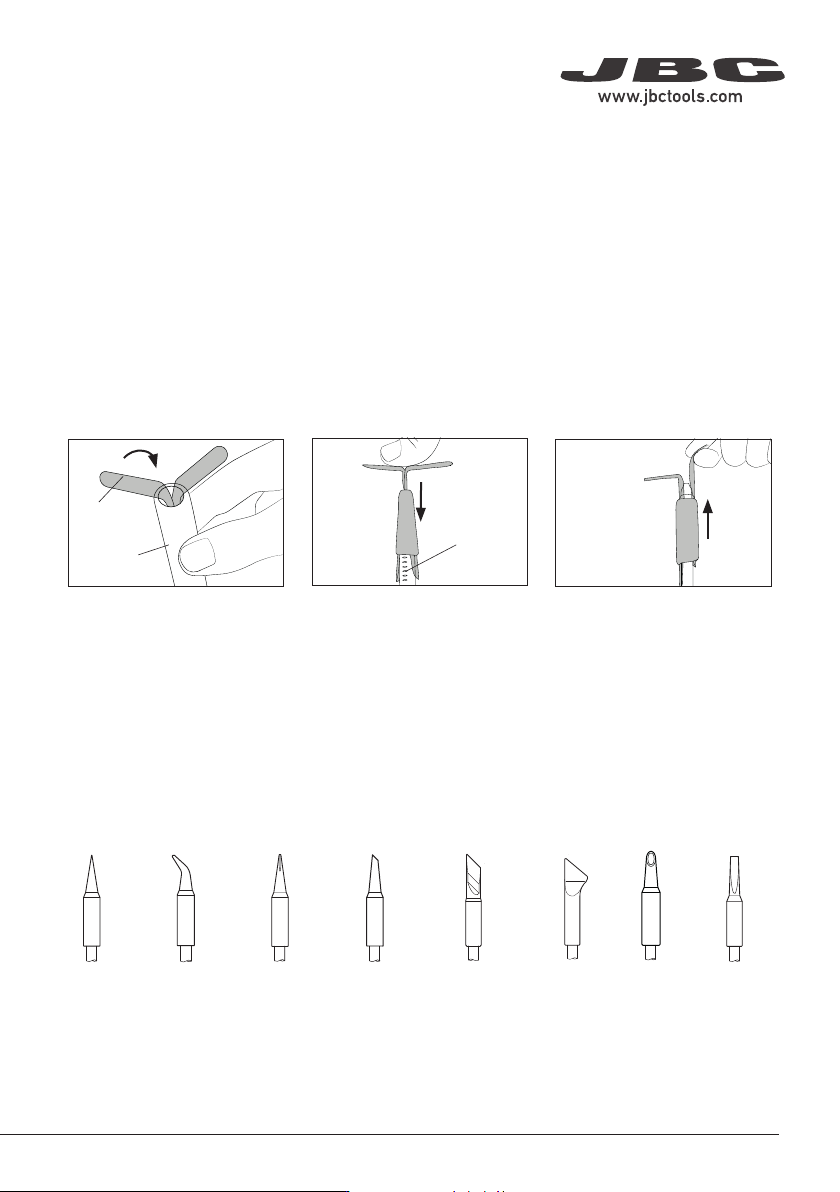
Changing Cartridges
Save time and change cartridges safely without having to switch the station off.
Removing Inserting Aligning
Place the cartridge into the
extractor slot (1) and pull
the handle to remove the
cartridge (2).
Push the new cartridge into
the handle until the reference
ring*.
Use the holes to rotate the
cartridges for proper alignment.
*Important
It is essential to insert the
cartridges up to the re-
ference ring for a proper
connection.
Reference
Ring
1
2
Compatible Cartridges
Nano Handle NT115 works with C115 cartridges. Find the model that best suits your soldering needs
at www.jbctools.com
Conical
Chisel
Bevel
Knife
Conical
bent
Reference
Ring
NT115
NT115/NP115
HT420/HT470
T245
WS440
NH HEATER HOSE
HT420
HT420
HT420
NT115
NT115/NP115
HT420/HT470
T245
WS440
NH HEATER HOSE
HT420
HT420
HT420
NT115
NT115/NP115
HT420/HT470
T245
WS440
NH HEATER HOSE
HT420
HT420
HT420
Hold this way
so that the tab
can slide
New Grip
Fitter
To remove the fitters, hold the
grip and pull the fitters out. Use
pliers if necessary.
Push the grip with the fitters
onto the nano handle.
Assembling GripInserting Fitters
Replace the grips easily using the included fi tters as shown in the following pictures.
Soft foam grips for NT115 Nano Handles ensure better manual control of the handle and greater
comfort when working.
Soft Foam Grips are available in 3 different colors:
N8662 green N3308 blue N3309 black
Ref. 0018662 (incl. 4x grips) Ref. 0023308 (incl. 4x grips) Ref. 0023309 (incl. 4x grips)
Changing Soft Foam Grips
Removing Fitters
Insert the fitters into the new
grip.
Nano
Handle
Changing Grips on NT115 Handle
Compatible Cartridges for NT115 Handle
5
40 mm
50 mm
60 mm
80 mm
100 mm
130 mm
130 mm
para manuales - color gris
200 mm
300 mm
ø 0,3
0,2 x 0,1
0,7
3,5
Ø2,5
Ø2,5
C115
C11
C105 /
C105 / C115
C115
C11
C105 /
C105 / C115
C115
C11
C105 /
C105 / C115
NAE
Control Unit
PORT
2
ROBOT
PEDAL
2
NAE
Control Unit
PORT
2
ROBOT
PEDAL
2
ROBOT
C115
C11
C105 /
C105 / C115
19:29
19:29
Port
2
Actual Temp. 25ºC
NT105
ºC
Power
45%
Selected 350ºC
350
Port
2
NT105
Hibernation
19:29
Port
2
Actual Temp. 25ºC
AN115
Hibernation
19:29
ºC
Power
45%
Selected 350ºC
350
Port
2
AN115
No
Yes
NAE
Control Unit
PORT
2
ROBOT
PEDAL
2
PORT
1
PEDAL
2
NAE
Control Unit
PORT
2
ROBOT
PEDAL
2
NAE
Control Unit
PORT
2
ROBOT
PEDAL
2
ROBOT
C115
C11
C105 /
C105 / C115
19:29
19:29
Port
2
Actual Temp. 25ºC
NT105
ºC
Power
45%
Selected 350ºC
350
Port
2
NT105
Hibernation
19:29
Port
2
Actual Temp. 25ºC
AN115
Hibernation
19:29
ºC
Power
45%
Selected 350ºC
350
Port
2
AN115
No
Yes
NAE
Control Unit
PORT
2
ROBOT
PEDAL
2
PORT
1
PEDAL
2
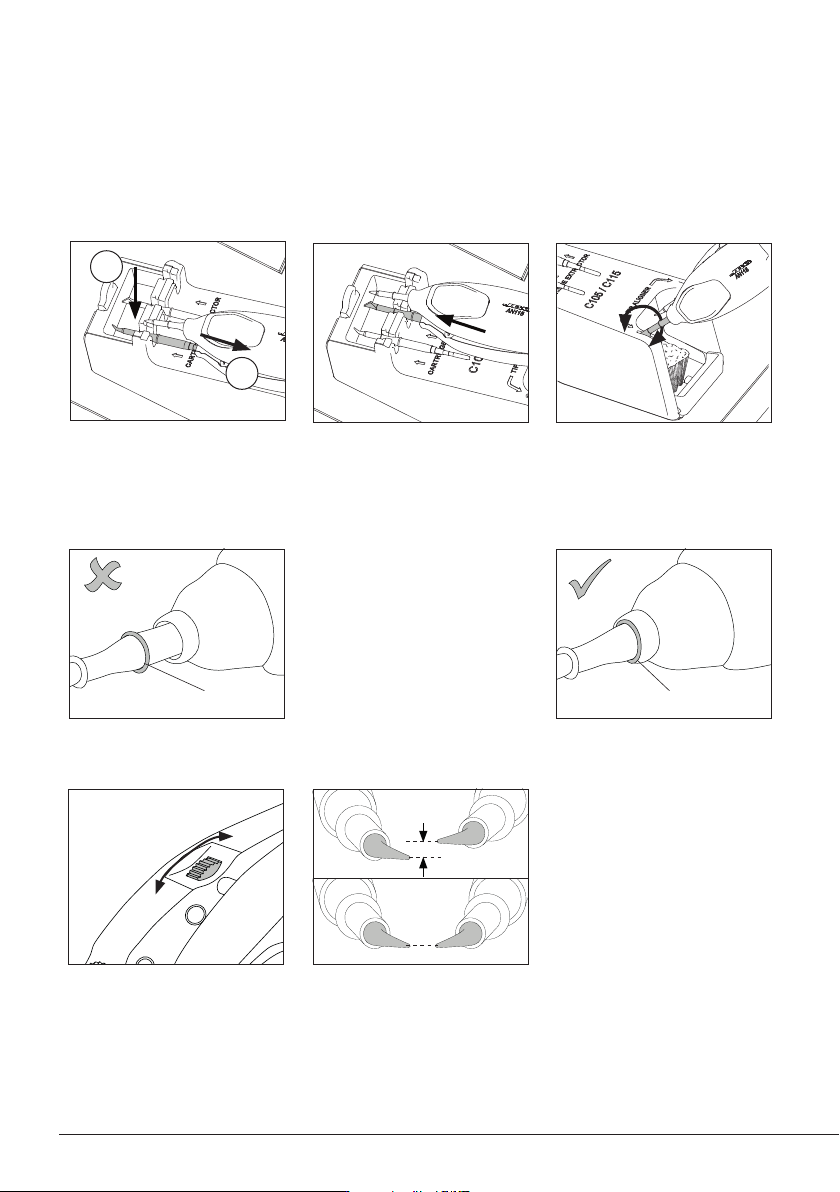
*Important
It is essential to insert the
cartridges up to the re-
ference ring for a proper
connection.
Tweezer Chisel BladeTweezer
Conical Bent
Changing Cartridges
Save time and change cartridges safely without having to switch the station off.
Removing Inserting Aligning
Place the cartridge into the
extractor slot (1) and pull
the tweezers to remove the
cartridge (2).
Push the tweezers onto
the new cartridge until the
reference ring*.
Use the holes to rotate
the cartridges for a proper
alignment.
Compatible Cartridges
The Nano Tweezers NP115 and AN115 work with C115 cartridges. Find the model that best suits your
soldering needs on www.jbctools.com
1
2
Reference
Ring
Reference
Ring
OK
OK
TOOL
EARTHING FUSE
AUX
USE ONLY WITH A 250 V FUSE
OK
OK
TOOL
EARTHING FUSE
AUX
USE ONLY WITH A 250 V FUSE
Changing Cartridges on AN115 Tweezers
not aligned
aligned
Turn the tweezer’s hand wheel forwards or backward for a vertical
cartridge alignment. One tip lines up with the other.
Vertical Cartridge Alignment
6