manual-na103-na104-updating-kits-0033002_ID-243966_EN.pdf - 第7页
ø 0,3 0,2 x 0,1 0,7 3,5 Ø2,5 Ø2,5 C115 C11 C105 / C105 / C115 C115 C11 C105 / C105 / C115 C115 C11 C105 / C105 / C115 NAE Contr ol Unit POR T 2 ROBOT PEDAL 2 NAE Contr ol Unit POR T 2 ROBOT PEDAL 2 ROBOT C115 C11 C105 / …
ø 0,3
0,2 x 0,1
0,7
3,5
Ø2,5
Ø2,5
C115
C11
C105 /
C105 / C115
C115
C11
C105 /
C105 / C115
C115
C11
C105 /
C105 / C115
NAE
Control Unit
PORT
2
ROBOT
PEDAL
2
NAE
Control Unit
PORT
2
ROBOT
PEDAL
2
ROBOT
C115
C11
C105 /
C105 / C115
19:29
19:29
Port
2
Actual Temp. 25ºC
NT105
ºC
Power
45%
Selected 350ºC
350
Port
2
NT105
Hibernation
19:29
Port
2
Actual Temp. 25ºC
AN115
Hibernation
19:29
ºC
Power
45%
Selected 350ºC
350
Port
2
AN115
No
Yes
NAE
Control Unit
PORT
2
ROBOT
PEDAL
2
PORT
1
PEDAL
2
NAE
Control Unit
PORT
2
ROBOT
PEDAL
2
NAE
Control Unit
PORT
2
ROBOT
PEDAL
2
ROBOT
C115
C11
C105 /
C105 / C115
19:29
19:29
Port
2
Actual Temp. 25ºC
NT105
ºC
Power
45%
Selected 350ºC
350
Port
2
NT105
Hibernation
19:29
Port
2
Actual Temp. 25ºC
AN115
Hibernation
19:29
ºC
Power
45%
Selected 350ºC
350
Port
2
AN115
No
Yes
NAE
Control Unit
PORT
2
ROBOT
PEDAL
2
PORT
1
PEDAL
2
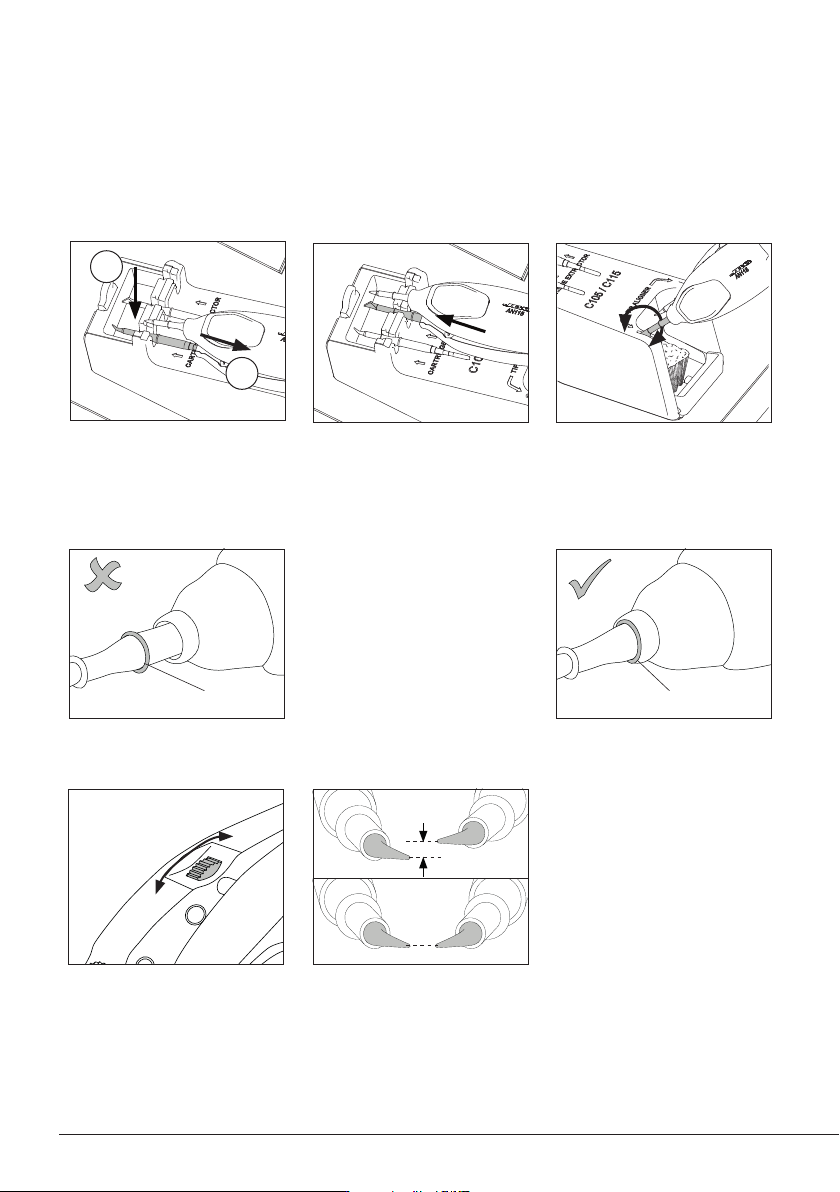
*Important
It is essential to insert the
cartridges up to the re-
ference ring for a proper
connection.
Tweezer Chisel BladeTweezer
Conical Bent
Changing Cartridges
Save time and change cartridges safely without having to switch the station off.
Removing Inserting Aligning
Place the cartridge into the
extractor slot (1) and pull
the tweezers to remove the
cartridge (2).
Push the tweezers onto
the new cartridge until the
reference ring*.
Use the holes to rotate
the cartridges for a proper
alignment.
Compatible Cartridges
The Nano Tweezers NP115 and AN115 work with C115 cartridges. Find the model that best suits your
soldering needs on www.jbctools.com
1
2
Reference
Ring
Reference
Ring
OK
OK
TOOL
EARTHING FUSE
AUX
USE ONLY WITH A 250 V FUSE
OK
OK
TOOL
EARTHING FUSE
AUX
USE ONLY WITH A 250 V FUSE
Changing Cartridges on AN115 Tweezers
not aligned
aligned
Turn the tweezer’s hand wheel forwards or backward for a vertical
cartridge alignment. One tip lines up with the other.
Vertical Cartridge Alignment
6

ø 0,3
0,2 x 0,1
0,7
3,5
Ø2,5
Ø2,5
C115
C11
C105 /
C105 / C115
C115
C11
C105 /
C105 / C115
C115
C11
C105 /
C105 / C115
NAE
Control Unit
PORT
2
ROBOT
PEDAL
2
NAE
Control Unit
PORT
2
ROBOT
PEDAL
2
ROBOT
C115
C11
C105 /
C105 / C115
19:29
19:29
Port
2
Actual Temp. 25ºC
NT105
ºC
Power
45%
Selected 350ºC
350
Port
2
NT105
Hibernation
19:29
Port
2
Actual Temp. 25ºC
AN115
Hibernation
19:29
ºC
Power
45%
Selected 350ºC
350
Port
2
AN115
No
Yes
NAE
Control Unit
PORT
2
ROBOT
PEDAL
2
PORT
1
PEDAL
2
NAE
Control Unit
PORT
2
ROBOT
PEDAL
2
NAE
Control Unit
PORT
2
ROBOT
PEDAL
2
ROBOT
C115
C11
C105 /
C105 / C115
19:29
19:29
Port
2
Actual Temp. 25ºC
NT105
ºC
Power
45%
Selected 350ºC
350
Port
2
NT105
Hibernation
19:29
Port
2
Actual Temp. 25ºC
AN115
Hibernation
19:29
ºC
Power
45%
Selected 350ºC
350
Port
2
AN115
No
Yes
NAE
Control Unit
PORT
2
ROBOT
PEDAL
2
PORT
1
PEDAL
2
*Important
It is essential to insert the
cartridges up to the re-
ference ring for a proper
connection.
Tweezer Chisel BladeTweezer
Conical Bent
Changing Cartridges
Save time and change cartridges safely without having to switch the station off.
Removing Inserting Aligning
Place the cartridge into the
extractor slot (1) and pull
the tweezers to remove the
cartridge (2).
Push the tweezers onto
the new cartridge until the
reference ring*.
Use the holes to rotate
the cartridges for a proper
alignment.
Compatible Cartridges
The Nano Tweezers NP115 and AN115 work with C115 cartridges. Find the model that best suits your
soldering needs on www.jbctools.com
1
2
Reference
Ring
Reference
Ring
ø 0,3
0,2 x 0,1
0,7
3,5
Ø2,5
Ø2,5
C115
C11
C105 /
C105 / C115
C115
C11
C105 /
C105 / C115
C115
C11
C105 /
C105 / C115
NAE
Control Unit
PORT
2
ROBOT
PEDAL
2
NAE
Control Unit
PORT
2
ROBOT
PEDAL
2
ROBOT
C115
C11
C105 /
C105 / C115
19:29
19:29
Port
2
Actual Temp. 25ºC
NT105
ºC
Power
45%
Selected 350ºC
350
Port
2
NT105
Hibernation
19:29
Port
2
Actual Temp. 25ºC
AN115
Hibernation
19:29
ºC
Power
45%
Selected 350ºC
350
Port
2
AN115
No
Yes
NAE
Control Unit
PORT
2
ROBOT
PEDAL
2
PORT
1
PEDAL
2
NAE
Control Unit
PORT
2
ROBOT
PEDAL
2
NAE
Control Unit
PORT
2
ROBOT
PEDAL
2
ROBOT
C115
C11
C105 /
C105 / C115
19:29
19:29
Port
2
Actual Temp. 25ºC
NT105
ºC
Power
45%
Selected 350ºC
350
Port
2
NT105
Hibernation
19:29
Port
2
Actual Temp. 25ºC
AN115
Hibernation
19:29
ºC
Power
45%
Selected 350ºC
350
Port
2
AN115
No
Yes
NAE
Control Unit
PORT
2
ROBOT
PEDAL
2
PORT
1
PEDAL
2
*Important
It is essential to insert the
cartridges up to the re-
ference ring for a proper
connection.
Tweezer Chisel BladeTweezer
Conical Bent
Changing Cartridges
Save time and change cartridges safely without having to switch the station off.
Removing Inserting Aligning
Place the cartridge into the
extractor slot (1) and pull
the tweezers to remove the
cartridge (2).
Push the tweezers onto
the new cartridge until the
reference ring*.
Use the holes to rotate
the cartridges for a proper
alignment.
Compatible Cartridges
The Nano Tweezers NP115 and AN115 work with C115 cartridges. Find the model that best suits your
soldering needs on www.jbctools.com
1
2
Reference
Ring
Reference
Ring
Changing Cartridges on AN115 Tweezers
Maintenance
- Before carrying out maintenance or storage, always unplug the tool.
- Check periodically that the metal parts are clean to ensure it is detected when on the stand.
Always use a damp cloth or alcohol.
- Periodically check all cables and tube connections.
- Replace any defective or damaged pieces. Use original JBC spare parts only.
- Repairs should only be performed by a JBC authorized technical service.
Compatible Cartridges for AN115 Tweezers
AN115 works with C115 Cartridges. Find the model that best suits your soldering needs at
www.jbctools.com.
7
40 mm
50 mm
60 mm
80 mm
100 mm
130 mm
130 mm
para manuales - color gris
200 mm
300 mm

Safety
- Do not use the units for any purpose other than soldering or rework. Incorrect use may cause a fire.
- The power cord must be plugged into approved bases. Be sure that it is properly grounded before
use. When unplugging it, hold the plug, not the wire.
- Do not work on electrically live parts.
- The tool should be placed in the stand when not in use in order to activate the sleep mode. The
soldering tip or nozzle, the metal part of the tool and the stand may still be hot even when the station
is turned off. Handle with care, including when adjusting the stand position.
- Do not leave the appliance unattended when it is on.
- Do not cover the ventilation grills. Heat can cause inflammable products to ignite.
- Avoid flux coming into contact with skin or eyes to prevent irritation.
- Be careful with the fumes produced when soldering.
- Keep your workplace clean and tidy. Wear appropriate protection glasses and gloves when working
to avoid personal harm.
- Utmost care must be taken with liquid tin waste which can cause burns.
- This appliance can be used by children over the age of eight and also people with reduced physical,
sensory or mental capabilities or lack of experience provided that they have been given adequate
supervision or instruction concerning the use of the appliance and understand the hazards involved.
Children must not play with the appliance.
- Maintenance must not be carried out by children unless supervised.
It is imperative to follow safety guidelines to prevent electric
shock, injury, fire or explosion.
8