00198442-04_UM_TX-V2_EN.pdf - 第190页
4 Setting up and commissioning In struction manual SIPLACE TX 4.4 Infrastructure at the installation location From software ve rsion 714.0 12/2020 190 Run the mains power cable through the cable fixture ( item 2 ) on t…
Instruction manual SIPLACE TX 4 Setting up and commissioning
From software version 714.0 12/2020 4.4 Infrastructure at the installation location
189
4.4.3.4 Mains connection - WITHOUT mains connection cable (configuration 1)
The placement machine has NO mains connection cable with it on delivery. The mains supply ca-
ble is connected to the connection terminals (1) in sector 1 at the output end of the placement ma-
chine.
4
4
4
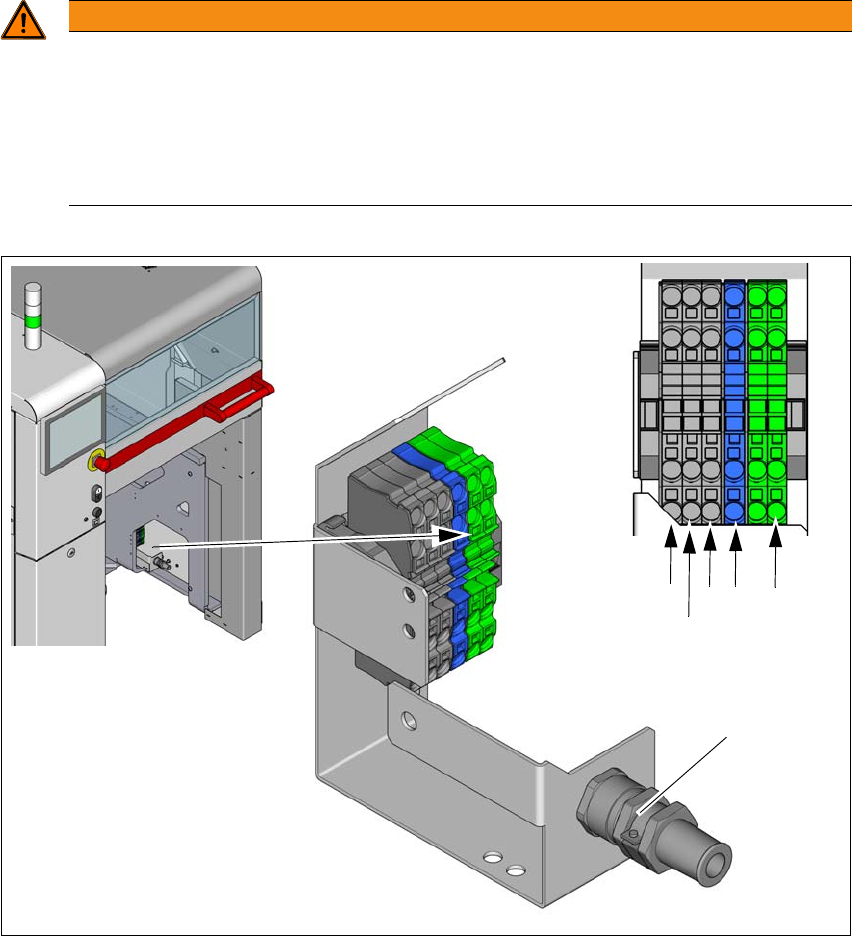
Fig. 4.4 - 4 Terminal panel for connecting the power cable
(1) Mains connection terminals (X2) for the mains power cable L1, L2, L3, N and PE. The con-
nection terminals are designed for a wire diameter of 4 mm².
(2) Opening with cable fixture on the assembly frame.
WARNING
The mains connection cable may only be connected by a qualified electrician.
The mains connection cable may only be connected by a qualified electrician. A qualified
electrician is a person with suitable professional qualifications, knowledge and experi-
ence, who is able to recognize hazards caused by electrical power and also prevent
these hazards from arising.
The regulations of the country in which the placement machine is operated apply.
(2)
(1)
L1
L2
L3
N
PE
4 Setting up and commissioning Instruction manual SIPLACE TX
4.4 Infrastructure at the installation location From software version 714.0 12/2020
190
Run the mains power cable through the cable fixture (item 2) on the assembly frame to the
mains connection terminal X2 (item 1) in the fig. 4.4 - 4
, page 189.
Make sure that the bending radius is adequate. The wires must not be kinked.
Crimp a ferrule onto each end of the mains connection cable.
Connect L1,L2, L3, N and PE to the mains connection terminals X2 (item 1) in fig. 4.4 - 4,
page 189
. Make sure that the connection terminal is not damaged when you insert the wire
into it.
4
Hand-tighten the cable fixture (item 2) in fig. 4.4 - 4, page189.
Make sure that the wires and the cable can not rub against anything or get trapped. Fix the
wires and cables into place with cable ties, if needed.
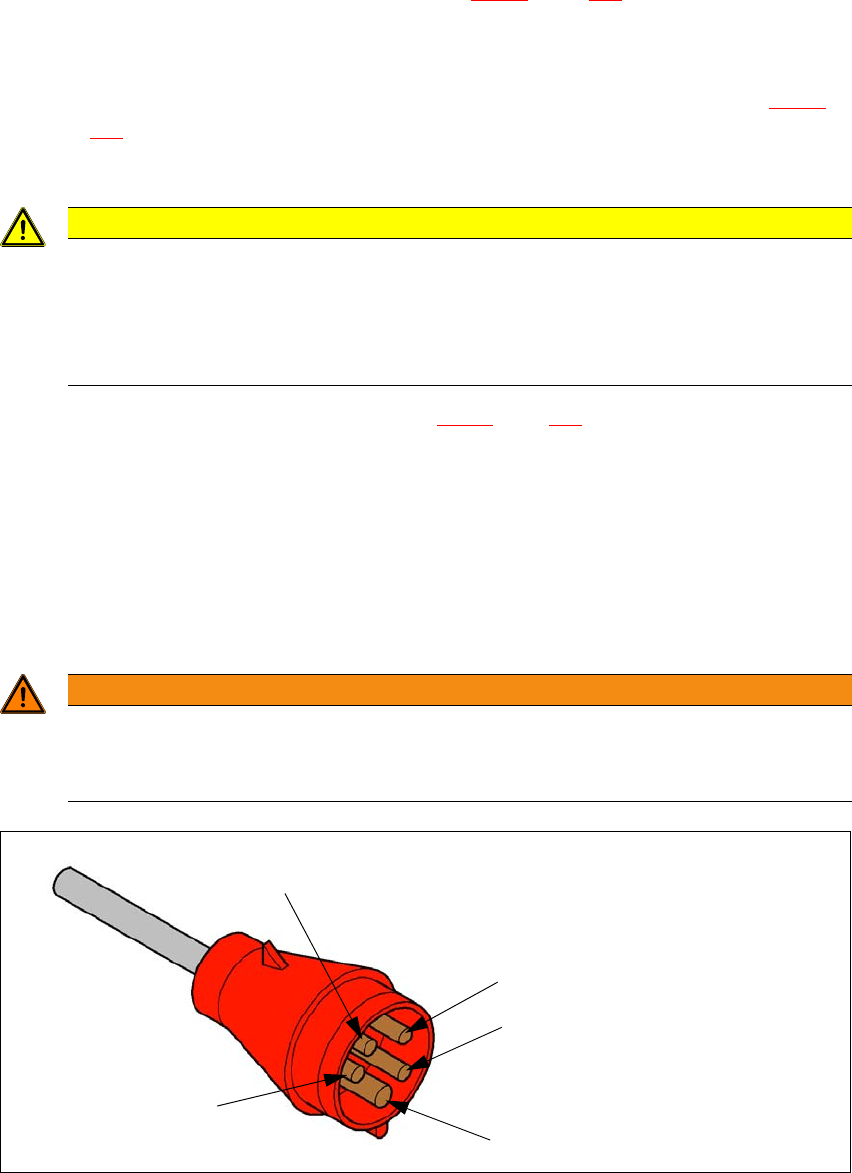
4.4.3.5 Mains connection - mains connection cable WITH plug (configuration 2)
The placement machine is supplied with an approx. 5 m mains connection cable WITH a CEE
plug, red 16 A (in accordance with IEC 60309).
4
4
Fig. 4.4 - 5 Assignment in the CEE plug
CAUTION
Pay attention to correct phase sequence!
Pay attention to correct phase sequence. Incorrect phase sequence could lead to mal-
functions and cause damage to the vacuum pump! Check the vacuum pump (s) for cor-
rect direction of running when putting the placement machine into action.
Check the PE connection on the placement machine for correct function.
WARNING
The mains connection cable may only be connected by a qualified electrician.
The mains connection cable may only be connected by a qualified electrician.
The regulations of the country in which the placement machine is operated apply.
PE
L1
L2
L3
N
Instruction manual SIPLACE TX 4 Setting up and commissioning
From software version 714.0 12/2020 4.4 Infrastructure at the installation location
191
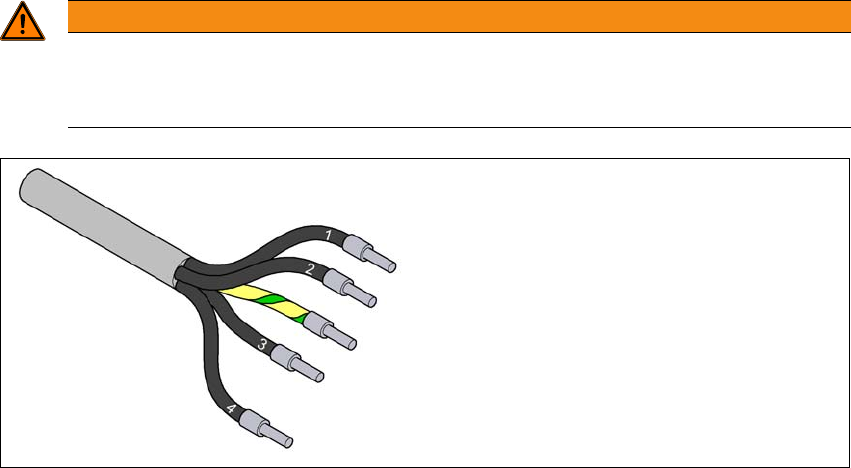
4.4.3.6 Mains connection - mains connection cable WITHOUT plug (configuration 3)
The placement machine is supplied with an approx. 5m mains connection cable WITHOUT plug.
4
4
Fig. 4.4 - 6 Description of wires in the mains power cable
WARNING
The mains connection cable may only be connected by a qualified electrician.
The mains connection cable may only be connected by a qualified electrician.
The regulations of the country in which the placement machine is operated apply.
1 = (L1): three-phase
2 = (L2): three-phase
3 = (L3): three-phase
4 = (N): neutral conductor
green/yellow = (PE): conductor